3-84
IT
EN
648870 IT-EN-PL (04/05/2015)
H1/1 H1/2
H - OCCASIONAL MAINTENANCE
H1 - Change a wheel
In the event of a wheel being changed on
the public highway, make sure of the follo-
wing points:
- Stop the lift truck, if possible on even and
hard ground.
- To pass on stop of lift truck (See chapter:
DRIVING INSTRUCTIONS in paragraph: 1 -
OPERATING AND SAFETY INSTRUCTIONS).
- Action the parking brake
- Put the warning lights on.
- Immobilise the lift truck in both directions
on the axle opposite to the wheel to be
changed.
- Unlock the nuts of the wheel to be chan-
ged.
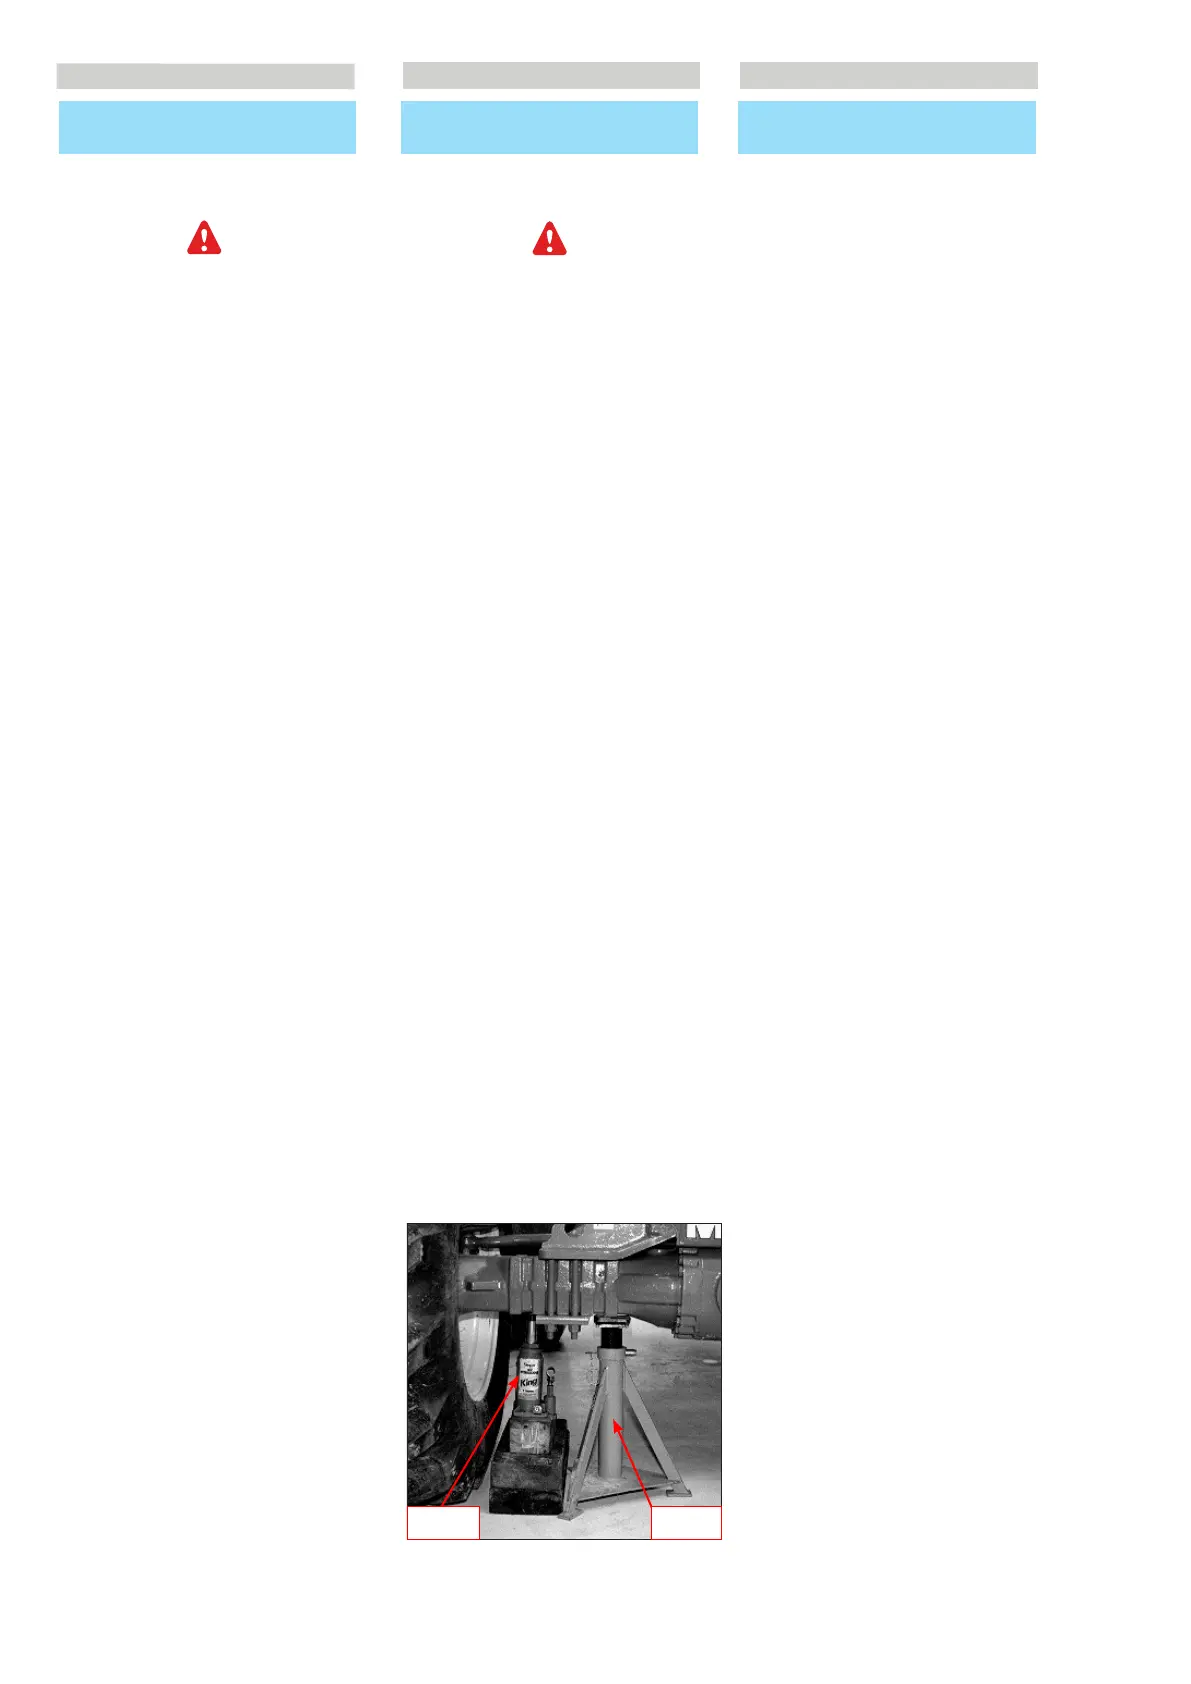
- Place the jack under the flared axle tube,
as near as possible to the wheel and adjust
the jack (Fig. H1/1).
- Lift the wheel until it comes off the ground
and put in place the safety support under
the axle (Fig. H1/2).
For this operation, we advise you to use the
hydraulic jack and the safety support.
- Completely unscrew the wheel nuts and
remove them.
- Free the wheel by reciprocating move-
ments and roll it to the side.
- Slip the new wheel on the wheel hub.
- Refit the nuts by hand, if necessary
grease them.
- Remove the safety support and lower the
lift truck with the jack.
- Tighten the wheel nuts with a torque
wrench (See chapter: A - DAILY OR EVERY
10 HOURS SERVICE in paragraph: 3 -
MAINTENANCE for tightening torque).
H - MANUTENZIONE OCCASIONALE
H1 - Sostituire una ruota
Qualora la sostituzione della ruota dovesse
essere effettuata lungo la strada, procedere
come descritto qui di seguito:
- Se possibile fermare il carrello elevatore in
piano su un terreno compatto.
- Spegnere il carrello elevatore (Vedi
capitolo: ISTRUZIONI DI GUIDA nella
parte: 1 - ISTRUZIONI E NORME DI
SICUREZZA).
- Attivare il freno di stazionamento
- Accendere le luci di emergenza.
- Applicare cunei per immobilizzare il car-
rello elevatore nelle due direzioni sull’as-
sale opposto alla ruota da sostituire.
- Allentare i bulloni dalla ruota da sostituire
- Sistemare il cric sotto la semiscatola del-
l’assale, il più vicino possibile alla ruota e
regolare il cric (Fig. H1/1).
- Sollevare la ruota fino a staccarla da terra
e posizionare il sostegno di sicurezza
sotto l’assale (Fig. H1/2).
Per effettuare questa operazione, vi con-
sigliamo di utilizzare un cric idraulico e il
sostegno di sicurezza.
- Svitare completamente i bulloni delle
ruote e rimuoverli.
- Estrarre la ruota con movimenti di va e
vieni e ruotarla sul lato.
- Mettere la ruota nuova sul mozzo.
- Avvitare manualmente i bulloni, se neces-
sario lubrificarli con del grasso. - Stringere
a fondo i bulloni delle ruote con una chia-
ve dinamometrica
- Rimuovere il sostegno di sicurezza e
abbassare il carrello elevatore con il cric.
(Vedi capitolo: A - OGNI GIORNO O OGNI
10 ORE DI FUNZIONAMENTO nella parte:3
MANUTENZIONE, per la coppia di serrag-
gio).
PL
H - KONSERWACJA OKAZJONALNA
H1 - Wymiana koła
W przypadku wymiany koła na drodze
publicznej należy postąpić w następujący
sposób:
- W miarę możliwości zatrzymać wózek pod-
nośnikowy na równym i twardym gruncie.
- Wyłączyć wózek podnośnikowy (Patrz
rozdział: INSTRUKCJE DOTYCZĄCE
PROWADZENIA, część: 1 - INSTRUKCJE I
ZASADY DOTYCZĄCE BEZPIECZEŃSTWA).
- Włączyć hamulec postojowy
- Włączyć światła awaryjne.
- Podłożyć odpowiednie kliny, aby unie-
ruchomić wózek w obu kierunkach na osi
przeciwnej do zmienianego koła.
- Poluzować nakrętki koła przewidzianego
do wymiany
- Umieścić podnośnik pod pochwą osi,
możliwie najbliżej koła i wyregulować
podnośnik (Rys. H1/1).
- Podnosić koło do momentu, aż uniesie się
nad podłoże i ustawić pod osią podpórkę
zabezpieczającą (Rys. H1/2).
Do tej operacji zalecamy użyć podnośnik
hydrauliczny i podpórkę zabezpieczającą.
- Odkręcić i zdjąć nakrętki kół.
- Zdjąć koło wykonując ruchy naprzemien-
ne /tam i z powrotem/ i przetoczyć je na
bok.
- Nasunąć nowe koło na piastę.
- Nakręcić ręcznie nakrętki, w razie potrzeby
nasmarować je. - Dokręcić nakrętki koła za
pomocą klucza dynamometrycznego
- Usunąć podpórkę zabezpieczając i opuś-
cić wózek za pomocą podnośnika.
(Patrz rozdział: A - CODZIENNIE LUB
CO 10 GODZIN EKSPLOATACJI, część:
3 KONSERWACJA, odnośnie momentu
dokręcania).
648870 IT-EN-PL (04/05/2015)