5
(A)
M6x25
Screw
Qty: 12
(B)
ST4x10
Screw
Qty: 12
HARDWARE LIST
• BEFORE ASSEMBLY READ ALL INSTRUCTIONS CAREFULLY.
• ASSEMBLE UNIT ON A CLEAN, FLAT SURFACE.
• TOOL NEEDED: PHILLIPS HEAD SCREWDRIVER
**Some assembly steps may already be completed due to pre-assembly at the factory.**
STOP!
DO NOT RETURN TO RETAILER For Assembly Assistance, Missing or Damaged Parts
Call: MASTERBUILT Customer Service at 1-800-489-1581.
Please have Model Number and Serial Number available when calling.
These numbers are located on silver label on back of unit.
MODEL# 20078715 REPLACEMENT PARTS LIST
REPLACEMENT PART ITEM NO
Body Kit, Black 9907140022
Digital Smoker Control 9007140017
Smoking Rack 9007120002
Cooking Grate Support 9007120001
Door Latch Kit, Black 9907120004
Wood Chip Tray 9007130026
Drip Pan 9007120009
Drip Defl ector 9007120003
Drip Defl ector Support Kit 9907120040
Adjustable Screw Leg 910050006
Wood Chip Loader 9007130028
Grease Tray 9007140011
Water Bowl 9007120004
Element Kit, 800 Watt 9907120011
Wood Chip Housing Kit 9907130009
Air Damper Kit 990060221
30” Door Kit 9907140051
Door Handle Kit 9907120012
Right Front Foot Kit 9907120006
Left Front Foot Kit 9907120007
Grease Tray Bracket Kit 9907140019
Right Trim Panel Kit 9907120009
Left Trim Panel Kit 9907120010
Door Hinge Kit 9907120013
Hinge Cover Kit 9907120008
Control Panel Housing Kit 9907120002
Power Circuit Board Kit 9907140014
High Temperature Limiter Kit 9907140015
Troubleshooting Guide 9807140122
Hardware Kit 9907140021
Instruction Manual 9807140082
Nota: La luz solar directa puede interferir con la habilidad de leer la pantalla LED, bloquee la luz de ser necesario.
Para confi gurar la temperatura:
•Presione el botón ON.
•Presione el botón SET TEMP una
vez, la luz LED empezará a titilar.
•Use +/- para confi gurar la
temperatura.
•Presione el botón SET TEMP
otra vez para fi jar la temperatura.
Nota: No empezará a calentarse
hasta que se confi gura el
cronómetro.
Para confi gurar el cronómetro:
•Presione el botón SET TIME una vez, la pantalla LED para horas empezará a titilar.
•Use +/- para confi gurar las horas.
•Presione el botón SET TIME otra vez para fi jar las horas. Los minutos LED empezarán a titilar.
•Use +/- para confi gurar los minutos.
•Presione el botón SET TIME para fi jar los minutos y empezar el ciclo de cocción.
El calor se apagará cuando el tiempo haya expirado.
Para REANUDAR el panel de control:
Si el panel de control muestra un mensaje de error, apague el ahumador eléctrico, desenchufe la unidad del
tomacorriente, espere diez segundos, vuelva a enchufar la unidad al tomacorriente y luego encienda el ahumador
eléctrico. Esto reanudará el panel de control.
10
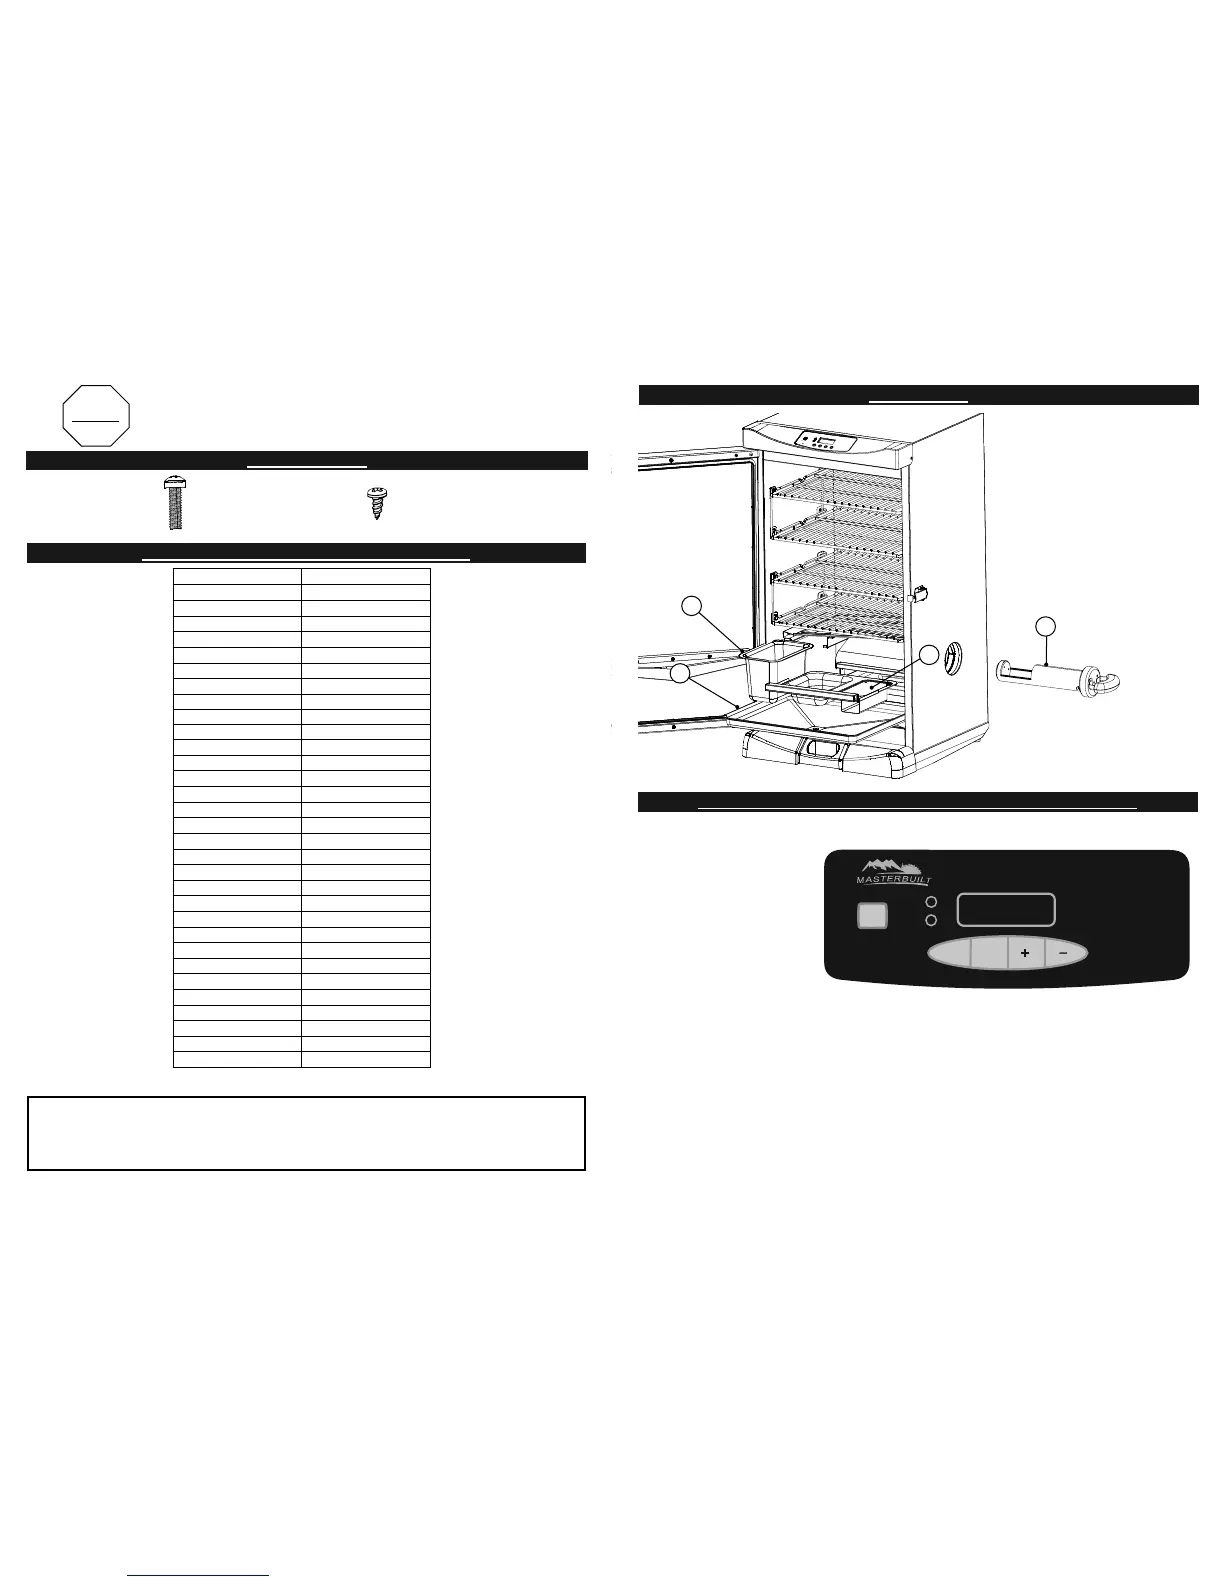
PASO 9
Coloque el tazón de agua (7), la
bandeja de trozos de madera (8) y
la bandeja de goteo (9) dentro del
ahumador como se muestra.
Inserte el cargador de trozos de
madera (11) en la parte lateral del
ahumador.
El ensamblaje está completo.
8
11
7
9
CÓMO USAR EL PANEL DE CONTROL Y EL CONTROL REMOTO
ENSAMBLAJE
HEATING
POWER
ON
OFF
Heat will turn off when time has expired
SET
TIME
SET
TEMP
Step 1- Setting Temperature:
1) Press ON button
2) Press SET TEMP once
3) Use
+/- to set desired temperature
4) Push SET TEMP to lock temperature
Step 2- Setting Timer:
1) Press SET TIME
once
2) Use
+/- to set hours
3) Push SET TIME to set minutes
4) Use
+/- to set minutes
5) Press SET TIME to start Cook Cycle
*Lea el Manual de instrucciones para obtener información
más detallada y en otros idiomas
*Lire le mode d'emploi pour plus de détails