62
11921 Slauson Ave. Santa Fe Springs, CA. 90670 (800) 227-4116 FAX (888) 771-7713
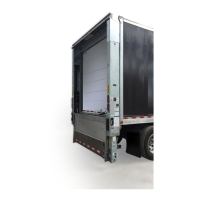
STEP 11 - CONNECT CHARGE LINES & BATTERIES
CONNECTING CHARGE LINE TO MASTER
DISCONNECT SWITCH
FIG. 62-2
3. If vehicle batteries are used
to power the Liftgate, do the
following. At the pump box,
remove nut from OUTPUT
terminal on master disconnect
switch (FIG. 62-2). Connect
positive (+) power cable (charge
line) to OUTPUT terminal on
master disconnect switch (FIG.
62-2). Reinstall and tighten nut.
1. Remove nut from negative (-)
battery terminal. Disconnect
negative (-) battery cable from
vehicle battery (FIG. 62-1).
Start nut on the terminal.
Prevent injury and equipment damage. Before connecting charge lines or
power cables, ensure negative (-) battery cable is disconnected at vehicle bat-
tery or battery box (if equipped). Ensure master disconnect switch is turned
OFF on the pump box.
WARNING
!
NOTE: Ensure batteries are fully charged before operating Liftgate & before deliv-
ery to customer.
POSITIVE (+)
BATTERY TERMINAL
NEGATIVE (-)
BATTERY CABLE
NEGATIVE (-)
BATTERY TERMINAL
NUT
POSITIVE (+)
POWER CABLE
CONNECTING CHARGE LINE TO BATTERY
FIG. 62-1
2. Remove nut from positive
(+) battery terminal. Connect
positive (+) power cable
(charge line) to positive (+)
battery terminal (FIG. 62-1).
Reinstall and tighten nut.
OUTPUT
CHARGE
LINE
MASTER DISCONNECT
SWITCH
CHARGE LINE
MASTER DISCONNECT
SWITCH
NOTE: Skip instruction 3 below
if connecting to optional
battery box.
 Loading...