-- 1 0 --
STORAGE
WARNING: Prepare unit for storage at
end of season or if it will not be used for 30 days
or more.
S Allow engine to cool, and secure the unit be-
fore storing or transporting.
S Store unit and fuel in a well ventilated area
where fuel vapors cannot reach sparks or
open flames from water heaters, electric mo-
tors or switches, furnaces, etc.
S Store unit with all guards in place. Position unit
so that any sharp object cannot accidentally
cause injury .
S Store unit and fuel well out of the reach of chil-
dren.
EXTERNAL SURFACES
S If your unit is to be stored for a period of time,
clean it thoroughl y before storage. Store in a
clean dry area.
S Lightly oil external metal surfaces.
INTERNAL ENGINE
S Remove spark plug and pour 1 teaspoon of
2-cycle engine oil (air cooled) through the
spark plug opening. Slowly pull the starter
rope 8 to 10 times to distribute oil.
S Replace spark plug with new one of recom-
mended type and heat range.
S Clean air filter .
S Check entire unit for loose screws, nuts, and
bolts. Replace any damaged, broken, or worn
parts.
S Start each season using only fresh fuel hav-
ing the proper gasoline to oil ratio.
OTHER
S Do not store gasoline from one season to
another .
S Replace your gasoline can if it starts to rust.
1.See “Fueling Your Unit.”
2.Replace with correct spark plug.
3.Contact an authorized service dealer .
4.Contact an authorized service dealer .
TROUBLE CAUSE REMEDY
Engine will not
start.
1.Engine flooded.
2.Fuel tank empty .
3.Spark plug not firing.
4.Fuel not reaching carburetor.
5.Compression low.
1.See “Starting Instructions.”
2.Fill tank with correct fuel mixture.
3.Install new spark plug.
4.Check for dirty fuel filter; replace.
Check for kinked or split fuel line;
repair or replace.
5.Contact an authorized service dealer .
Engine will not
idle properly.
1.Fuel not reaching carburetor.
2.Carburetor requires adjustment.
3.Crankshaft seals worn.
4.Compression low.
1.Check for dirty fuel filter; replace.
Check for kinked or split fuel line;
repair or replace.
2.Contact an authorized service dealer .
3.Contact an authorized service dealer .
4.Contact an authorized service dealer .
1.Air filter dirty .
2.Fuel not reaching carburetor.
3.Spark plug fouled.
4.Spark arresting screen clogged.
5.Carburetor requires adjustment.
6.Carbon build up.
7.Compression low.
Engine will not
accelerate,
lacks power , or
dies under a
load.
1.Clean or replace air filter.
2.Check for dirty fuel filter; replace.
Check for kinked or split fuel line;
repair or replace.
3.Clean or replace spark plug; re-gap.
4.Replace screen.
5.Contact an authorized service dealer .
6.Contact an authorized service dealer .
7.Contact an authorized service dealer .
Engine
smokes
excessively.
1.Choke partially on.
2.Fuel mixture incorrect.
3.Air filter dirty .
4.Carburetor requires adjustment.
1.Adjust choke.
2.Empty fuel tank and refill with
correct fuel mixture.
3.Clean or replace air filter.
4.Contact an authorized service dealer .
Engine
runs hot.
1.Fuel mixture incorre ct.
2.Spark plug incorrect.
3.Carburetor requires adjustment.
4.Carbon build up.
TROUBLESHOOTING TABLE
WARNING: Always stop unit and disconnect spark plug before performingany of the
recommended remedies below other than remedies that require operation of the unit.
-- 4 3 --
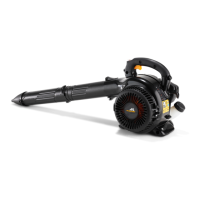
OQUEÉOQUÊ?
1. Acelerador 9. Tubo superior do soprador
2. Interruptor STOP 10. Tubo inferior do soprador
3. Botão de espoleta 11. Bocal de alta velocidade
4. Controlo do ar 12. Tubo de cotovelo
5. Tampão de combustível 13. Saco de aspirador
6. Corda de arranque 14. Tubo superior de aspirador
7. Pega do aspirador 15. Tubo inferior de aspirador
8. Vela de ignição 16. Manual do instru ção
14
15
13
12
6
1
2
8
9
10
11
4
3
7
5
16
OQUEÉOQUÊ?
MONTAGEM
CONTEÚDO DA EM BALA GEM
Verifique se o conteúdo da embalagem
corresponde à seguinte lista.
S Soprador
S T ubo superior do soprador
S T ubo inferior do soprador
S Bocal de alta velocidade
S T ubo de cotovelo
S Saco de aspirador
S T ubo superior de aspirador
S T ubo inferior de aspirador
S Parafuso para o montagem dos tubos de
aspirador
NOTA: É normal que o filtro de combustível
chocalhe dentro do depósito de combustível
quando este estiver vazio.
MONTAGEM
ADVERTÊNCIA: Pare o motor e
comprove que as pás do impulsor estão
paradas antes de abrir a porta de entrada de
aspirador ou de tentar inserir ou retirar os tubos
de aspirador o tubo de sopro. As pás rotativas
podem causar ferimentos graves. Desligue a
vela de igni ção ant es de realizar a manut enção.
ADVERTÊNCIA: Se receber a
máquina montada, repita todos os passos
para se assegurar que a máquina está
devidamente montada e que as peças estão
bem apertadas.
D Uma chave está requerida para o montagem.
MONTAGEM DO SOPRA DOR
MONTAGEM DOS TUBOS DO
SOPRADOR
1. Alinhe a saliência do tubo superior do
soprador com o entalhe situado na saída
do soprador; deslize o tubo para o lugar.
NOTA: O parafuso de fixação do tubo deve
estar suficientemente desapertado para permitir
que os tubos do soprador sejam inseridos na
saídadosoprador.Desaperteoparafuso
rodando--o no sentido contrário ao dos
ponteiros do relógio (não retire as porcas).
Saída do soprador
Ranhura
Saliência