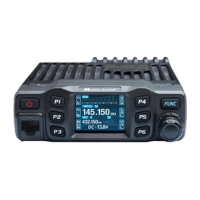
3� Turn the channel knob to choose the desired setting
ON: Turn on talk around function
OFF: Turn o talk around function
4� Press the PUSH button or the [P3] button to store the setting and exit
Oset Frequency and Direction Setup
1� Enter the CHAN MENU list, choose the No�10 function
2� Press the [PUSH] button, the menu value in the LCD turns to green
3� Turn the channel knob to choose the desired setting, press the [FUNC] button to set the
oset direction.
- Minus oset, means the transmitting frequency is lower than the receiving frequency
+ Plus oset, means the transmitting frequency is higher than the receiving frequency.
OFF: OFFSET is turned o
VHF: 0 - 38 Mhz frequency avaiable
UHF: 0 - 90 Mhz frequency avaiable
4� Press the [PUSH] button or the [P3] button to store the setting and exit
Editing Channel Name
After adding a name for a channel, if the display mode has a channel name, the radio will
display the name in this menu� Otherwise it will display the frequency
1� Enter the CHAN MENU list, choose the No�11 function
2� Press the [PUSH] button, the menu value in the LCD turns to green
3. Turn the channel knob to choose the desired setting. Press the [PUSH] to conrm and enter
editing for the next charactor
4� Press the [PUSH] button or the [P3] button to store the setting and exit
Busy Channel Lockout
Busy channel lockout is to disable transmitting once the channel is busy and you press the
[PTT], the radio will beep as warning and get back to receiving�
1� Enter the CHAN MENU list, choose the No�12 function
2� Press the [PUSH] button, the menu value in the LCD turns to green
3� Turn the channel knob to choose the desired setting
BU: Busy Channel Lockout is enabled, transmitting is inhibited when the current channel
receives a matching carrier
RL: Busy Channel Lockout is enabled, transmitting is inhibited when the current
channel receives a matching carrier but unmatching CTCSS/DCS code
OFF: Busy channel lockout is disabled� Transmitting is allowed in any receiving status
4� Press the [PUSH] button or the [P3] button to store the setting