EasyManua.ls Logo

Miller Digital Infinity Series - User Manual

Miller Digital Infinity Series
32 pages
Print Icon
To Next Page IconTo Next Page
Loading...
Digital Infinity
Series
Auto-Darkening Helmets
OM-289711C 2023-02
Auto-Darkening Helmets
Model: Infinity Series w/Infotrack
OM-269681F
2019-06
To help us serve you better, go to www.MillerWelds.Com/Register
OWNER’S MANUAL

Questions and Answers

  • G
    Gregory RobertsAug 5, 2025
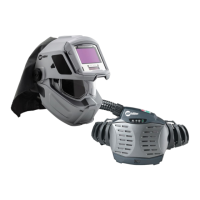
    What to do if my Miller Digital Infinity auto-lens is not switching and stays light?
    • O
      Oscar PaulAug 5, 2025
      If your Miller Welding Accessories auto-lens stays light during welding or cutting, immediately stop the process and press the On/Off button. Ensure the power is on, then check and adjust the sensitivity settings based on the recommendations. Also, inspect the lens cover and sensors for any obstructions, cleaning them as needed. Make sure the sensors are directly facing the arc; angles greater than 45° might prevent the arc light from reaching them.
  • C
    Christine GreenAug 10, 2025
    Why is my Miller Digital Infinity auto-lens switching or flickering during welding?
    • H
      hsmithAug 10, 2025
      If your Miller Welding Accessories auto-lens is flickering—darkening and lightening while welding or cutting—first, review and increase the sensitivity setting if possible. Ensure that the arc sensors aren't blocked from directly accessing the arc light. Next, inspect the lens cover for any dirt or spatter that might be obstructing the arc sensors. You might also reduce switching by increasing the Lens Delay to 0.1 - 0.3 seconds.
  • D
    David PierceAug 15, 2025
    How to fix a Miller Digital Infinity Welding Accessories auto-lens that is not turning on?
    • T
      Timothy BeckAug 15, 2025
      If your Miller Welding Accessories auto-lens doesn't darken when you press the On button, start by checking the batteries. Make sure they are in good condition and properly installed. Next, inspect the battery surfaces and contacts, cleaning them if necessary. Finally, check the battery for proper contact, gently adjusting the contact points if needed, especially if the helmet has been dropped.
  • S
    Spencer DunnAug 20, 2025
    Why does my Miller Welding Accessories auto-lens stay dark?
    • A
      Amy DiazAug 20, 2025
      If your Miller Welding Accessories auto-lens remains dark after the arc is extinguished or stays dark when no arc is present, try reducing the Sensitivity setting. In very bright conditions, it might also be necessary to decrease the surrounding light levels.
  • A
    Amy BrownAug 26, 2025
    What to do if sections of my Miller Digital Infinity Welding Accessories auto-lens are not going dark?
    • R
      Rachel EricksonAug 26, 2025
      If sections of your Miller Welding Accessories auto-lens are not darkening, with distinct lines separating light and dark areas, stop welding or cutting immediately. This issue may be due to a cracked auto-lens, possibly from dropping the helmet or weld spatter. The lens may need replacement.
  • B
    Barbara GalvanAug 30, 2025
    Why is the shading inconsistent on my Miller Digital Infinity Welding Accessories auto-lens?
    • S
      saraallenAug 30, 2025
      Inconsistent or lighter shading on the outside edges and corners of your Miller Welding Accessories auto-lens in the dark state is referred to as an angle of view effect. Auto-darkening lenses have an optimum viewing angle of 90° to the lens surface. When the viewing angle varies in the dark state, lighter areas may be noticed at the edges and corners. This is normal and not a health or safety hazard; it may be more noticeable with magnifying lenses.

Summary

Section 1 - Safety Precautions - Read Before Using

Symbol Usage

Explains hazard symbols and their meanings for safe operation.

Arc Welding Hazards

Details dangers from arc rays, noise, fumes, and gases, and necessary precautions.

Helmet Protection Limitations and Usage

Clarifies helmet protection limits and emphasizes reading instructions and general safety.

Lens Shade Selection Table

Table for selecting appropriate lens shade based on welding process and current.

California Proposition 65 Warnings

Legal warning regarding cancer and reproductive harm.

Principal Safety Standards

Lists relevant industry safety standards and their websites.

Section 3 - Definitions

Safety Symbol Definitions

Defines specific safety symbols used to indicate hazards and warnings.

Miscellaneous Symbols and Terms

Explains general symbols like power, battery status, and navigation arrows.

Section 4 - Specifications

Helmet Technical Specifications

Details the technical specifications of the auto-darkening welding helmet.

Section 5 - Operating Instructions

Helmet Control Panel Overview

Identifies and explains the main controls and display functions of the helmet.

Mode Control Button and Indicator Light

Describes the mode control button and the low battery/grind/memory indicator light.

Operating Modes: Weld, Cut, Grind, X-Mode

Explains the function and usage of each operating mode for different tasks.

Adjusting Lens Shade and Delay

Guides users on adjusting the lens shade and delay settings for optimal performance.

Sensitivity Adjustment and AutoSense

Details how to adjust lens sensitivity and use the AutoSense™ feature.

Arc Time and Arc Count Features

Explains how to track arc time and count using dedicated controls.

Memory Function for Presetting Modes

Describes how to save and recall preferred shade, delay, and sensitivity settings.

Section 6 - Adjusting Headgear

Headgear Fit and Adjustment

Instructions for adjusting the headgear for proper depth, tightness, and angle.

Section 7 - Replacing Lens Covers

Lens Cover Replacement Procedure

Step-by-step guide for removing and installing the inside and outside lens covers.

Section 8 - Replacing the Batteries

Battery Replacement Guide

Instructions for safely removing and replacing the helmet batteries.

Section 9 - Installing Optional Magnifying Lens

Magnifying Lens Installation

Steps for installing an optional magnifying lens and its adapter frame.

Section 10 - Maintenance and Storage

Helmet Care and Storage Procedures

Guidance on cleaning, maintaining, and storing the welding helmet for longevity.

Section 11 - Troubleshooting

Common Issues and Solutions

Addresses common problems like lens not darkening and provides remedies.

Section 12 - Parts List

Replacement Parts Identification

Lists all available parts for the auto-darkening welding helmet.

Section 13 - Limited Warranty

Warranty Terms and Conditions

Outlines the warranty period, coverage, and required proof of purchase.

Miller Digital Infinity Series Specifications

General IconGeneral
Viewing Area13.4 sq. in.
Delay Control0.1 - 1.0 sec
Sensitivity ControlAdjustable
Lens Shade5-13
Sensors4
Power SourceSolar and battery
Switching Speed1/20, 000 sec
Operating Temperature14 to 131°F (-10 to 55°C)
StandardsANSI Z87.1, CSA
Weight23 oz.

Related product manuals