-
5
-
Displaying the FUNCTION Menu
1. Select “LANGUAGE” in the OPTION menu.
2. Press the “STILL,” “+,” and “STILL” buttons on the remote control. The FUNCTION menu will be displayed.
Exiting the FUNCTION Menu
Press the “MENU” button while the FUNCTION menu is displayed.
Note: The menu is not initialized by selecting “RESET ALL” in the OPTION menu. To initialize the menu, press the “MENU,”
“ENTER,” and “- ” buttons of the projector at the same time.
Notes in Displaying the FUNCTION Menu
When you press the “STILL,” “+,” and “STILL” buttons with other selection than “LANGUAGE” in the OPTION menu, the
FUNCTION menu isn’t displayed.
If you continue setting without displaying the FUNCTION menu, you may not be able to display the menus such as the OPTION
menu and the INSTALLATION menu by the “” or “” button. In such cases, press the “MENU” button on the remote control
or that of the projector to exit the current menu, and open the menu again.
Notes in Using the FUNCTION Menu
• If you insert or disconnect the connectors while a test pattern is displayed, such test pattern may disappear from the screen.
In such a case, you can display other test patterns by pressing the “” or “” button.
• If you change the settings of the WARNING menu after the lamp operating time exceeds 1500 hours (SL2U:1000 hours) , the
warning indication may stay on the screen. In such a case, press the “RESET” button or turn off the power to cancel the
warning indication.
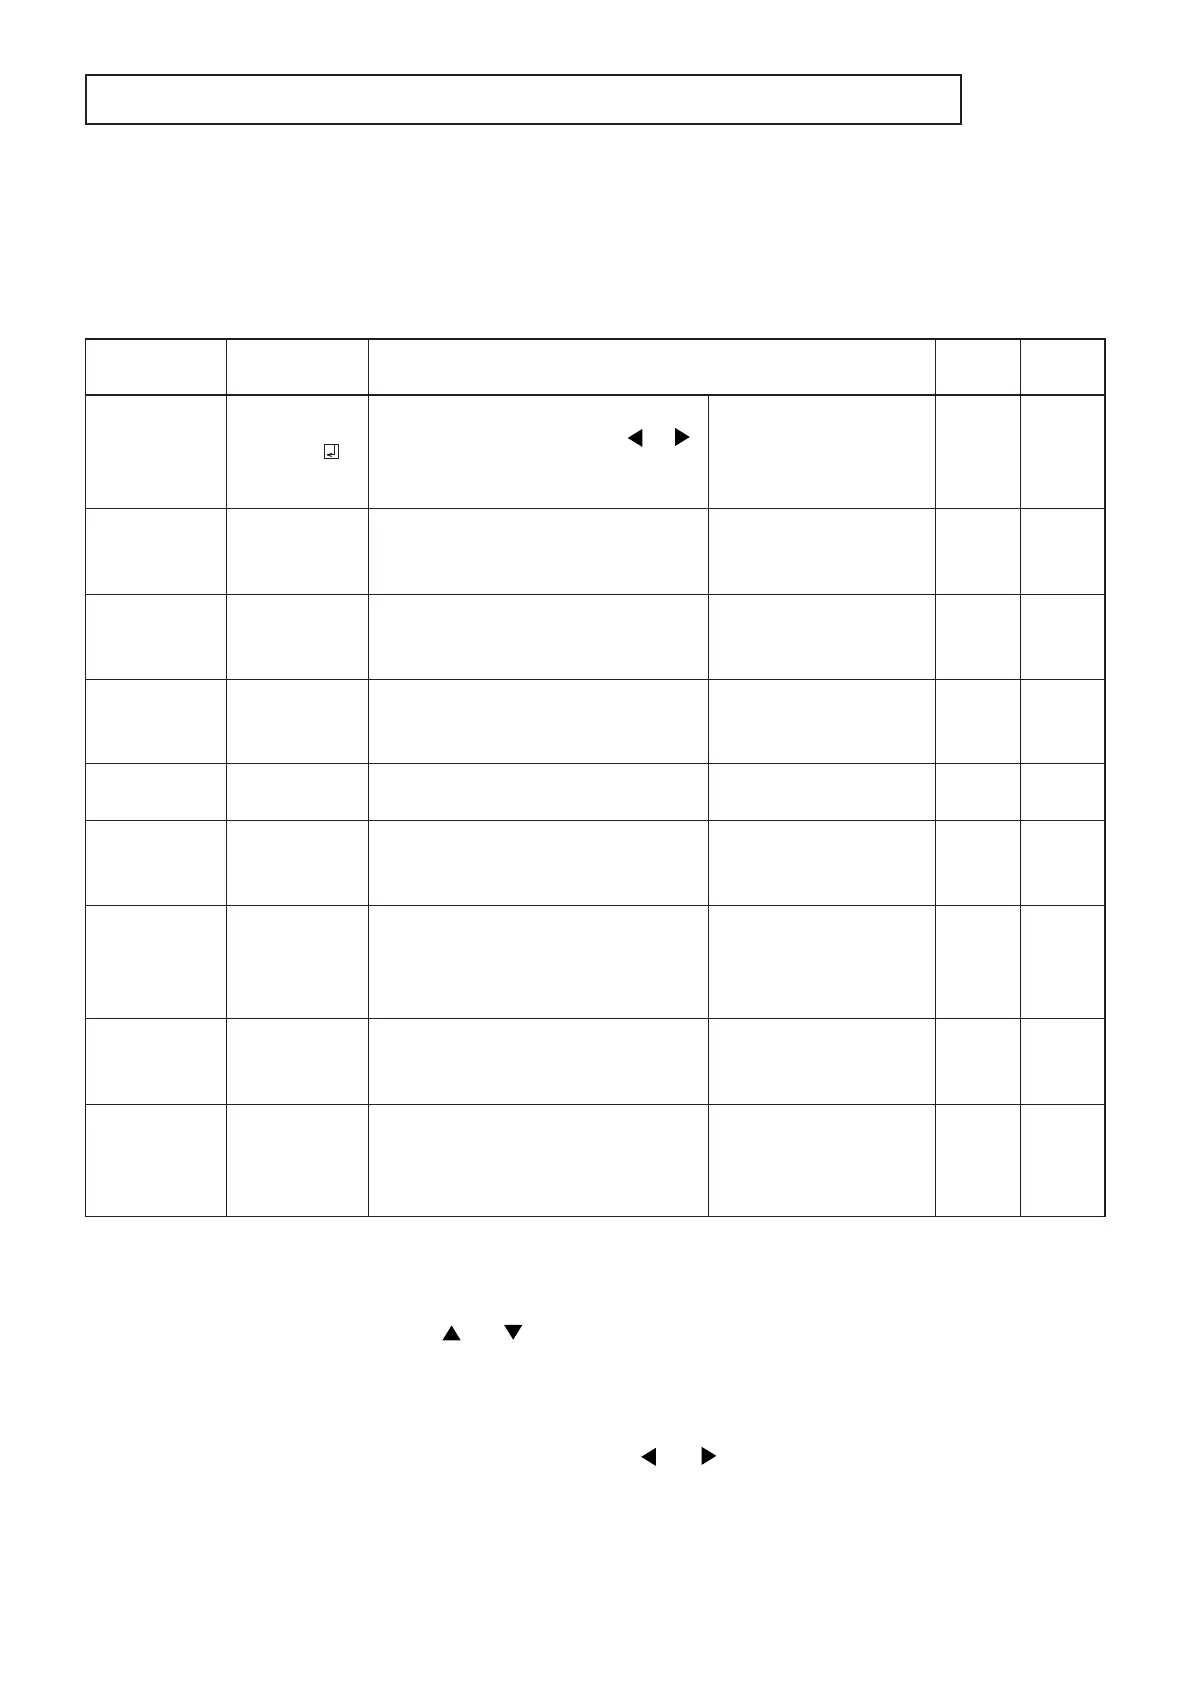
FUNCTION MENU
(
SETTING MENU ONLY FOR SERVICE
)
ITEM
TEST SIGNAL
OFF, ON
Function
To display the test patterns.
(The ENTER button displays the test pattern. The and
buttons switch the displayed test patterns. The POWER, MENU,
and SWITCH buttons cancel the display of the test pattern.)
Full white
Full black
Crosshatch
Color bars
OFF No
A/D LEVEL
±
5
To adjust the input gain of A/D to improve solid white
in the image (or too dark image) when the amplitude
of the video signal of the computer is large (or small).
Max.=+10%
Min. =–10%
(every 2%)
0Yes
AI DEMO ON, OFF
To demonstrate the RIS effect.
OFF: Normal mode
ON: Demo mode (responses
in a short time)
OFF Yes
Y/C DELAY
±
3
To adjust the amount of DELAY of Y and C of
the VIDEO signal (which is input to the
S-VIDEO and VIDEO terminal).
Max.=+216 ns
Min.=–216 ns
(every 72 ns)
0Yes
MODE DISPLAY
ON, OFF
To select whether or not to indicate the switched
input terminal in the upper right-hand corner of the
screen at the time of switching the input terminal
while the power is on.
ON:
With indication
OFF:
Without indication
ON Yes
REMOTE POS.
AUTO, FRONT, REAR
To set the time over which the alert for the
lamp replacement is displayed.
AUTO: Both of FRONT and REAR sensors
FRONT: Front sensor only
REAR: Rear sensor only
AUTO Yes
WARNING
1 MIN, NO LIMIT
1 MIN: 1 minute
NO LIMIT: No time limit (After the alert is
displayed for one minute, you can cancel it
by any button or the RS-232C command.)
1 MIN Yes
UNIFORMITY ON, OFF
To demonstrate the effect of color uniformity
correction.
OFF: Without correction
ON : With correction
ON No
Last
memory
Default
setting
Setting range
DEC LEVEL
±
5
To adjust the input gain of DECODER to improve solid
white in the image (or too dark image) when the
amplitude of the video signal is large (or small).
Max.=+10%
Min. =–10%
(every 2%)
0Yes
To select the remote control sensor to be
enabled.

 Loading...