Do you have a question about the Nabco Acusensor M and is the answer not in the manual?
Explains the meaning and hierarchy of different warning labels used in the manual.
Provides essential safety practices for installation and operation to prevent injury or damage.
Step-by-step instructions for physically securing the Acusensor M sensor unit onto the door header.
Configuration of switches 1-2 to define the door's operational monitoring mode.
Setting switch 3 to determine the sensor's output logic (Normally Open or Closed).
Setting switch 4 to configure the sensor's input logic behavior.
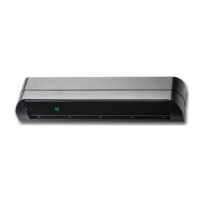
The Acusensor M is an advanced presence detection sensor designed for use with automatic sliding, swing, and folding doors. It utilizes an active reflective near-infrared system to detect changes in multiple near-infrared rays beamed from the sensor down to various points on the floor. These reflected rays form a grid, allowing the Acusensor M to detect both moving and stationary pedestrians or objects within its detection area. Upon detecting a presence, the sensor outputs a signal to the door control system, which then signals the motor/operator to open the automatic door. The Acusensor M is developed with a focus on safety, comfort, reliability, and versatility.
The primary function of the Acusensor M is to provide presence detection for automatic doors, ensuring safety by preventing doors from closing on individuals or objects. It achieves this through its near-infrared sensing system, which creates a detection grid on the floor. This grid is divided into invisible rows (depth) and columns (width) to accurately monitor the presence detection area.
A key feature of the Acusensor M is its "Monitoring Operation Mode," which adds a layer of communication between the door control and the sensor. In this mode, the control sends a signal to the sensor, which then performs a self-diagnostic test and sends a signal back to the control, confirming proper operation. This monitoring function determines which rows of presence detection are active and applied to the monitoring. Active rows can trigger the door to open, but not all active rows are necessarily monitored.
The sensor offers different operation modes tailored to specific door types and monitoring requirements:
The Acusensor M also incorporates an "ECO Mode" (Ecological Friendly Mode, also known as Directional Sensing), which determines whether movement is approaching or moving away from the door. This mode helps decide how far an object can get before the door is allowed to close, contributing to energy efficiency. However, ECO Mode is not recommended for Doorway 2 operation and may not function correctly if the sensor's mounting height is low, as movement can be detected across multiple rows simultaneously.
For output logic, the sensor can be configured as Normally Open (N.O.) or Normally Closed (N.C.). When a presence is detected within a monitored area, the control sends a pulse to the input logic, and the output logic responds by opening the door. In the event of a self-diagnostic error, the door will not open, and the sensor's LED will blink red, indicating an error.
The input logic (Switch 4) determines how the sensor communicates with the control system. It can be set to "High" or "Low," affecting how the sensor connects to voltage or output. This setting must match the corresponding setting on the U30 or Opus control for proper operation.
The sensor's detection area width can be adjusted independently for the left and right sides of the door using switches 5 through 8. This feature is particularly useful for swing and fold doors to prevent detection of the door itself in the open position.
The Acusensor M is designed for flexible installation and configuration to suit various automatic door applications. It can be mounted on the header cover of slide, swing, and fold door units. An optional angled spacer, sold separately, can be used with slide doors to increase the depth range of the detection area.
The sensor features a full-color LED that displays its operating status. During the learning phase, the LED blinks white twice every five seconds. In normal operation, it blinks green twice every five seconds. Flashing LEDs also indicate that the sensor has been in use for a period, suggesting that replacement is recommended to ensure continued safe operation.
The "Area Check Mode" is a crucial installation feature used for adjusting the depth of the detection area and confirming test command input. In this mode, a unique LED color is assigned to each depth row (1 through 6). When a specific depth row is selected by the installer, the sensor's LED illuminates with the assigned color. If multiple depth rows are detected simultaneously, the LED illuminates the color assigned to the depth row closest to the door face. During Area Check Mode, the control sends a Test Command Input Signal to the sensor every time the door opens, and the sensor's LED blinks white four times (10Hz) to indicate normal communication. In this mode, ECO Mode is inactive, and the learn time is fixed at 5 seconds.
The "Learn Time" setting (Switches 12 and 13) is critical for the sensor to adapt to its environment. It determines how long the sensor takes to learn that a stationary object is part of the area and to ignore it, allowing the door to close. ANSI standards require a minimum learn time of 30 seconds. It's important to avoid entering the presence detection area for one minute after power-on to allow the sensor to learn its environment correctly.
The Acusensor M includes several features to prevent false detections:
An "IP Mode" (Switches 19 and 20) is available for installations with multiple sensors in the same area or when sensors are facing each other. Different IP mode settings must be used for each sensor to prevent interference and malfunction.
The "Area Adjuster" is a Phillips head screw that allows the installer to physically angle the sensor. Turning it counter-clockwise extends the detection area pattern, while turning it clockwise retracts it. One half-turn of the adjuster is roughly equivalent to one degree of angle change. An angled spacer adds an additional 5 degrees of angle. This adjustment is crucial to ensure detection within 5 inches of the door face and to prevent the door itself from being detected.
The Acusensor M is designed for reliability and ease of maintenance. The LED operating status provides visual cues for troubleshooting. A blinking red light (1Hz) indicates a self-diagnostic error, signaling that the door will not open and requires attention.
The manual emphasizes the importance of proper installation and regular safety checks by qualified technicians. All electrical troubleshooting and service must be performed by licensed electricians in compliance with applicable codes.
The sensor's design allows for easy access to switch settings. Lifting a reusable protection flap on the left side of the Acusensor M reveals three groups of switches (1-8, 9-16, and 17-20), along with a diagram on the flap's backside for setting switches 1 through 8. A diagram for switches 9 through 20 is located in the middle of the sensor.
The "Area Check Mode" can be used during installation to confirm the detection area depth and test command input, aiding in initial setup and verification. Once installed, the depth setting should be changed from Area Check to a normal operating mode.
The manual also highlights potential causes for malfunctions, such as exposure to steam, exhaust fumes, insects, heavy rain, heavy snow, pools of water, moving objects within the detection area (due to wind), multiple sensors installed too close or facing each other, and strong direct or reflected sunlight or artificial light. Understanding these factors helps in proper installation and troubleshooting.
The Acusensor M is part of NABCO's commitment to comply with the ANSI A156.10 Power Operated Pedestrian Door Standard, which now includes sensor monitoring requirements. This means the sensor's functionality and its interface with the door control system are verified, and a detected fault will cause automatic operation to cease until corrected. This monitoring occurs at least once prior to closing. NABCO has been shipping monitoring-capable units since late fall of 2016, with U30 controls having monitoring capabilities starting with Revision E. Retrofit kits are available for existing doors that need to be upgraded to monitoring-capable systems.
| Technology | Microwave |
|---|---|
| Detection Mode | Motion |
| Material | Plastic |
| Mounting Height | 2.5m - 4m |
| Power Supply | 12-24V DC |
| Function | Activation |