9
Thissectiondescribeshowtosetupyourprojectorandhowtoconnectvideoandaudiosources.
2. Installation and Connections
➊
Setting Up the Screen and the Projector
Selecting a Location
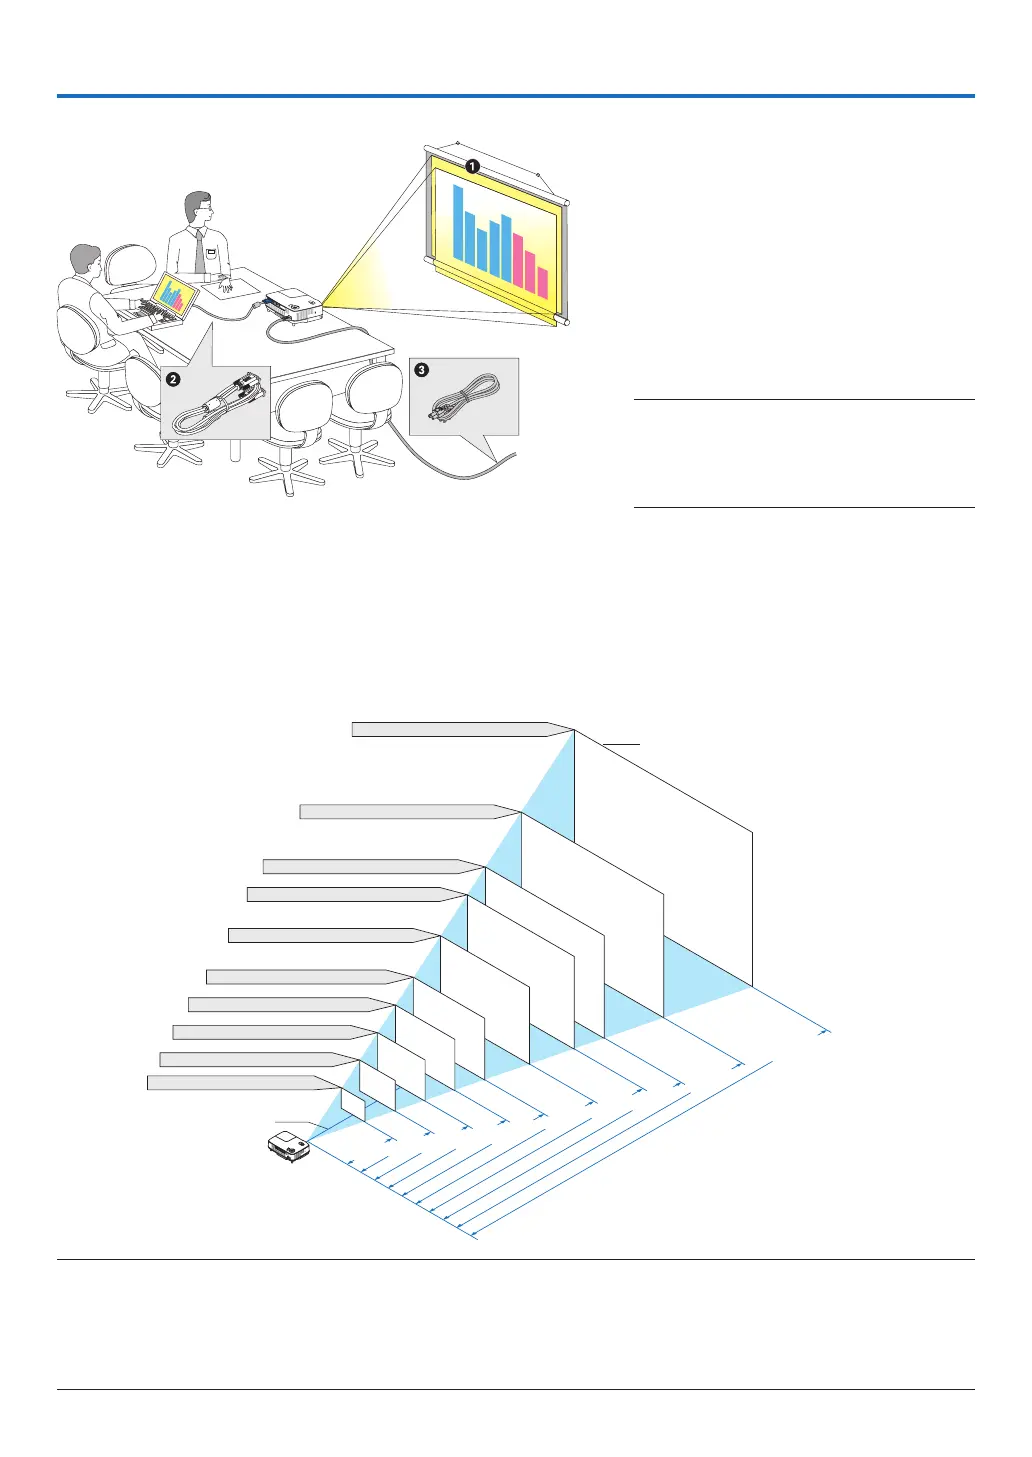
Thefurtheryourprojectorisfromthescreenorwall,thelargertheimage.Theminimumsizetheimagecanbeis
33"(0.84m)measureddiagonallywhentheprojectorisroughly57inches(1.44m)fromthewallorscreen.The
largesttheimagecanbeis300"(7.6m)whentheprojectorisabout484inches(12.3m)fromthewallorscreen.
Usethechartbelowasaroughguide.
Yourprojectorissimpletosetupanduse.
Butbeforeyougetstarted,youmustrst:
➊
Setupascreenandtheprojector.
➋
Connect yo ur com pu ter or vid eo
equipmenttotheprojector.Seepages
12,13,14.
➌
Connect the supplied power cable.
Seepage15.
NOTE:Ensurethatthepowercableandanyoth-
er cables aredisconnected before moving the
projector.Whenmovingtheprojectororwhen
itisnotinuse,coverthelenswiththesliding
lenscover.
Distance (U
nit: m/inch)
Lens center
Screen Size (diagonal: inch)
Screen Size (Unit: cm/inch)
609.6(W)×457.2(H) / 240(W)×180(H)
487.7(W)×365.8(H) / 192(W)×144(H)
406.4(W)×304.8(H) / 160(W)×120(H)
365.8(W)×274.3(H) / 144(W)×108(H)
304.8(W)×228.6(H) / 120(W)×90(H)
243.8(W)×182.9(H) / 96(W)×72(H)
203.2(W)×152.4(H) / 80(W)×60(H)
162.6(W)×121.9(H) / 64(W)×48(H)
121.9(W)×91.4(H) / 48(W)×36(H)
81.3(W)×61.0(H) / 32(W)×24(H)
300"
240"
200"
180"
150"
120"
100"
60"
40"
80"
12.3/484.3
9.8/385.8
8.2/322.8
7.4/291.3
6.1/240.2
4.9/192.9
4.1/161.4
3.3/129.9
2.4/94.5
1.6/63.0
NOTE:
• Thedistancesareindicatedbyintermediatevaluesbetweenteleandwide.Useasaruleofthumb.
• TheZoomleveradjuststheimagesizeupto+/−10%
• Formoredetailsonthrowdistance,seenextpage.
• ChangingtheimagesizestartstheAUTOFOCUStoadjustthefocus;changingthethrowanglestartstheAutoKeystoneto
correcttheverticalkeystonedistortion.
To the wall outlet.


 To Next Page