3-1
SVP Server Installation, Setup, & Maintenance Manual - Revision 1
3
Installing the SVP Server
As shown in the system diagram (Figure 2-1 on page 2-5), the SVP
Server is connected to the Ethernet switch. This chapter describes
specifications which allow flexibility in physical placement of the
components within stated guidelines.
Chapter Topics • Customer Required Material
• Locate the SVP Server
• Mounting and Connecting the SVP Server
Customer Required Material
Table 3-1 lists equipment that must be provided by the customer.
Table 3-1 Customer Requirements for SVP Server
Locate the SVP Server
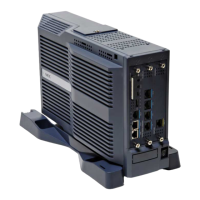
The SVP Server measures approximately 4 x 12.5 x 7 inches, and
weighs about five pounds. The unit is designed to be wall mounted,
vertically or horizontally, over ¾” plywood.
Equipment Requirements
Power Outlet
The outlet must accept the AC adapter provided by NEC Business
Solutions Ltd.
Backboard space
¾” Plywood secured on the wall
Note: The SVP Server is designed to be wall mounted to
¾” plywood securely screwed to the wall.
Screws
Required to mount the SVP Server to the wall. Four #8 -
¾” panhead wood screws (or similar device) are required.
CAT 5 Cable
A RJ-45 connector is needed at the SVP Server to connect
to the Ethernet switch.