Installing the SVP Server 3-3
SVP Server Installation, Setup, & Maintenance Manual - Revision 1
Meounting the SVP Server to Wall
The SVP Server can be mounted either horizontally or vertically.
Use the following steps to mount the SVP Server.
Step 1 Using a 1/8 inch drill bit, drill four pilot holes, on 1.84 by 12.1 inch centers
(approximately equivalent to 1-13/16 inch by 12-1/8 inch).
Step 2 Insert the #8 x 3/4 inch screws in the pilot holes and tighten, leaving a
1/8 to 1/4 inch gap from the wall.
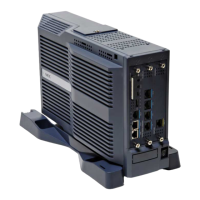
Connecting SVP Server to LAN
Using a Cat. 5 cable, connect the NETWORK port on the SVP Server
to the connecting port on the Ethernet switch.
Connecting Power
Use the following steps to connect the power.
Step 1 Connect the power plug from the AC adapter to the jack labeled PWR on
the SVP Server.
Step 2 Plug the AC adapter into a 110VAC outlet to apply power to the SVP
Server. The system will cycle through diagnostic testing and the LEDs
will blink for about one minute.
Step 3 Ensure that the system is ready for use:
—The ERROR LED should be off.
—Status 1 should be blinking.
After the SVP Server is installed, you must configure the UNIVERGE WL
Mobile Handsets. For Wireless Telephone configuration, see the
Setup and Administration document for the MH110/MH120 Handsets.
CAUTION
Use only the provided Class II AC Adapter with output 24VDC, 1A.