EasyManua.ls Logo

NordicTrack GX 4.5 PRO - User Manual

NordicTrack GX 4.5 PRO
28 pages
Print Icon
To Next Page IconTo Next Page
Loading...
USER’S MANUAL
Serial
Number
Decal
Model No. NTEVEX77020.0
Serial No.
Write the serial number in the space
above for reference.
CAUTION
Read all precautions and
instructions in this manual before
using this equipment. Keep this
manual for future reference.
iconeurope.com
CUSTOMER SERVICE
UNITED KINGDOM
Call: 0330 123 1045
From Ireland: 053 92 36102
Website: iconsupport.eu
E-mail: csuk@iconeurope.com
Write:
ICON Health & Fitness, Ltd.
Unit 4, Westgate Court
Silkwood Park
OSSETT
WF5 9TT
UNITED KINGDOM
AUSTRALIA
Call: 1800 993 770
E-mail: australiacc@iconfitness.com
Write:
ICON Health & Fitness
PO Box 635
WINSTON HILLS NSW 2153
AUSTRALIA
Question and Answer IconNeed help?

Do you have a question about the NordicTrack GX 4.5 PRO and is the answer not in the manual?

Summary

Customer Service and Safety Information

Customer Service Contact

Contact details for customer support in the UK and Australia.

Important Safety Caution

Crucial warning to read all precautions and instructions before operating.

Important Precautions

Getting Started

Before You Begin

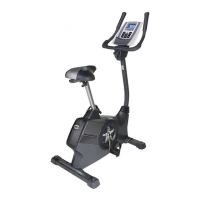
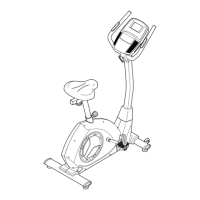
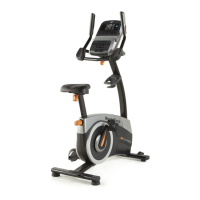
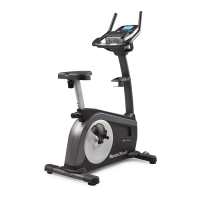
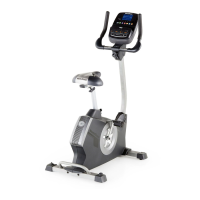
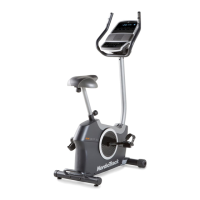
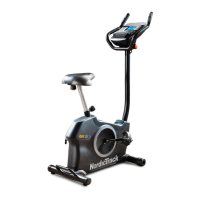
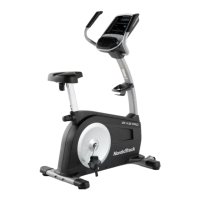
Welcome, manual guidance, and identifying bike parts.

Part Identification Chart

Assembly - Part 1

Register Product and Activate Warranty

How to register your product and activate warranty in UK and Australia.

Attach Front Stabilizer

Attaching the front stabilizer to the main frame with screws.

Assembly - Part 2

Attach Rear Stabilizer

Attaching the rear stabilizer to the main frame with screws.

Orient Upright and Shield Cover

Orienting the upright and sliding the shield cover onto it.

Assembly - Part 3

Attach Upright to Frame

Securing the upright to the frame, avoiding wire pinching.

Seat Post and Shield Cover Assembly

Inserting seat post and sliding shield cover onto side shields.

Assembly - Part 4

Knob Shield and Seat Post Adjustment

Attaching knob shield and adjusting seat post height.

Attach Seat to Seat Carriage

Attaching the seat to the seat carriage using locknuts and washers.

Assembly - Part 5

Seat Carriage and Seat Knob Installation

Installing seat carriage and securing it with seat knob.

Connect Main Wire to Console

Connecting the main wire to the console.

Attach Console to Upright

Securing the console to the upright, avoiding wire pinching.

Assembly - Part 6

Attach Handlebars

Attaching the right and left handlebars to the upright.

Attach Console Covers

Attaching the front and rear console covers.

Assembly - Part 7

Attach Accessory Tray

Mounting the accessory tray to the upright.

Attach Pedals

Tightening the right and left pedals into the crank arms.

Assembly - Part 8

Plug in Power Adapter

Connecting the power adapter to the bike's receptacle.

Final Inspection

Performing a final check of all parts and ensuring proper function.

How to Use the Exercise Bike

How to Plug in the Power Adapter

Connecting the power adapter to the bike and an outlet.

Seat Adjustment

Adjusting seat height and lateral position for optimal comfort.

Pedal Strap Adjustment

Adjusting pedal strap tightness for secure foot placement.

How to Level the Exercise Bike

The Optional Tablet Holder

How to Use the Console

Console Diagram and Features

Labeled console diagram and overview of functions like manual mode, iFit, audio.

Manual Mode Operation

Console Startup and Manual Mode

Turning on the console and selecting manual mode automatically.

Change Resistance and Track Progress

Adjusting pedal resistance and understanding displayed workout information.

Console Advanced Functions - Part 1

Heart Rate Monitoring

Instructions for connecting and using a heart rate monitor.

Fan Control and Workout Management

Operating the fan, pausing/resuming workouts, and auto-off.

Customize Scan Mode

Selecting specific data points to display in the scan cycle.

Console Advanced Functions - Part 2

How to Use the Sound System

Guide to playing music or audio books through the console's sound system.

iFit Workout Guide - Setup

Downloading iFit app and connecting heart rate monitor/smart device.

iFit Workout Operation

Select and Start iFit Workout

Browsing, selecting, and beginning an iFit workout.

Manage and End iFit Workout

Pausing, ending workouts, disconnecting smart device, and demo mode.

Console Settings and Connectivity

Connect Heart Rate Monitor

Detailed steps for pairing a Bluetooth Smart heart rate monitor with the console.

Change Console Settings

Guide to accessing and modifying console settings like units and demo mode.

Console Settings - Details

Console Display Tests

Diagnostic tests for display, buttons, time, and distance.

Contrast and Demo Mode Settings

Adjusting display contrast and managing demo mode.

Exit Settings Mode

Exiting the console settings menu.

Maintenance and Troubleshooting

Regular Maintenance

Regular checks, tightening parts, and cleaning instructions.

Console Troubleshooting

Steps for fixing common console problems like not turning on or freezing.

Reed Switch Adjustment

Exercise Guidelines

Exercise Intensity and Heart Rate Zones

Using heart rate to determine proper intensity for fat burning and aerobic goals.

Workout Guidelines

Recommendations for warming up, training zone, and cooling down.

Exercise Frequency

Guidelines on how often to exercise for optimal results.

Part List

Exploded Drawing

Ordering Replacement Parts

Recycling Information

Overview

This document is a user's manual for the NordicTrack GX 4.5 PRO exercise bike, providing comprehensive instructions for assembly, operation, maintenance, and troubleshooting.

Function Description

The NordicTrack GX 4.5 PRO is a revolutionary exercise bike designed for home use, offering an effective way to increase cardiovascular fitness, build endurance, and tone the entire body. It provides an impressive selection of features to make workouts more effective and enjoyable. The bike allows users to engage in cycling exercises, adjust resistance levels, track workout progress, and connect to smart devices for interactive training. It is intended for individuals seeking to improve their fitness in a home environment.

Usage Features

The exercise bike offers a variety of features to enhance the user experience:

  • Adjustable Resistance: Users can easily change the resistance of the pedals using numbered Resistance buttons or dedicated increase/decrease buttons on the console. This allows for customized workout intensity.
  • Console and Display: The advanced console provides continuous exercise feedback, displaying various workout information such as Calories burned (CALS), Calories per Hour (CALS/HR), Resistance level (RESIST), pedaling speed in revolutions per minute (RPM), elapsed Time, Pace (minutes per mile/kilometer), Distance (MI or KM), and Speed (MPH or KPH). The display can be switched between standard and metric units using the St/Met button.
  • Scan Mode: The console includes a scan mode that cycles through and displays workout information automatically. Users can also customize the scan mode to show only desired information and manually advance the cycle.
  • Heart Rate Monitoring: The console is compatible with all Bluetooth® Smart heart rate monitors, allowing users to continuously monitor their heart rate during workouts. A compatible chest heart rate monitor may be included with some models. Instructions are provided for connecting a heart rate monitor to the console.
  • Sound System: The console features a sound system that allows users to play music or audio books from their personal audio player. A 3.5 mm male to 3.5 mm male audio cable (not included) is required to connect the audio player. Volume can be adjusted via console buttons or the audio player.
  • iFit Workouts: The exercise bike offers access to a large and varied library of iFit workouts through the iFit app. Users can download the free iFit app on their iOS® or Android™ smart device, create an iFit account, and connect their device to the console via Bluetooth. iFit workouts automatically adjust pedal resistance, with coaches guiding users through immersive video workouts. Users can manually override resistance settings if needed.
  • Adjustable Seat: Both the height and lateral position of the seat can be adjusted to ensure effective exercise and comfort. The seat post knob allows for easy adjustment and secure locking into adjustment holes.
  • Adjustable Pedal Straps: The pedal straps can be tightened or loosened to secure the user's feet during exercise.
  • Leveling Feet: The exercise bike is equipped with leveling feet beneath the rear stabilizer to eliminate rocking motion on uneven floors.
  • Optional Tablet Holder: An optional tablet holder (G) is available to securely hold a tablet, allowing users to use their device while exercising.

Maintenance Features

To ensure optimal performance and longevity of the exercise bike, the manual outlines several maintenance procedures:

  • Regular Inspection and Tightening: Users are instructed to inspect and properly tighten all parts each time the exercise bike is used. This helps reduce wear and ensures safety.
  • Part Replacement: Any worn parts should be replaced immediately to maintain the bike's functionality and safety.
  • Cleaning: The exercise bike should be cleaned with a damp cloth and a small amount of mild soap. It is crucial to keep liquids away from the console and protect it from direct sunlight to prevent damage.
  • Console Troubleshooting:
    • Power Issues: If the console does not turn on, users should ensure the power adapter is fully plugged in. If a replacement adapter is needed, it must be a manufacturer-supplied regulated power adapter.
    • Display Issues: If lines appear in the console display, the contrast level can be adjusted in the settings mode.
    • Console Freezing/Malfunction: If the console does not boot properly or freezes, it can be reset to factory default settings. This process requires two people: one to unplug the power adapter and press a small reset button on the console with a bent paper clip, and another to plug the power adapter back in. The reset erases all custom settings.
  • Reed Switch Adjustment: If the console does not display correct feedback, the reed switch may need adjustment. This involves unplugging the power adapter, removing shields, locating the reed switch and magnet, slightly loosening a screw, adjusting the switch's position relative to the magnet, and then retightening the screw. This procedure helps ensure accurate speed and distance readings.

The manual also includes important precautions, such as consulting a physician before starting any exercise program, keeping children and pets away from the machine, wearing appropriate clothing and athletic shoes, and being careful when mounting and dismounting. It emphasizes that the product is for home use only and not intended for therapeutic use.

NordicTrack GX 4.5 PRO Specifications

General IconGeneral
Resistance TypeMagnetic
Resistance Levels25
iFit CompatibilityYes
Flywheel Weight20 lbs
User Weight Capacity350 lbs
Adjustable SeatYes
Cooling FanYes
Warranty10-Year Frame, 2-Year Parts, 1-Year Labor
TypeUpright
Heart Rate MonitoringYes

Related product manuals