Do you have a question about the OLI High vision and is the answer not in the manual?
Provides information for adequate and safe use of the unit throughout its life cycle.
Manual must accompany the unit and be available to all operators and technicians.
Explains how to consult the manual using the index, menu, and references.
Provides contact information for OLI eBike Systems for problems or information.
States compliance with Community Directives and safety requirements.
Covers unit warranty for 36 months; outlines conditions for loss of warranty.
Instructions for returning the unit, including packaging requirements.
Advises on conduct to minimize dangerous situations when using the eBike.
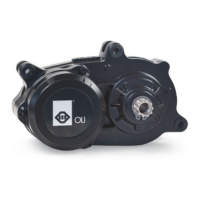
Describes the unit as a sturdy ABS body housing LCD display and keypad.
Lists technical specifications like display type, operating/storage temperature, and protection degree.
Provides graphical representation of the unit's dimensions.
First step of display installation involves placing rings on the handlebar.
Second step involves mounting the display and tightening M4 screws.
Step 3 for display installation: positioning and tightening screws with nuts at an angle.
Steps 1 and 2 for keypad installation, including angle and screw tightening.
Step 3 involves connecting the display cable to the power unit.
Store indoors in dry environments, protected from agents, above -10°C.
Details short press and long press actions for each key (power, up, down, down+up).
Instructions on how to turn on the display by pressing the power-on key.
Instructions on how to turn off the display by pressing the power-on key.
Describes the 6 screens in the Home section and how to scroll through them.
Explains actions like adjusting assistance level, entering Walk mode, and changing lights.
Details the elements displayed on the Home section screens and their meanings.
Lists and explains various parameters like motor power, cyclist power, distance, and speed.
Displays distance travelled in km since the last reset.
Displays time elapsed in motion since the last reset, in hours:minutes:seconds.
Shows instantaneous speed of rotating pedals in rpm.
Displays energy consumed by the cyclist in kcal since the last reset.
Shows motor power and cyclist power in watts, plus average energy consumption.
Illustrates power graph display with upper bar for motor power and lower for cyclist power.
How to enter the Menu section from the Home screen by holding keys.
Explains using up/down keys to scroll and power-on key to confirm menu items.
Lists main menu items: Trip reset, Advanced, System info, Battery info, Back.
Allows resetting all recorded lap data by returning counters to zero.
Displays firmware versions for the installed HMI and associated motor.
How to access the Advanced section from the Menu by selecting the relevant item.
Details scrolling through items and confirming selections in the Advanced section.
Lists settings like Brightness, Language, Measure unit, Weight, Gender, Night mode.
Addresses battery communication issues and checks cable connections.
Deals with communication issues between power unit and HMI.
Troubleshoots speed sensor detection issues and alignment.
Covers torque meter signals, offsets, and sensor faults requiring assistance.
Discusses excessive drive or motor temperature and recommended actions.
Addresses battery voltage and current sensor issues, and overcurrent detection.
Troubleshoots keypad faults and communication problems between HMI and power unit.
Provides contact details and data needed for requesting manufacturer assistance.
Lists essential data like model, serial number, and version numbers for support requests.
Instructions for cleaning the HMI unit, advising against immersion or harsh chemicals.
Guidelines for proper disposal of unit components and packaging according to environmental regulations.
Specifies separate collection and ecological reuse for rechargeable and worn-out batteries.