190-Series Leak Testing/ Reprocessing Scope Considerations
2
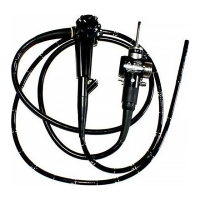
The ETO cap must be removed from the
venting connector before:
Immersion for cleaning/disinfection
Conducting a leakage test
Connector Cap & Venting Connector Must Be Dry
1
Remove ETO Cap
Scope under fluid during leak test or reprocessing
Check that the Connector Cap of the leakage
tester is not wet inside.
Check that the Venting Connector of the
endoscope is not wet.
3
Attaching/Detaching Leakage Tester
Connector cap Venting Connector
DO NOT attach/detach the leakage tester while the endoscope is immersed.
Attaching/detaching under fluid could allow fluid to enter the endoscope,
resulting in damage.
Leakage tester under fluid
4
During Leakage Test
If continuous bubbling at the connection of the leakage tester MB-155 to
the endoscope is noted, this indicates a leak. Either the leakage tester or the
endoscope could have damage.
Bubbling during leakage test
ETO cap OFF ETO cap ON
(EVIS EXERA III Endoscopes)
CAUTION: This guide is only a summary of some key considerations to properly perform a leak test on your 190-series scopes. Be sure to follow
the detailed steps outlined in the ENDOSCOPE REPROCESSING MANUAL included with your endoscope purchase.
QR 07.281 V1.0 November 2019
For complete product details see Instructions for Use.
OLYMPUS AU
STRALIA
PTY LTD
3 Acacia Place, Notting Hill VIC 3168, Australia
Customer Service: 1300 132 992 | www.olympusaustralia.com.au
OLYMPUS NEW ZEALAND LIMITED
28 Corinthian Drive, Albany, Auckland NZ 0632
Customer Service: 0508 659 6787 | www.olympus.co.nz

 Loading...