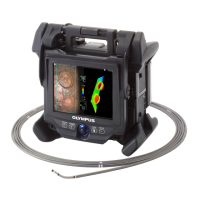
What to do if Olympus IPLEX NX IV9000N Industrial Equipment displays
- KkellybrandonSep 5, 2025
If you see this message, it means the file name you are trying to use already exists. Specify a file name that is different from the existing one.
What to do if Olympus IPLEX NX IV9000N Industrial Equipment displays
If you see this message, it means the file name you are trying to use already exists. Specify a file name that is different from the existing one.
What should I do if my Olympus IPLEX NX IV9000N displays
If your device shows this message, it means the SDHC card or USB flash drive is full. You should delete any unnecessary data to create more space, or replace it with a new SDHC card or USB flash drive.
Why is my Olympus IPLEX NX IV9000N Industrial Equipment image not sharp?
The lack of sharpness may be due to a dirty objective lens on the distal end of the insertion tube or the optical adapter. Try wiping it with a clean piece of gauze or a cotton swab. Also, ensure the optical adapter is correctly attached and that both the image sharpness and external monitor are properly adjusted.
What to do if Olympus IPLEX NX IV9000N displays
This message indicates that the battery voltage is low. Stop all operations like recording, copying, deleting, or formatting the USB flash drive. Replace the battery immediately or connect the AC adapter.
Why is my Olympus Industrial Equipment not turning on?
Several reasons may prevent the system from turning on. Make sure the AC adapter or battery is correctly connected. Ensure the power is switched ON. Verify that you are using the designated AC adapter or battery. Finally, check that the scope unit is properly attached to the main unit.
What to do if Olympus Industrial Equipment displays
This message indicates that the SDHC card or the USB flash drive is not loaded. Load the SDHC card or the USB flash drive you intend to use and try again. Alternatively, turn the instrument off and then on again.
Why does my Olympus IPLEX NX IV9000N optical adapter not attach to the insertion tube?
The inability to attach the optical adapter could be due to a foreign object stuck to the screws. Try wiping with a clean piece of gauze or a cotton swab. It could also be that you are not using the designated optical adapter for this system, so ensure you are using the correct adapter. Finally, the installation procedure may be incorrect.
Why won't my Olympus IPLEX NX IV9000N turn off?
If the system cannot be turned off, the main unit might be damaged. Remove the AC adapter or the battery from the main unit and turn OFF the power.
What to do if Olympus IPLEX NX IV9000N displays
This message indicates that the self-check function was activated due to an overcurrent in the light source. Terminate the inspection, allow the instrument to cool down, and then turn the power back on again.
What to do if Olympus IPLEX NX IV9000N displays
This message indicates that the distal end has become too hot, activating the self-check function. Immediately pull the insertion tube out of the observation object.
Brand | Olympus |
---|---|
Model | IPLEX NX IV9000N |
Category | Industrial Equipment |
Language | English |
Describes the instrument's purpose.
Explains manual contents and safe usage.
Refers to system charts for device compatibility.
Provides essential safety guidelines for instrument handling.
Specific safety guidelines for handling the hook assembly.
Critical safety instructions for battery usage and handling.
Details labels and caution symbols on the base unit.
Details labels and caution symbols on the scope unit.
Details labels and caution symbols on the remote control unit.
Lists all items included in the product package.
Instructions for storing accessories in the optical adapter case.
Identifies parts of the main and LCD units.
Identifies parts of the distal end and optical adapters.
Identifies icons and indicators on the LCD screen.
Instructions for safe transportation of the carrying case.
Guidelines for positioning the instrument before use.
Procedures for preparing the battery and AC adapter.
Step-by-step guide for removing the insertion tube.
Detailed instructions for mounting and dismounting optical adapters.
Procedures for detaching and connecting the scope unit.
How to connect the remote control unit to the main unit.
Instructions for inserting SDHC cards and USB flash drives.
Guide to using the shoulder strap for carrying.
Steps for installing the hook assembly into the instrument.
Instructions for replacing the safety cap on the universal cord.
How to use the handle holder for retrieval tools.
Securing the instrument using port grips and belt clamps.
Checklist for inspecting the instrument before and after use.
Procedures for powering the instrument on and off.
How to control the illumination at the distal end.
Details on operating via touch panel and remote control.
Guide to inserting and observing with the instrument.
Instructions for safely removing the scope unit.
How to freeze, zoom, and adjust image brightness.
How to navigate and select image folders.
Preparation and process for recording still images and movies.
Procedures for viewing recorded images and movies.
Connecting the instrument to an external display.
How to transfer and use recorded images on a computer.
Explains how to navigate and use the instrument's menus.
Settings and adjustments available on the live and freeze screens.
Operations for managing recorded image files.
Outlines the step-by-step process for stereo measurement.
Instructions for correctly mounting the stereo optical adapter.
Procedures to verify measurement accuracy using a check tool.
How to select and view the measurement area appropriately.
Detailed steps for performing measurements.
Describes the process for performing scaler measurements.
How to attach optical adapters for scaler measurement.
How to identify the correct area for scaler measurement.
Steps to perform and record scaler measurements.
Lists common error messages and their solutions.
Lists typical operational issues and their resolutions.
Instructions for replacing the instrument's battery.
Procedure for replacing the O-ring on the optical adapter.
Guidelines for cleaning various parts of the instrument.
Recommendations for storing the instrument properly.
Details the environmental conditions for instrument operation.
Lists various technical specifications of the instrument.
Technical details for different optical adapters.
Compliance information for electromagnetic compatibility and FCC regulations.
Information regarding the use of open source software.
Details on the AVC patent license.
A diagram illustrating system components and connections.