100c User Manual
12
ch.1
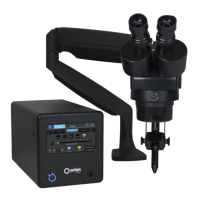
MICROSCOPE ARM SETUP
A video explanation of the microscope setup can be found at http://www.orionwelders.com/
resources/orion-c-series-resources/
1. Place the upper half of the microscope arm into the arm base.
2. Install the rubber eyepiece covers.
3. Insert the welding stylus into the stylus holder
under the microscope head then tighten the stylus
holder knob.
4. Loosen the bolt in front of the microscope mount
to move the microscope head left and right.
5. Loosen/tighten the allen on the microscope
arm to adjust the spring pressure. Turn the allen
clockwise if the arm does not hold the microscope
up. Turn the allen counter clockwise if the arm does
not allow the microscope to come down.
6. Ensure the microscope cable is plugged into the microscope shutter
light ring (this is an RJ45 port at the bottom of the microscope head).
7. Plug the other end of the microscope cable into the “Microscope” port
on the back of the power supply.
ADJUST WELDING STYLUS POSITION
A video explanation of the steps below can be found at http://www.orionwelders.com/
resources/orion-c-series-resources/
1. Loosen the screws on either side of the stylus holder.
2. Adjust the welding stylus to a 45-degree angle then slightly
tighten the screws just enough to hold the stylus in place at a
45-degree angle
3. While looking through the microscope, slide the welding
stylus holder forward/backward until the tip of the stylus is
in the center of your focus.
4. Now securely tighten the stylus holder screws.
5.
4.
3.
2.
1.
2. 45°