Oxigraf O2iM NEMA 4X Oxygen Analyzer
February 13, 2007 08-0427-B0, Manual, O2iM.doc Page 16
4.3.7 Test Mode – TEST Key
Press the TEST key to enter test mode where the fault memory and critical analyzer parameters are
displayed. Test mode also allows emulation of the O2 concentration by setting a specific value via
the keypad. An O2 ramp function is also available that sweeps the simulated O2 value from 0 to
100%. This is useful for checking operation of the 4 to 20 mA current and alarm outputs.
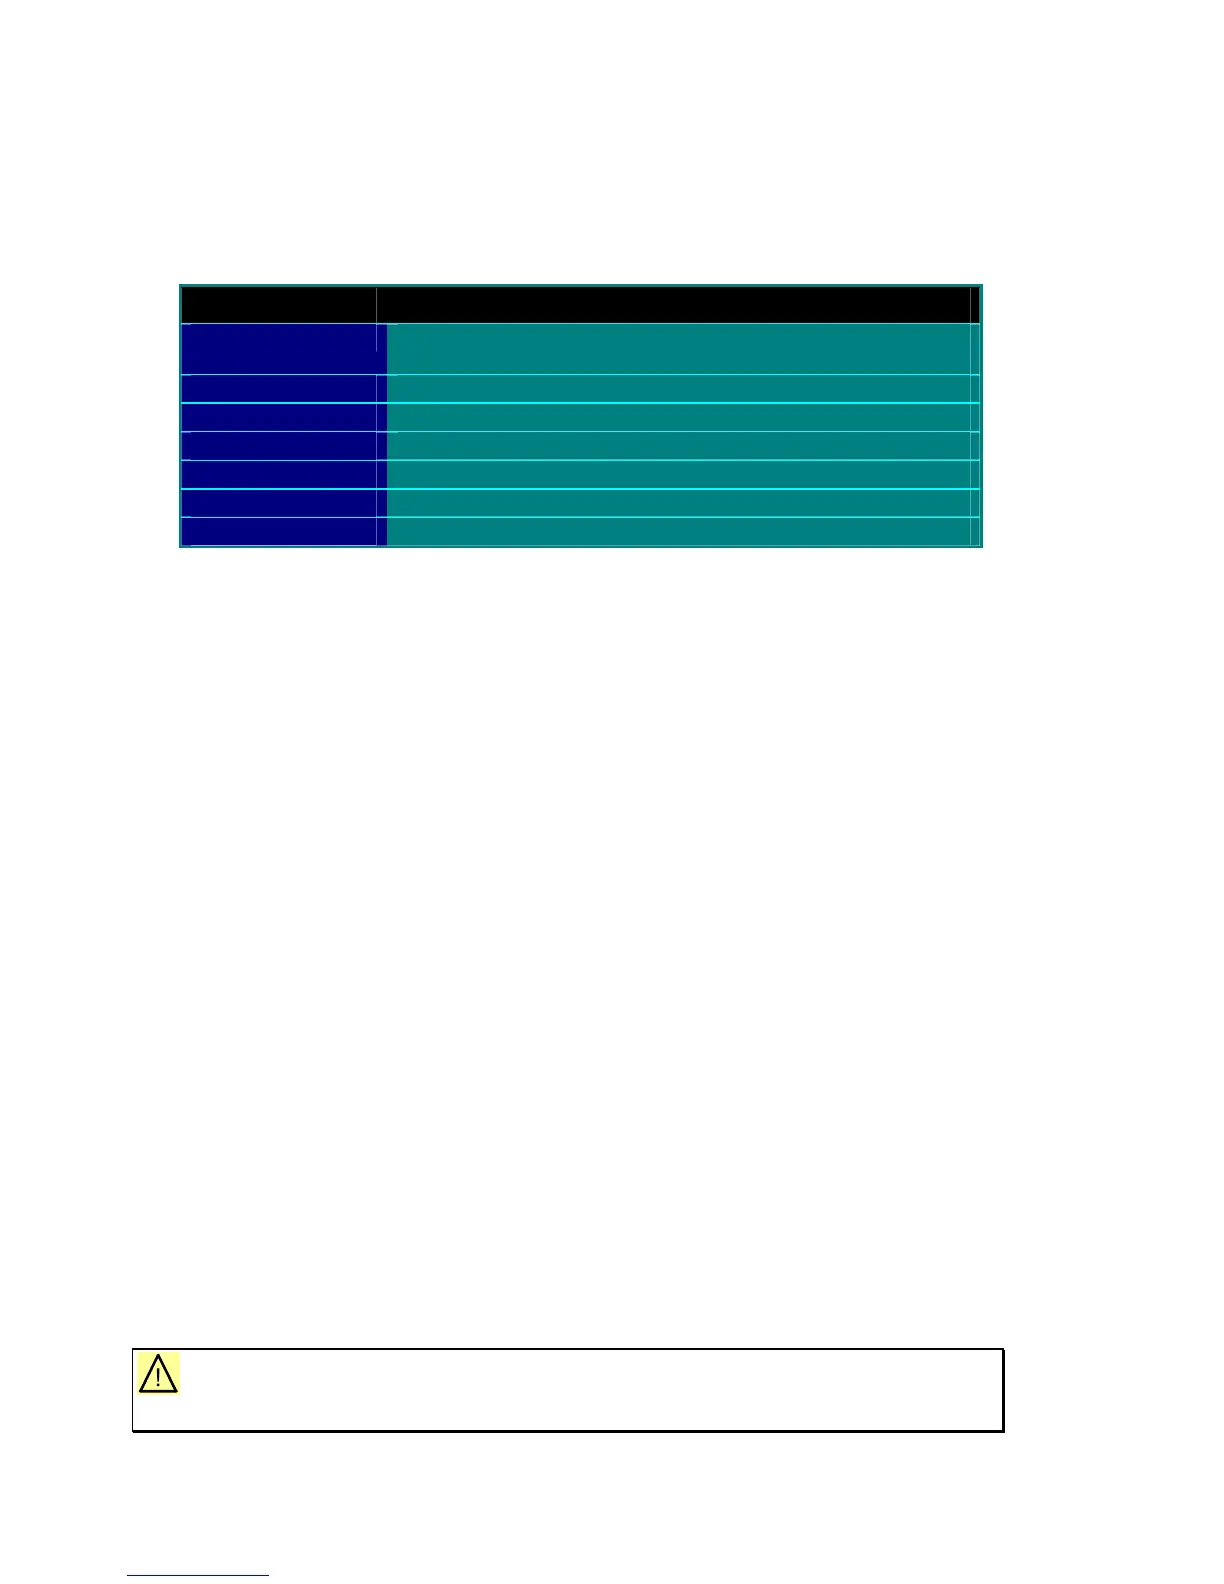
Test Mode Function
Fault Messages
Sequentially display analyzer fault memory, reset by pressing
ENTER
Cell Status
Oxygen cell temperature and pressure
Laser Status
Laser temperature setpoint and measured value
Reset Calibration
Press ENTER to reset analyzer calibration to factory defaults
Restart Analyzer
Press ENTER to restart analyzer software
Static Simulation
Simulated O2 by keypad entry
Ramp Simulation
Simulated O2 by slewing value from 0 to 100%
4.3.8 Help Mode – HELP Key
Press the HELP key to display the Oxigraf service phone number, and a second time to show the
instrument model and serial number.
4.4 Calibration
The calibration modes are used to calibrate the oxygen analyzer using a known oxygen
concentration. To fully calibrate the sensor two gas samples are required, typically 100% and 21%
O2 certified to 0.03% accuracy. Room air may be used for O2 calibration but is diluted by water
vapor and may vary from 20.5 to 20.9% if not dried.
All calibration modes are incremental, i.e., calibration at one point (high or low) does not affect the
calibration at the other point. Consequently, high or low point calibration can be repeated or done in
any order.
4.4.1 Manual Calibration
The O2iM analyzer, without the autocal feature enabled, is calibrated manually by applying the
calibration gas to the cal input port.
To perform a manual two-point oxygen cal use the following procedure.
a) Press the CAL 2 key to select High Cal mode and pass the indicated cal gas through the
analyzer. If the desired cal gas does not match the indicated value press the SETUP key to
correct the analyzer High Cal setting and return to High Cal mode. When the measured
concentration value has stabilized, press the ENTER key. The cal factors and oxygen reading
will change as a result of this cal cycle. Flow control of the high cal gas is required.
b) Switch to Low Cal mode by pressing the CAL 1 key and pass the indicated calibration gas
through the analyzer. If the desired cal gas does not match the indicated value press the SETUP
key to correct the analyzer Low Cal setting and return to Low Cal mode. When the oxygen
reading has stabilized press the ENTER key to execute the calibration cycle. Widely separated
sample concentrations, such as 100% and 20.9%, will provide the most accurate calibration.
The cal factors and oxygen reading will change as a result of this cal cycle.
Caution: Calibration should not be performed until the analyzer has
warmed up for at least 10 minutes.