www.pelprostoves.com 7083-171H • February 23, 2015 7
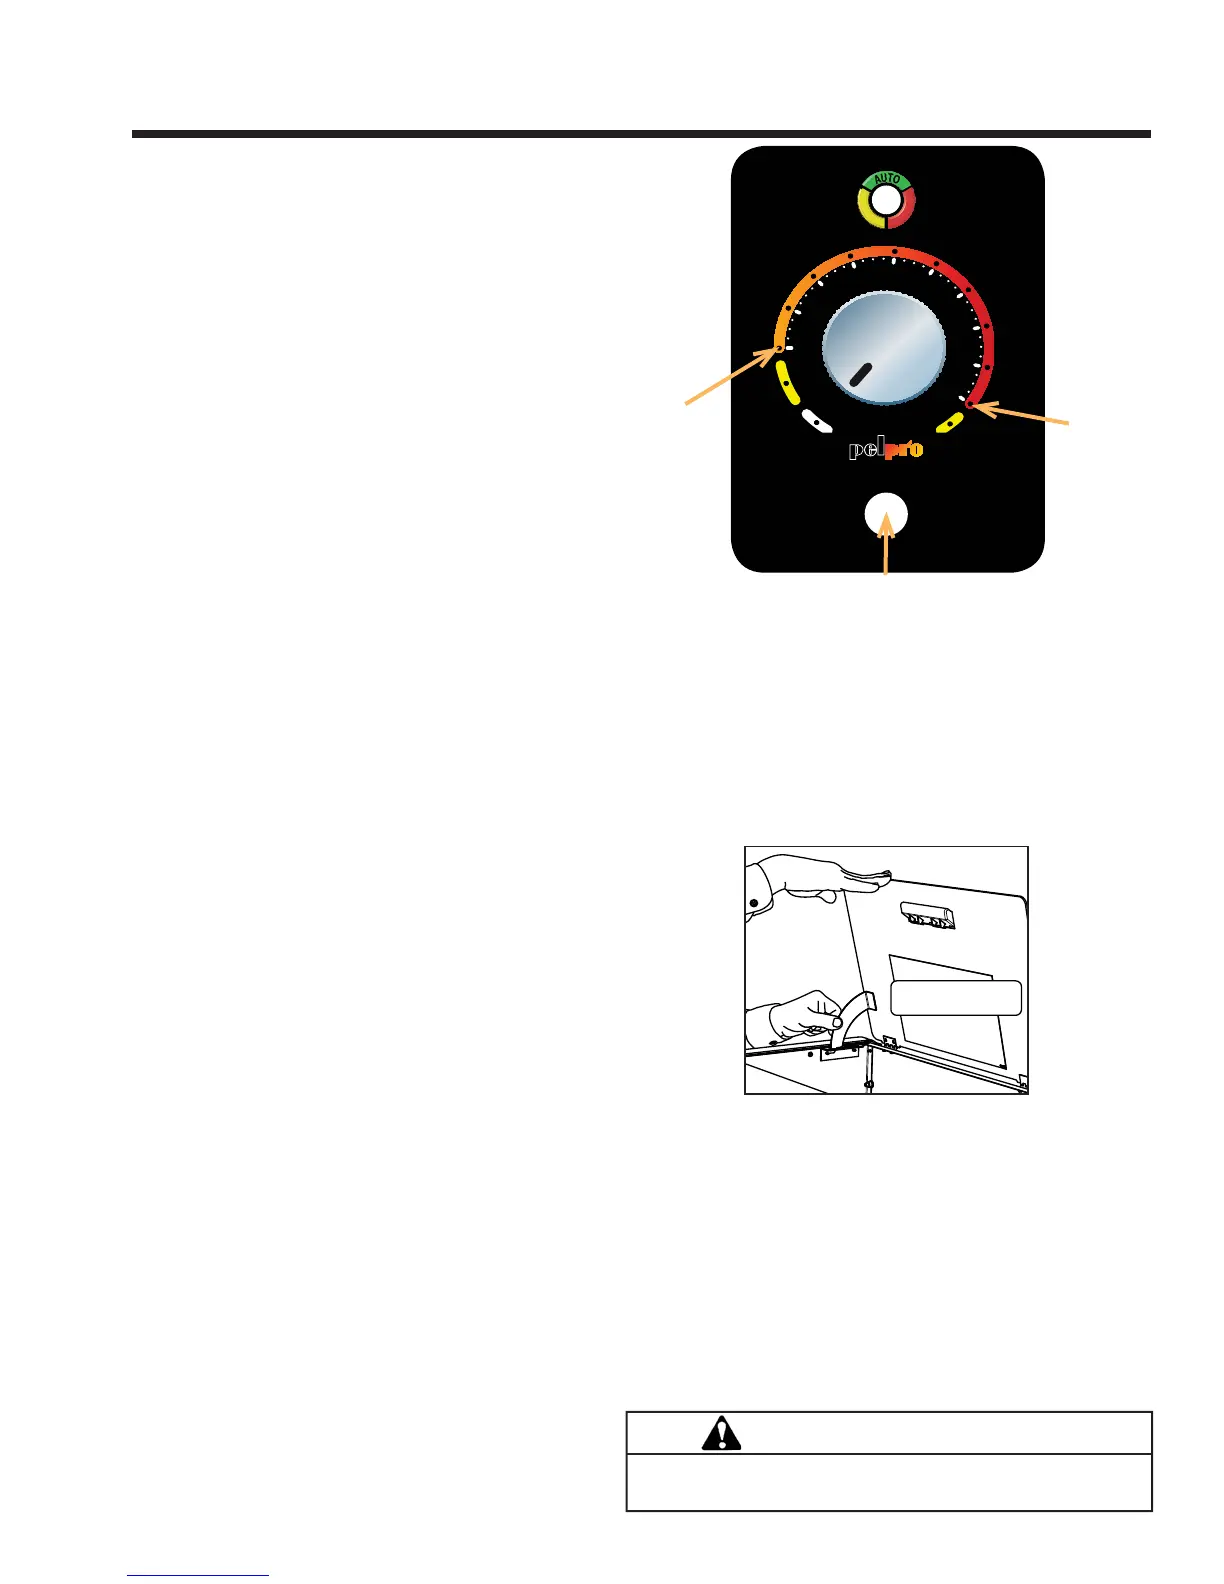
A. User Dial Control
The appliance has one dial control located on the side of
the unit used for daily operation. There are four primary
settings on this dial.
1) OFF: When the dial indicator is in the off position
the unit will go into a shut down and remain off until the
dial is turned to one of the other three settings. The LED
will fl ash green once per second when in the off position.
2) LO : When the dial indicator is directed to the LO
setting the unit will burn on low until the hopper runs out
of pellets or the dial control is turned to a different set-
ting. When in this setting the LED will be amber in color
and continuously on. When burning in this mode, the
unit should be turned off at least once daily for clean-
ing. If lower quality fuels are used, additional daily shut
downs may be required for cleaning.
3) HI : Similar to the LO mode, the unit will run continu-
ously at the high burn rate until the unit has run out of
fuel or the dial is turned to a different setting. To operate
in this mode, turn the dial clockwise until it stops. When
in this setting the LED will be amber in color and contin-
uously on. Follow the daily cleaning recommendations
when operating in this mode. If lower quality fuels are
used, additional daily shut downs may be required for
cleaning.
4) COMFORT LEVEL : To burn in the Comfort Level
mode, turn the dial control clockwise to the desired
comfort level. When operating in the automatic mode,
the unit changes the burn setting based on the differ-
ence between the room temperature and the desired
set point. In other words, the unit will burn on High if the
difference between the desired and room temperature is
greater than 8 degrees Fahrenheit. As the room heats
up and the gap closes, the unit will automatically reduce
the burn rate. When the room temperature is close
to the set point the light will stop fl ashing and become
solid green. at this time the stove will be burning on
the lowest burn rate. When the desired temperature is
achieved the unit will shut down. As the room cools,
the unit will restart automatically. When burning in this
mode the LED will be blinking green. The number of
green fl ashes corresponds to the current setting.
B. Filling the Hopper
Open the hopper lid by lifting the handle. The unit has a
locking latch that will engage when the hopper lid is fully
opened. The hopper lid for the cabinet will open past
ninety degrees and stay open automatically. Fill the hopper
with fuel. FOR USE WITH ONLY WOOD PELLET FUEL.
Slowly close the hopper lid. See fi gure below for releasing
the latch. NOTE: The unit will not feed with the hopper lid
open. If left open, the fi re will go out.
Push Bottom of Latch
Inward to Release
C. Priming the Feed Tube
The feed tube may need to be primed only if the hopper
is being fi lled for the fi rst time or if the unit has run out of
pellets. To prime the unit, turn the dial control from the off
position to the HI position, to OFF to HI. This will run the
feed motor continuously for two minutes without turning on
the igniter. When the feed motor is running continuously,
the LED light wil be a continuous green color. When pellets
start to drop into the fi repot, the feed tube is primed. Turn
the dial control to the desired position and the stove will
begin its ignition sequence with a blinking green light. Allow
the unit up to 20 minutes for ignition to occur.
0
-
1
-
2
-
3
-
4
+
1
+
2
+
3
+
4
O
N
A
U
T
O
A
L
A
R
M
About 65 •F
About 82 •F
Trim
CAUTION
Do not restart or manually add pellets or any type
of fuel to the burn pot during this process.
3 General Operating Information