EN
9
Make sure that the tool slides out of the housing
without any increased resistance.
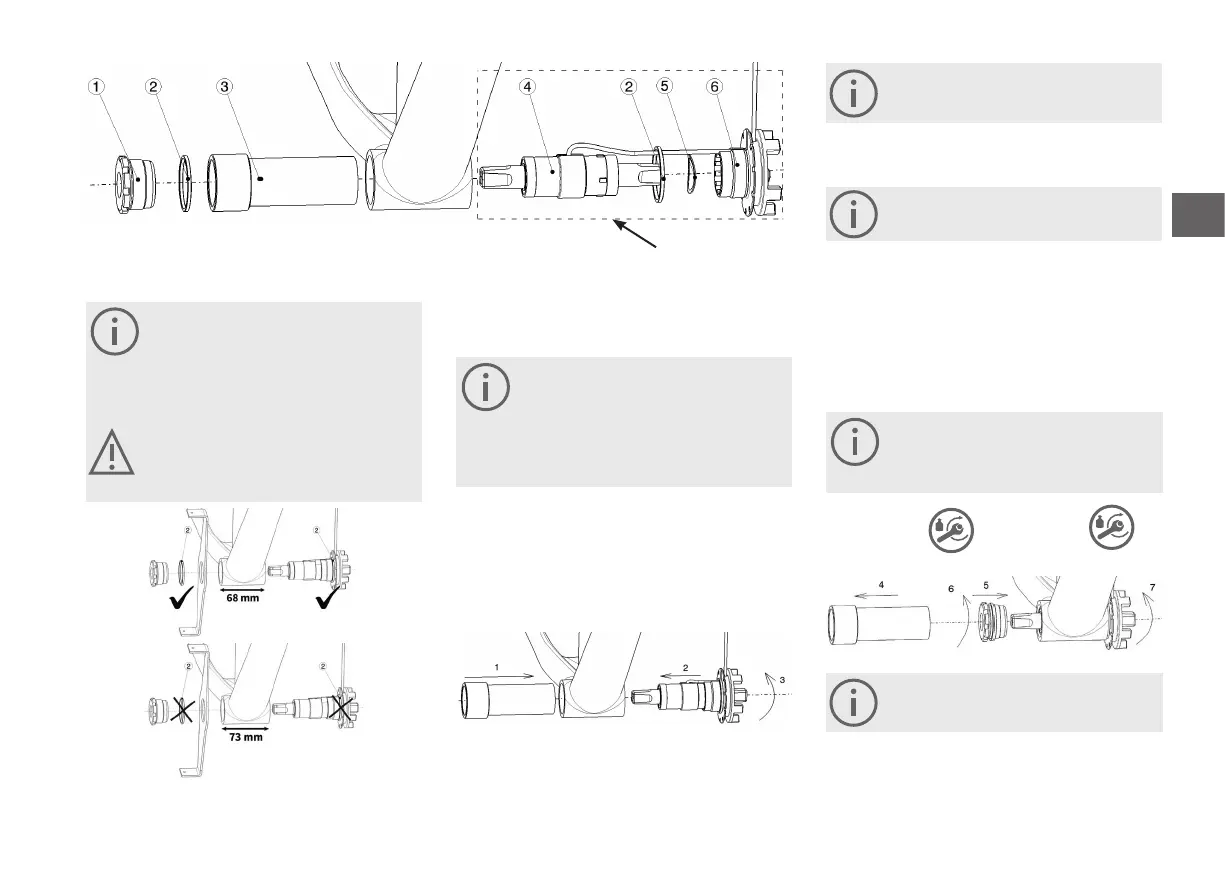
supplied in preassembled condition
1 Screwed bushing aluminium
2 Spacer ring
3 Installation tool
For assembly, Pendix recommends the use of
installation tool (No. 3). You can order this from
the Pendix online shop or via the ordering chan-
nel you are familiar with. We can assume no re-
sponsibility (guarantee) for damage to the Pendix
bottom bracket caused by using a dierent tool.
Please check, if the bottom bracket has a width
of 68 mm or 73 mm. In case of a bottom bracket
with 68 mm, you require on the right and le side
one spacer ring each.
1. Insert the installation tool in the bottom bracket hous-
ing from the right-hand side (in driving direction),
and push in as far as it will go.
When doing this, make sure that the tool slides
into the case without meeting any increased re-
sistance. If you notice any resistance, remove any
disturbing elements in the bottom bracket hous-
ing by filing or grinding. Make sure not to damage
the bottom bracket thread.
5. Now fasten the electronic bottom bracket on the
other side by turning in the screwed bushing (No.1 in
drawing top le).
6.
15 Nm +/- 2 Nm
65 Nm +/- 3 Nm
In the housing of a BSA bottom bracket, theth-
read on the right hand side (in driving direction)
Screw the bottom bracket on the right side with a
tightening torque of 15 Nm +/- 2 Nm.
Please pay attention to mount a standardized
chain guard, which is conform to standard DIN
EN ISO 4210-2.
Only hand-tighten the bottom bracket in this
step.
Before step 7 push the bottom bracket as far as possible in
direction of the just mounted screwed aluminium bushing.
7. As final step, use a torque wrench to tighten the
bottom bracket on the le side to a torque of 65 Nm
+/- 3 Nm.
Aer installing the electronic bottom bracket, make sure
that the sha turns freely without showing any resistance.
4 Bottom bracket
5 Wave washer
6 Bottom bracket mounting
* is applicable with or without chainguard
*
*
2. Push the electronic bottom bracket from the le-
hand side (in driving direction) into the bottom
bracket housing. Make sure that it slides easily into the
assembly tool without damaging the cable in doing so.
3. Push the bottom bracket mounting (No.6) into the
bottom bracket housing by turning it.
4. Aer tightening the electronic bottom bracket on the
le side by hand, remove the installation tool from the
bottom bracket housing by carefully pulling it out.
/6.