27640 -9/34-
1
11
1-
--
-1
11
11.[Check] Shutter speeds, X
1.[Check] Shutter speeds, X1.[Check] Shutter speeds, X
1.[Check] Shutter speeds, X-
--
-Time lug.
Time lug.Time lug.
Time lug.
[Jigs, Tools, Testers]
[Jigs, Tools, Testers][Jigs, Tools, Testers]
[Jigs, Tools, Testers] Shutter tester (1/6000sec. Measurable), AE master lens(ML-245).
1) Check manual shutter speeds.
[Note]
[Note][Note]
[Note] When measuring exposures not at the center of the aperture(1
st
and 2
nd
) , please
use Shutter testers with master lens mounted and the light is slanted light or pin-point type.
[Standard]
[Standard][Standard]
[Standard] Tolerated range of manual shutter speed.(Center of Aperture)
S.Speed(sec.) Exposure time(ms) Exposure value(EV)
1/6000
0.112~0.283 ±0.7
1/4000
0.172~0.345 ±0.5(~1/3000sec.)
1/2000
0.370~0.644 ±0.4(~30sec.)
2)Set 1/180 sec. and check X time lug.
Parallel light(24mm running time)
Ref. Value(Spot beam、21mmRunning time)
1
st
・・・ Over-0.05 ms 1
st
・・・ Over 0.25 ms
2
nd
・・・ Over 0.8 ms 2
nd
・・・ Over 1.35 ms
1
11
1-
--
-12.[Check] Exposure value
12.[Check] Exposure value12.[Check] Exposure value
12.[Check] Exposure value・
・・
・DX correspondence.
DX correspondence.DX correspondence.
DX correspondence.
1)Set camera at Programmed auto mode and measure the exposure values.
[Preparation]
[Preparation][Preparation]
[Preparation] Shutter tester, Master lens for AE.(ML-245)
[Standard]
[Standard][Standard]
[Standard] Exposure Value(Master lens for AE、Aperture A position)
Brightness(LV) Tolerated range(EV)
LV6~14 +0.70~-0.50
LV15
+0.95~-0.25
LV16
+1.20~±0.00
☆ Check other exposure mode if necessary.
2)Check DX correspondent.
[Preparation]
[Preparation][Preparation]
[Preparation] DX correspondent film(ISO400, 200, 100, and others.)
Load film and make sure that the LCD indication is matching with ISO of the film inside.
(Supplement:It can be checked with ISO 5000 film.(All contact pieces are closed.)
1
11
1-
--
-13.[Check] Checking Data imprinting.
13.[Check] Checking Data imprinting. 13.[Check] Checking Data imprinting.
13.[Check] Checking Data imprinting.
[Testers]
[Testers][Testers]
[Testers] Regulated power supply.
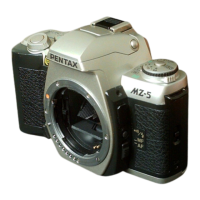
1-13-1. Checking Data imprinting LED.(Back cover)
[Note]
[Note][Note]
[Note] Be sure not scratch on contact piece.
1) Apply 4.5V to the terminal⑨(+) and ⑧()
as shown in Fig.
2) Check 1 LED turns on by making contact terminals ① and ⑧().
3) Check LED by shorting between ②~⑦ accordingly.
1
11
1-
--
-13
1313
13-
--
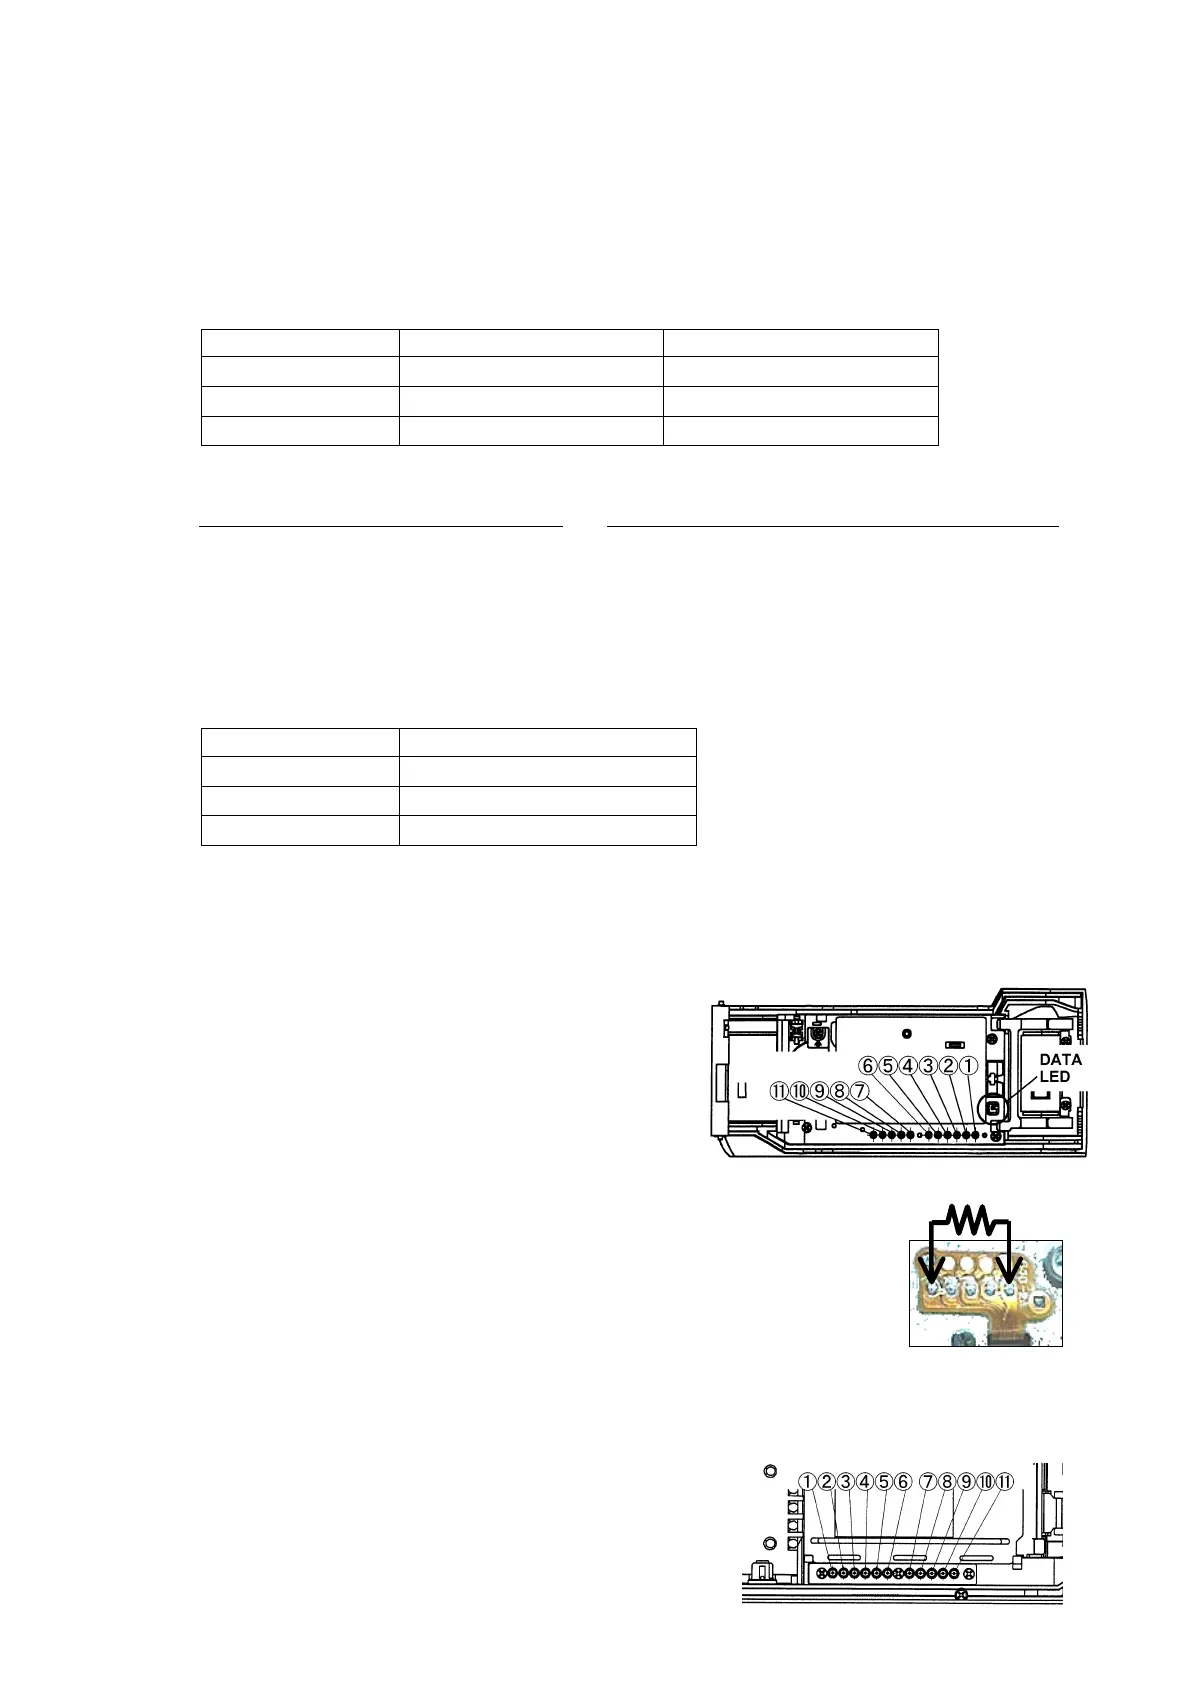
-2. Checking Data imprinting.(Main body)
2. Checking Data imprinting.(Main body)2. Checking Data imprinting.(Main body)
2. Checking Data imprinting.(Main body)
[Preparation]
[Preparation][Preparation]
[Preparation] Logic tester・Analogue(Needle indication)Circuit tester.
[Note]
[Note][Note]
[Note] Be sure not scratch on contact land.
1)Same as the indication in viewfinder, connect resister(1k-2.5k) temporary for checking.
2) Turn Main SW ON (All LED should turn ON) and check followings.
3) DC 5V should exist between land ⑧ and ⑨(+).
Check to see if 2~4V output exist when shorting between
the land ⑨(+) and ①~⑦.
1k-2.5k

 Loading...