Do you have a question about the Philips EasyKey DDL709-FVP-7HWS and is the answer not in the manual?
Read and understand all instructions before use. Warranty void if instructions are not followed. Use manufacturer-specified accessories.
Do not place batteries near ignition sources. Use only approved power supplies and components. Avoid short circuits.
Follow local regulations for disposal and recycling. Proper disposal prevents environmental and health impacts.
Lists all included components with corresponding images. This list is for reference only.
Detailed diagram showing all parts of the smart lock and their numerical identifiers for assembly reference.
Information on door opening directions (left/right swing, inswing/outswing) and door thickness compatibility.
Step-by-step guide on how to adjust the latch orientation using an Allen wrench for proper fit.
Step-by-step guide for installing the smart lock, including drilling, mounting mortise, and connecting cables.
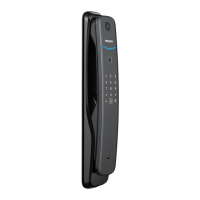
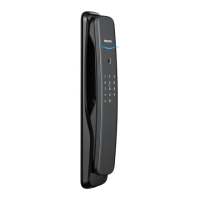
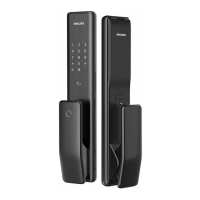
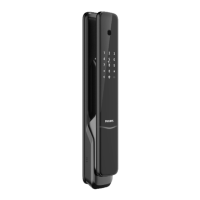
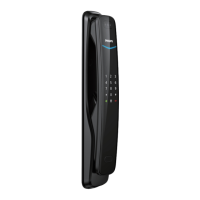
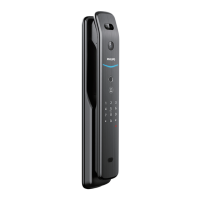
Identifies and labels all components on the exterior part of the smart lock for user familiarization.
Identifies and labels all components on the interior part of the smart lock for user familiarization.
Explains system modes (general, dual-verification) and provides a table for user code information.
Steps to enter and operate in master mode using PIN or fingerprint for configuration and management.
Guide on adding user PIN codes, fingerprints, and key tags via master mode for access control.
Detailed instructions for adding a new user PIN code, including confirmation steps for accuracy.
Instructions for enrolling a new fingerprint, including multiple scans for improved recognition accuracy.
Process for enrolling a new key tag to be used as an access method for unlocking the door.
Steps to create and add a PIN code that is valid for a single use only.
Instructions for enrolling a user's facial data for unlocking the door via facial recognition.
Guide to add a new master fingerprint or replace the existing one for administrative access.
Instructions to change the current master PIN code to a new, secure code.
Options to select the preferred language for the lock's voice prompts and display.
Controls for adjusting the volume of voice prompts and operational sounds.
Procedure to remove specific user access methods (PIN, fingerprint, key tag, Face ID) or all user data.
Options to manage power saving features like video and facial recognition for battery efficiency.
Configuration to enable or disable the dual-verification mode for enhanced security.
Instructions to enable or disable the infrared handle feature for unlocking the door.
Steps to connect the smart lock to a Wi-Fi network for app integration and remote control.
Guide on downloading the app and binding the door lock via QR code or manual entry for smart functionality.
Information on subscribing to and using the cloud storage service for recorded videos from the lock.
Explains methods for unlocking the door from the outside using PIN, fingerprint, key tag, or Face ID.
Describes how to unlock the door from the inside using the rotary knob, OPEN button, or infrared handle.
Details how the latch bolt automatically locks after closing the door, with a voice prompt.
How to enable and use the inside deadlock feature, which disables outside functionalities.
Instructions on how to use the mechanical key for emergency unlocking in case of battery failure.
Explains the function and usage of the indoor infrared unlock feature for convenient entry.
Describes the function and usage of the outside forced lock mode, which triggers an alert when tampered.
Instructions on how to enable or disable mute mode for quiet operation, avoiding disturbance.
Procedure to reset the lock to its factory default settings, clearing all user data and configurations.
Explains the doorbell function, visitor alerts, and integration with the mobile app for remote viewing.
Details the video intercom functionality for viewing and communicating with visitors via the app.
Information on the indoor display, how to view the doorway, and app-based display settings like brightness.
Explains the meaning of different indicator light colors (blue, green, red) for system status and door lock.
Describes the red flashing indicator for low battery and the associated voice prompt for replacement.
Explains the white light on digit '8' indicating that the outside forced lock mode can be activated.
Indicates when inside deadlock is enabled, disabling exterior functions and showing a specific code.
Explains the lock-out mechanism due to consecutive incorrect access attempts for security.
Details various alerts such as outside forced lock, low battery, and anti-dismantling for problem identification.
Guide on using an external power source for temporary power when the battery is insufficient or system crashes.
Instructions on how to safely replace the internal Li-polymer battery of the smart lock.
Information on how to charge the Li-polymer battery using a charging cable and relevant voltage.
| Type | Smart Door Lock |
|---|---|
| User Capacity | Up to 100 fingerprints |
| Material | Zinc Alloy |
| Connectivity | Bluetooth |
| Battery Type | AA |
| Number of Batteries | 4 |
| Keypad | Touchscreen |
| Key Override | Yes |
| Auto Lock | Yes |
| Warranty | 1 Year |
| Unlock Methods | Fingerprint, PIN Code |
| Power Supply | 4 AA batteries |
| Emergency Power Supply | 9V Battery (External) |
| Lock Type | Mortise |
| Power Source | Battery |
| Backup Power | 9V Battery (External) |
| Compatibility | Standard doors |
| Installation | DIY Installation |
| Features | Auto Lock, Anti-Peep PIN Code, Low Battery Indicator |