Chapter 7
Component Removal/Installation
1049766 Rev A V60 Ventilator Service Manual 7-35
7.32 Front Bezel,
Touch Screen
Follow these steps to remove the front bezel and touch screen (Figure 7-33).
Reverse to install.
NOTE: When installing a new touch screen, remove the protective film and avoid
touching the screen surface.
NOTE: After installing a new UI assembly, perform the touch screen calibration
(section 5.3).
1. Open the UI (section 7.28).
2. Disconnect these cables from the UI PCBA:
• Switch PCBA cable
• Nav-ring cable
• Power switch overlay cable
• Touch screen cable
3. Remove the switch PCBA.
4. Remove the screw that attaches the cable clamp to the LCD tray.
5. Remove the screws and washers that attach the LCD tray to the front
bezel, then remove the LCD tray.
6. Remove the touch screen from the front bezel.
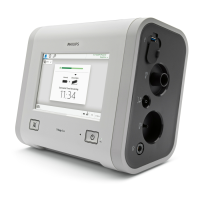
Figure 7-33: Removing the Touch Screen
Cable clamp
M3 x 6 screw (x8)
(34 +
3.4 N cm/
3.0 +
0.3 in.-lbf)
M3 x 6 screw (x1)
(62 +
5.7 N cm/
5.5 +
0.5 in.-lbf)
LCD tray
Front bezel
Touch screen
Nav-ring cable
Switch PCBA to
UI PCBA cable
Power switch
overlay cable
Touch screen
cable

 Loading...