Force Security System - Installation Guide
8
Chap. 2 Installation & Wiring
2.1 Location guidelines
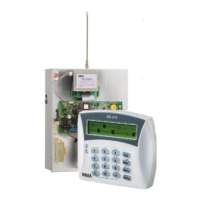
To make installation and servicing easy and efficient, the FORCE’s control panel, transformer
and backup battery are mounted on a special rack. The rack is covered by a metal case.
Use the following list as a guide to find a suitable location to install the FORCE security system:
Install this product on a protected location, where people cannot trip over any line or
power cord.
Select a location free from vibration and shock.
Mount this product on a flat stable surface, near telephone and network sockets, and a
power outlet.
Do not select a location that exposes the control panel to direct sunlight, excessive heat,
moisture, vapors, chemicals, or dust.
Protect cords from damage or abrasion.
Disconnect all sources of power supply prior to installation. Pay attention: do not install low
voltage wires near any AC power wires. They should be installed separately.
Do not install this product near water, e.g. bath tub, sink, wet basement.
2.2 Mounting the rack
The FORCE’s control panel is installed on a designated rack. The rack is supplied with a metal
cover. In addition to the control panel’s circuit, the rack is designed to hold the transformer,
backup battery, local zone expander, radio and GSM modules, and more.
The rack’s sizes including the metal cover are L:30.3 H:27.2 W:7.7 cm.
To mount the rack, follow the next steps:
1. Use the next diagram or the rack itself, to position the two upper and one middle hanging
holes.
2. Pass the wires of the zones and expanders from behind the rack, through the opening.
3. According to the designated surface, use appropriate wall plugs (if necessary) and screws
and mount the rack.
4. When you finish connecting the wires, place the metal cover: tilt it upwards, insert the two
tooth on the rack to the notches on the cover and place the cover on the rack.
5. Finally, fasten the screw at the bottom.