4.4Post-installationcheck
Checkthefollowingpointsafterinstallingthedriveandconnecting
thecoursecomputer:
Check
1
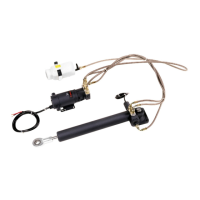
Ensurethatthehydraulicram’smountingfootiswell-securedtoa
substantialpartofthevessel.
2Ensurethatthehydraulicramiscorrectlyaligned:
•Mountingfootcorrectlyorientated.
•Drivemountedatrightanglestotillerarminamid-strokeposition
whenrudderisinamidshipposition.
•Pushrodaccuratelyalignedwithtillerarmplaneofrotation
(deviationlessthan10degreesforType2drives,or5degrees
forType3drives).
3Ensurethatthehydraulicramrodendis:
•Securelyattachedtothetillerarmorrudderquadrant.
•Attachedattherecommendedtillerarmradiusforthevessel.
4Ensurethatthemotorandclutchcablesarecorrectlyroutedand
securelyconnectedtothecoursecomputer.
5
Ensurethatallhydraulicpipesaresecurelyconnectedwithnoleaks.
6
Ensurethatthereservoirislledwithhydraulicuidtothecorrectlevel.
7
Ensurethatthetransitscrewandsealhavebeenremovedfromthe
reservoircap.Ensurethatthecapisttedsecurelytothereservoir.
8
Ensurethatthereservoirtapisinthe“ON”position.
Check
9
Ensurethatyou’vecompletedthehand-steeringcheck(seeSteering
check).
10Ensurethecoursecomputer’sclutchswitchisinthecorrectposition
(referto4.3Coursecomputerconnection).
Onceyou’vecompletedthecheckslistedaboveyoushouldperform
anautopilotsteeringcheck,toensurethattheautopilotcontrolhead,
coursecomputeranddriveunitareconnectedandcommunicating
correctly.Refertothehandbookthataccompaniesyourcourse
computer.
34
HydraulicLinearDriveInstallationinstructions
 Loading...