4 Pathfinder Smart Heading System - Owner’s Handbook
2 Installation
2.1 Planning the installation
Before you start installing the Smart Heading System, read through the
information in this chapter. In particular, consider:
• what connections you need to make to Pathfinder Plus units and/or
any other Raymarine equipment (see below)
• where you can locate the compass – so it is away from possible
sources of magnetic interference
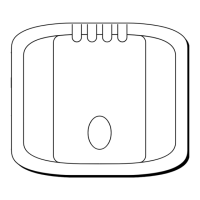
• where you can locate the GyroPlus 2 unit – so it is on a vertical surface
• how you will supply power to GyroPlus 2 unit (via SeaTalk or directly
from the boat’s distribution panel)
• the EMC and cabling guidelines
Typical integrated systems
When installing the Smart Heading System, you need to make the
following connections:
• Smart Heading System:
• provide power to the GyroPlus 2 unit (see page 11)
• connect the fluxgate compass to the GyroPlus 2 unit (see page 15)
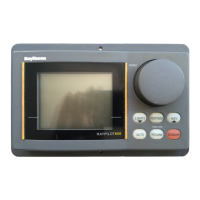
• Pathfinder Plus connections:
• connect the Smart Heading System to the Pathfinder Plus using
both NMEA and SeaTalk
• the SeaTalk connection allows the Pathfinder Plus unit to
calibrate the Smart Heading System (see page 16)
• the NMEA connection provides the Pathfinder Plus with fast
heading data for MARPA and radar/chart overlay (see page 16)
Adding the GyroPlus 2 unit to an autopilot
Refer to the Appendix if you need to add only the GyroPlus 2 unit to a
Raymarine autopilot (which has an existing fluxgate compass).
Connecting to a single Pathfinder Plus
If you connect the Smart Heading System to a single Pathfinder Plus
(with no other SeaTalk instruments), you will need to provide power to
the GyroPlus 2 unit direct from the distribution panel (see page 11). This
is because the Pathfinder Plus does not provide power to SeaTalk.
Note: If you need to connect the Smart Heading System to more than one
Pathfinder Plus, see page 17.
81198_1.book Page 4 Monday, February 11, 2002 8:36 AM
 Loading...