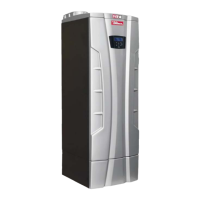
110
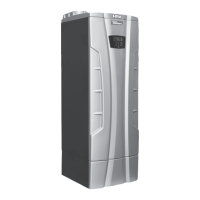
B
E
D
H
F
C
G
A
020009.01.008
15 - MAINTENANCE
Figure 15-2 Removing the casing
A = upper cover
B = screws
C = front cover
D = Electrical panel door
E = bottom cover
F = Junction box cover
G = Fixing screw
H = Fan cover
15.1.18 - Shut heater
down
1. Follow “To Turn Off Gas to
Appliance” on page 3 of this
manual.
2. Do not drain the system unless
exposure to freezing temperatures
will occur.
3. Do not drain the system if it is fi lled
with an antifreeze solution.
15.1.19 - Test low water
cutoff (if installed)
If the system is equipped with a low
water cutoff, test the low water cutoff
periodically, following the low water
cutoff manufacturer’s instructions.
15.1.20 - Reset button
(low water cutoff)
Testing the low water cut-off shuts the
unit off. Press the RESET button on
the low water cutoff to turn the unit
back on.
15.2 - Removing the
casing
In order to remove the casing, follow
the steps below while refering to
Figure 15-2:
1. Lift up by hands cover “A”
2. remove screws “B”;
3. pull back for 2 inches the upper
side of cover “C”;
4. pull up for one inch cover “C” and
remove it from appliance;
5. pull back for 2 inches the upper
side of cover “E”;
6. pull up for one inch cover “E” and
remove it from appliance;
7. pull back from left side the door “D”
8. pull up the fan cover “H”;
Now you can gain access to all
components inside heater.
To gain access to the junction box:
9. Remove screw “G”;
10. Take away cover “F”
 Loading...