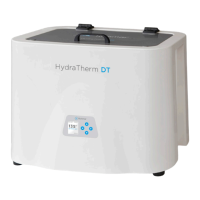
INSTALLATION
The HydraTherm DT Heating Unit is
designed to be simple and easy to use.
1. Remove all of the contents inside
the HydraTherm DT Heating Unit
and ensure filter is securely in place
at bottom of tank. Then place
the finned rack system into the
unit after attaching the dividers
to the bottom of the rack system
by snapping them in place.
2. Move tank to the location where it will
be used, prior to filling the tank. DO
NOT move the tank with hot water in it.
• Allow a minimum of 18.5” of
clearance above the lid so that the
packs can be removed without
external interference and 6” or more
in the back to be able to access the
electrical enclosure power switch.
WARNING
As with all electrical equipment and
components, the unit should be kept clear
of any hazardous or explosive gases.
3. Insert the heat pack(s).
4. Verify the drain hose has
been detached.
5. Plug power cord into back of device
and into a properly grounded
wall outlet. DO NOT plug device
into any adapter or power strip
as it will void the warranty.
NOTE: The HydraTherm DT can be filled
completely (to the fill line) with tap water.
No distilled water necessary.
CAUTION
Adding additional packs after the unit is
filled will cause the water to displace and
may cause an overflow condition.
WARNING
DO NOT attempt to use the unit if it is not
properly grounded.
A Ground Fault Interruption circuit or
receptacle (GFI outlet) is recommended
for additional protection.
The Digital Thermostat, located on the
front of the unit, controls and maintains
the temperature of the water, as well as
low water levels and error codes.
7
RACK ASSEMBLY AND RECOMMENDED PACK SET UP
Pack Set Up
When purchasing your HydraTherm DT
Heating Unit, Richmar recommends two
dierent pack configurations that will fit
into your device. It is not recommended
to use any more than 4 packs of any
other size configuration, than the two
recommended below, as the heat may
not evenly distribute throughout the heat
packs while in the tank.
The recommended pack configurations for
both options are shown below.
Figure 1: For the 6 - 12" x 10" pack
configuration, packs fit best with the long
side placed vertically into the tank.
Figure 2: For the variety size configuration,
fold the cervical and oversize pack and the
standard pack placed vertically.
NOTE: If using tongs to remove packs from
the heating unit, it is NOT recommended
to use metal tongs or any type of removal
method that includes sticking hand
in the water or anything that includes
metal, which can pierce or puncture the
packs, and will not be covered under the
warranty.
Large / Cervical
Large / Cervical
Oversize / Universal
Standard
Standard
Standard
Standard
Standard
Standard
Standard
Standard
Standard
Large / Cervical
Large / Cervical
Oversize / Universal
Standard
Standard
Standard
Standard
Standard
Standard
Standard
Standard
Standard
top view
side view side view
top view
Figure 1 Figure 2