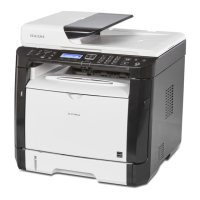
No. Name Description
2 ADF Cover Open this cover to remove originals jammed in the ADF.
3 Input Tray for the ADF Place stacks of originals here. They will feed in automatically. This
tray can hold up to 35 sheets of plain paper.
4 Auto Document Feeder
(Exposure Glass Cover)
The ADF is integrated with the exposure glass cover. Open this
cover to place originals on the exposure glass.
5 Envelope Levers Lower these levers when copying or printing on envelopes. Pull up
these levers back when copying or printing on paper other than
envelopes.
6 External Telephone
Connector
For connecting an external telephone.
7 USB Port For connecting the machine to a computer using a USB cable.
8 Ethernet Port For connecting the machine to the network using a network
interface cable.
9 G3 (analog) Line
Interface Connector
For connecting a telephone line.
10 Tray 1 Rear Cover Remove this cover when loading paper longer than A4 in Tray 1.
11 Rear Cover Open this cover to remove jammed paper or to lower the levers
inside before printing on envelopes.
12 Tray 1 This tray can hold up to 250 sheets of plain paper.
13 Bypass Tray This tray can hold up to 50 sheets of plain paper.
14 Front Cover Open this cover to replace the print cartridge or remove jammed
paper.
15 USB Flash Disk Port Insert a USB flash memory device to store scanned files using the
Scan to USB function.
16 Standard Tray Printed paper is output here. Up to 50 sheets of plain paper can
be stacked here.
17 Stop Fence Raise this fence to prevent paper from falling off.
18 Exposure Glass Place originals here sheet by sheet.
1. Guide to the Machine
18
 Loading...