16
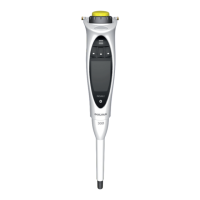
3. Mixing (Pipetting, Diluting)
Mixing ON = Mixing is currently OFF and pressing Mixing ON will turn Mixing
ON
Mixing OFF = Mixing is currently turned on and pressing Mixing OFF will turn
Mixing OFF
When mixing is activated, pipette will show the default volume for mixing
(80% of the dispensed volume). Mixing volume can be adjusted by the user by
turning the adjustment wheel and the settings can be confirmd by pressing
the operating button, mixing volume cannot exceed the pipette’s maximum
volume.
To change the mixing from manual to automated, press the operating button.
Manual mixing: hold the operating button pressed down.
Set the mixing times by turning the adjustment wheel and press the
operating button to confirm the setting. Automated mixing can be paused by
pressing the operating button. Press the operating button again to continue
dispensing. Press QUIT (left soft key) to stop mixing and empty the tip by
pressing the operating button.
4. Excess Adjustment (Rev. Pipetting, Multi Dispensing, Sequential
Dispensing)
Excess Adjustment can be used to set the excess volume. When activated, the
excess volume is set to default. Turn the adjustment wheel to reset the excess
volume and confirm the setting by pressing the operating button.
NOTE! Default is the maximum excess volume and can only be decreased
from default.
5. Automated Dispensing (Multi Dispensing)
Automated dispensing dispenses the liquid automatically without the need
to press the operating button. The delay for the dispensing can be set in time
frame from 0.1 sec. to 9.9 sec.
6. Fast dispensing (Titrate)
Fast volume dispensing dispenses the first volume rapidly. After dispensing the
fast volume, dispensing is continued manually.
3.3.10 Setup
Setup is the menu for user settings for calibration adjustment, sound and
backlight, user identification, GLP info and software reset function.
3.3.10.1 Calibration Adjustment
Adjustment enables the user to adjust the pipette in 1–3 calibration points.
1-point adjustment: calibration in one point, set the calibration volume
2-point adjustment: calibration in 10% and 100% of the nominal volume
3-point adjustment: calibration in 10%, 50% and 100% of the nominal
volume
Adjustment is always done in P mode and the adjustment is valid in all modes
when activated. When the Adjustment is activated ADJ – symbol is seen on
display.
– Select Menu
– Select Setup
– Select Adjustment