Power Connection / Safety Precautions
− Only use original Sartorius AC adaptors. The AC adaptor has an IP
rating of IP40 in accordance with EN 60529 / IEC 60529.
− Make sure that the voltage rating printed on the manufacturer’s
ID label is identical to that of your local mains voltage.
− If the stated supply voltage or the plug design of the AC adaptor
does not comply with your country’s standard, please inform the
nearest Sartorius representative.
− The power connection must be made in accordance with the
regulations applicable in your country.
t 1) First of all, plug the AC adaptor
into the socket at the back of your
balance.
t 2) Then connect the AC adaptor to
the wall outlet (main voltage).
Warm-up Time
To ensure accurate results are delivered,
the balance must warm up for at least
30 minutes after initial connection
to the power supply. Only after this
time will the device have reached the
required operating temperature.
When a verified balance of the accuracy class k
for use in legal metrology is connected to the mains
power, it must warm up for at least one hour before
operation.
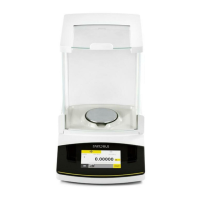
3.5 Leveling
Leveling the balance compensates for slant or
unevenness at the place of installation. The balance
must be perfectly horizontal to ensure consistent,
reproducible weighing results.
The balance needs to be re-leveled and then adjusted
each time its setup location is changed.
Secura Balances:
When “Level” appears on the display, you must level the balance.
t Make sure that the weighing pan is
unloaded.
t Press “LEVEL”.
t Follow the instructions on the
interactive display.
Quintix
®
Balances:
t Turn the two feet as shown in the
illustration until the air bubble is
centered within the circle of the
level indicator.
− Air bubble at “12 o’clock”: turn the
two feet clockwise.
− Air bubble at “3 o’clock”: turn the
left foot clockwise and the right
foot counterclockwise.
− Air bubble at “6 o’clock”: turn the
two feet counterclockwise.
− Air bubble at “9 o’clock”: turn the
left foot counterclockwise and the
right foot clockwise.
Instructions for Use in Legal Metrology
Additional Display Elements:
Metrology line with additional information about minimum load
(Min) and verification scale interval (e).
Warning symbol to indicate calculated values,
negative gross values or values that are smaller than
the minimum sample quantity (SQmin).
Setup Menu “Settings”:
On balances verified for use in legal metrology,
not all functions and settings are available.
Interface Specification (Data Output)
Settings “PC – SBI” and “USB RS232 SBI” for the identification of
digits not verified for use in legal metrology: In the setting “SBI”,
there is no automatic identification of display digits not verified for
use in legal metrology. Corresponding measures or settings must be
carried out on the peripheral device.
3.6 Anti-theft Locking Device
t A “Kensington” key lock can be
installed at the fastening point on
the back of the balance if required.
t The balance can also be secured
at the installation location with
a chain and lock, for example.
6 Installation and Operating Instructions Manual Secura
®
, Quintix
®
 Loading...