2
4
5
7.1 Cleaning the Outer Surface of the Pipette (daily)
Your Tacta® pipette should be checked daily to ensure it is clean.
To clean and decontaminate the outer surface of the pipette, use a disinfectant liquid or mild detergent and a soft, lint-free cloth.
Gently clean the surface of the pipette with the moistened cloth and wipe it dry. Pay special attention to the tip cone.
Change the tip cone filter.
7.2 Cleaning the Lower Part of the Pipette (every three months)
If the pipette is in daily use, it is recommended to clean, decontaminate, and grease it every three months. We recommend sending
multichannel pipettes to your local Sartorius service center for cleaning and greasing.
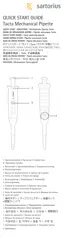
Parts and materials:
1. Tip ejector collar (polypropylene (PP))
2. Locking ring (polyetherimide (PEI) in 10 ml pipettes, polyamide (PA) in all other pipettes)
3. Tip cone (polyvinylidenefluoride (PVDF) in 3, 10, 20, and 100 μl pipettes, polyetherimide (PEI) in 200 and 300 μl pipettes,
polyphenylenesulphide (PPS) in 1000 μl, 5000 μl, and 10 ml pipettes)
4. Piston (stainless steel (SS) in 3, 10, and 20 μl single-channel and 10 μl multichannel pipettes, polyphenylenesulphide (PPS) in 10
μl
single-channel and 200, 1000, 5000 μl and 10 ml single-channel and 300 μl multichannel pipettes, polyetherimide (PEI) in 100μl
multichannel pipettes)
5. Piston seal (fluoroelastomer (FKM) in 3, 10, and 20 μl pipettes and 10 ml pipettes, ethylene propylene diene monomer (EPDM) in
100, 200, 1000, and 5000 μl pipettes)
3, 10, 20, and 100 μl pipettes
200 and 1000 μl pipettes
5000 μl and 10 ml pipettes
To clean and decontaminate the lower parts of a single-channel pipette, follow the steps below.
To disassemble and clean the pipette:
1. Eject the tip cone filter (if fitted; see 5.3, Using protective tip cone filters)
2. Unscrew the tip ejector collar (1) counterclockwise and remove it.
3. Depending on the pipette volume:
a. With all pipettes other than the 5000 μl or 10 ml models, unscrew the locking ring (2) counterclockwise and carefully remove it
together with the tip cone (3).
OR