15
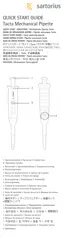
To reassemble the pipette:
1. Depending on the pipette volume:
a. With a 3, 10, 20, 100, 200, or 1000 μl pipette, carefully place the tip cone (3) on the piston (4) and attach it by screwing the tip
cone holder clockwise.
OR
b. With a 5000 μl pipette, carefully place the tip cone cylinder on the piston (4) and screw clockwise. Make sure the tip cone
cylinder is properly tightened. Avoid over-tightening.
OR
c. With a 10 ml pipette, carefully place the tip cone cylinder on the piston (4) and screw the locking ring (2) counterclockwise.
Make sure the tip cone cylinder is properly tightened. Avoid over-tightening.
2. Attach the tip ejector collar (1) by screwing it clockwise.
3. Insert a new tip cone filter.
4. Press the operating button several times to ensure that the grease has spread evenly.
5. Check the performance of the pipette.
NOTE: Always check the performance of the pipette after in-house service or maintenance.
7.3 Sterilizing the Pipette
The Tacta® pipette can be sterilized using autoclaving, UV, disinfectant, or
decontaminant liquids. Always follow the instructions below.
Autoclaving
1. Remove the Safe-Cone Filter if attached (see 5.3, Using protective tip cone filters).
2. With a multichannel pipette, hold the connecting collar and unscrew the lower part
by turning it 360° counterclockwise.
3. Put the pipette into the sterilization bag, and place the bag into the autoclave.
4. Sterilize at 121°C and 1 bar overpressure for 20 minutes.
5. Let the parts cool and dry overnight.
6. Depending on the pipette model:
a. With a multichannel pipette, reattach the tip cone housing to the pipette handle.
OR
b. With a single-channel pipette, check if the lower parts have become loose during
autoclaving, and tighten them if necessary.
UV sterilization
Tacta® pipettes are made of UV-resistant materials. Sartorius pipettes tolerate temporary exposure to UV radiation. Take note that
prolonged or frequent exposure to UV radiation may cause yellowing and brittling of the pipette.
8. Testing and Adjusting the Pipette
We recommend you check the performance of your Tacta® pipette regularly (we suggest, every three (3) months) and always after in-
house maintenance. Establish a regular testing routine that takes account of the following:
− Accuracy requirements of the application
− Frequency of use
− Number of operators using the pipette
− Nature of the liquid dispensed
− Maximum number of permissible errors (ISO 8655-1)