62JDL V1.0 8 2022
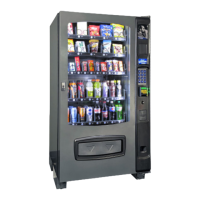
Unplug the wire harnesses on the right side of the deck and feed the connectors back through the grommet
(Fig. 25). This will prevent damage to the connectors when the deck is removed.
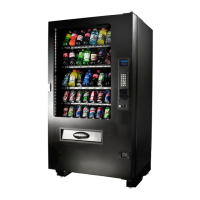
Figure 24 – Refrigeraon deck
Wire Harnesses
Rotate both handles outward and pull them toward you to remove them. Remove the guide bolt in the center
of the refrigeraon deck (Figure 26). The deck can now be pulled out from the vendor. Please make sure you
unplug wire harnesses prior to pulling all the way out. Do not p the refrigeraon deck more than 20° in any
direcon.
Figure 26 – Refrigeraon deck removal
Reverse these steps to reinstall the refrigeraon deck.
The refrigeraon deck is a modular system consisng of Compressor, Condenser, Condenser fan, Evaporator,
Evaporator Fan, Accumulator or Dryer, and Temperature Sensor which communicates to the VMC. The
temperature is pre-set at the factory for ecient and eecve operaon.
CLEANING THE CONDENSER
Dust and dirt restrict good airow and cooling of the condenser, causing the refrigeraon unit to not chill the
beverages properly. Remove the front boom panel of the beverage unit. Brush the dirt and dust from the
condenser ns. You can also blow canned air, available at computer and oce supply stores, on the condenser
or vacuum clean it. Do not damage the ns of the condenser while cleaning. Reassemble the front boom
panel aer cleaning.