G
Gwendolyn DavisAug 14, 2025
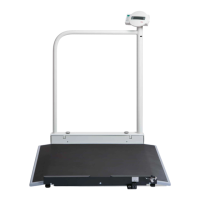
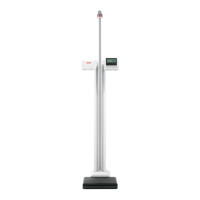
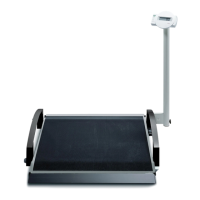
What to do if the display "bAtt" appears on Seca 664 Scales?
- MMelissa CollinsAug 15, 2025
If the display shows "bAtt", it means the battery block is discharged. You should charge the battery block.
What to do if the display "bAtt" appears on Seca 664 Scales?
If the display shows "bAtt", it means the battery block is discharged. You should charge the battery block.
How to fix Seca 664 Scales when no weight is displayed?
If your Seca scale isn't displaying a weight when loaded, the issue might be that the scale is not switched on. Check to ensure the scale is powered on.
What does it mean when the display "StOP" appears on Seca 664?
If the display shows "StOP", it indicates that the maximum load has been exceeded. Remove some of the load from the scale.
What does "Er:X:12" mean on Seca 664 and how to fix it?
If the display shows "Er:X:12", it means the scale was switched on with too high a load. Remove the load from the scale and then restart it.
Why 0.00 does not appear before weighing on Seca Scales?
If "0.00" doesn't appear before weighing, it could be that a load was already on the Seca scale when it was switched on. Remove the load, switch the scale off, and then switch it back on.
What does "Er:X:11" mean on Seca Scales and how to resolve it?
If the display shows "Er:X:11", it indicates that the scale has too high a load or too much load in one corner. Remove some of the load from the scale, distribute the weight more evenly, and then restart the scale.
Why does "tEMP" appear on Seca Scales?
If the display shows "tEMP", it means that the ambient temperature of the scale is too high or too low. Set up the scale in an ambient temperature between +10 °C and +40 °C and wait approximately 15 minutes for the device to adapt to the ambient temperature.
What does "Er:X:16" mean on Seca 664?
If the display shows "Er:X:16", it indicates that the scale was caused to oscillate, and the zero point could not be determined. Restart the scale.
What does "Er:X:72" mean on Seca 664 when pressing Enter?
If the display shows "Er:X:72" when pressing Enter, it means that data transmission is not possible because no wireless group is set up.
Overview of the chip card module's function and integration with other components.
Details the physical card contacts, insertion cycles, and memory card compatibility.
Explains the 3V supply voltage provided via the SeSAM bus to the module.
Describes the bus connection for module communication, data exchange, and power.
Covers the optional signal transmitter and its use with a piezo diaphragm.
Explains the reset mechanism for the microcontroller upon power-up or button press.
Details fault reporting with codes, module type, and display suppression.
Describes the derivation of the time base for timed processes from the quartz.
Explains storage of scale settings, user info, and measured values on the chip card.
Outlines how chip card functionality is programmed and affects scale operation.
Lists key specifications like supply voltage, current, operating temperature, and dimensions.
Lists possible causes and remedies for the scale failing to power on.
Details causes and solutions for inaccurate weight readings or fluctuations.
Describes potential causes for incomplete display information or unresponsive keypads.
Covers errors like Er:X:10, Er:X:11, Er:X:12 during weighing.
Addresses faults in kg value calculation, recalibration, and battery voltage measurement.
Covers temperature errors, data transmission interruptions, and buffer overflows.
Details issues with too many modules, missing EEPROM data, and access errors.
Explains errors due to incorrect software checksum and menu operation issues.
Visual representation of the scale's electronic modules and data flow.
Outlines requirements for scale recalibration without external tools or test weights.
Explains the calibration counter and its role in tracking recalibration procedures.
Step-by-step guide on how to switch scales to calibration mode.
Details the process of adjusting weight values using increment/decrement keys.
Notes on the timeout function to prevent improper calibration.
Provides a practical example of a typical recalibration sequence.
A table summarizing user actions and expected results during recalibration.
Guides on using PC-based configuration for diagnosis and recalibration.
Lists necessary hardware and software for PC configuration.
Instructions for unpacking and installing the 'SERVA' software.
Steps for connecting the scale to the PC and initiating configuration.
Details how to connect different display modules for PC configuration.
Steps to start the scale, 'SERVA' software, and access help.
Illustrates the wiring and connections for the base frame components.
Shows the cable connections for the chipcard reader and expanded display modules.
Safety precautions and steps for removing the power supply unit.
Detailed steps for disassembling the scale's column assembly.
Instructions for taking apart the joint and locking mechanism.
Steps to remove the main display housing unit.
Detailed guide for dismantling the display housing itself.
Specific steps to detach the joint connection from the display housing.
Instructions for removing and disassembling the scale's frame.
Steps to remove the housing containing electronics and battery.
Guide to removing the holder for the mains socket and bubble level.
Instructions on safely removing a faulty bubble level.
Steps for removing a load cell from the scale.
Instructions on how to remove the scale's adjustable feet.
Procedures for dismantling the main platform assembly.
Steps to remove castors and the left rail.
Steps to remove the right rail.
Instructions for removing the platform reinforcing plate.
Steps to remove the hinged ramp assembly.
Guide to removing the ramp stop component.
Instructions for removing the platform insert.
Steps to remove rubber elements and washers.
Instructions for removing the platform mat and associated screws.
General guidance for reassembling the scale components.
Steps and requirements for fitting a new load cell.
Specific instructions for the housing of electronics and battery.
Guidance on inserting the display unit into the column tube.
Steps for correctly assembling the display housing unit.
Procedures for adjusting and securing the joint and locking unit.
Lists spare parts for the base frame assembly.
Lists spare parts specifically for the scale's column.
Lists spare parts related to the scale's display unit.
Illustrates the location of various parts on the base frame.
Shows the layout of parts on the upper frame and column.