MX-M350/M450 N/U EXTERNAL VIEWS AND INTERNAL STRUCTURES 5 - 5
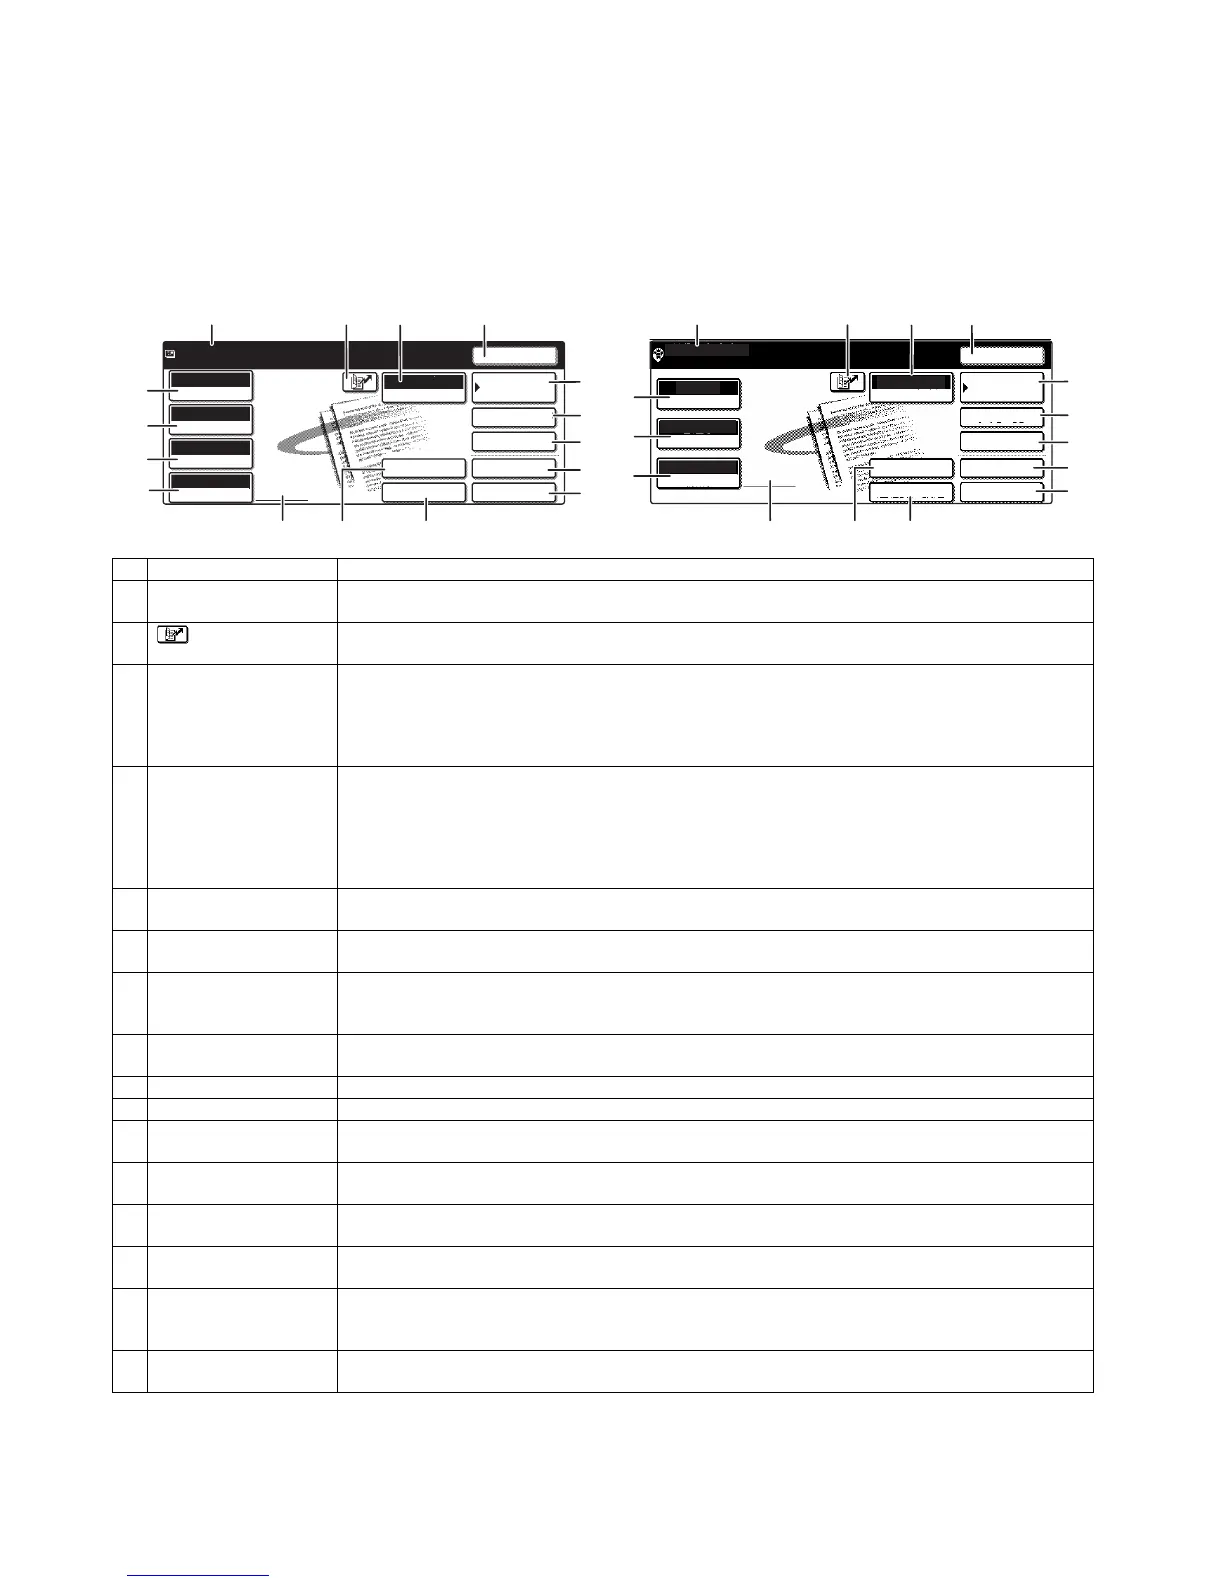
5. BASE SCREEN
To display the base screen of a mode, touch the [IMAGE SEND] key in the touch panel and then select the desired mode with the [MODE
SWITCH] key.
If you have set the display to show the address book screen when the [IMAGE SEND] key is pressed, touch the [CONDITION SETTINGS]
key in the address book to display the condition setting screen.
The administrator setting can be used to set the display to show either the condition setting screen or the Address book screen when the
[IMAGE SEND] key is pressed.
A. Condition settings screen
No. Name Function/Operation
1 Message display Messages appear here to indicate the current status of the machine.
When the machine is ready to send, an icon appears to the left.
2 [ ] (Quick) key When you add a one-touch key or a group key, the machine will automatically assign a shortened number.
Use this key for a three-digit shortened number to simplify the transmission procedure.
3 [MODE SWITCH] key Touch this to change the image send mode.
The modes that can be selected will vary depending on the peripheral devices (network scanner expansion
kit, facsimile expansion kit, Internet fax expansion kit) that are installed.
When the application integration module is installed, the [DATA ENTRY] key appears below the [MODE
SWITCH] key.
4 [RESEND] key Touch this key to resend to the last Scan to E-mail, Internet fax, or fax destination used.
Note that the following types of destinations are not retained for the resend function.
• A one-touch key in which multiple destinations are stored (group key).
• Scan to FTP, Scan to Desktop, and Scan to Network Folder addresses.
• Broadcasting addresses • Addresses used only for BCC delivery
After the resend address is entered, the key changes to the [NEXT ADDRESS] key.
5 [ADDRESS BOOK] key This displays the Address Book screen. Touch this key when you wish to use a onetouch key that has a
destination (or group) programmed in it.
6 [ADDRESS REVIEW] key When performing a broadcast transmission, touch this key to check your selected destinations. Your
selected destinations will appear as a list, and the list can be edited.
7 [SPECIAL MODES] key Touch this key to set the special modes.
• Program • Erase • Dual page scan • Timer • 2 in 1 • Card shot
• Job build • Transaction report
8 [FILE] key Touch this key to store a document image that you are transmitting in the hard disk (this includes selecting
a user name, file name, and location).
9 [QUICK FILE] key Touch this key to store a document image that you are transmitting in the temporary storage folder.
10 [SEND SETTINGS] key Touch this key to set the subject, file name, and sender name.
11 [ADDRESS ENTRY] key When performing Scan to E-mail, touch this key if you wish to enter the e-mail address of the recipient
manually instead of using a one-touch key.
12 Two-sided scanning icon
display
Icons appear here when you touch the [ORIGINAL] key and select two-sided scanning. The icons can be
touched to open function selection screens.
13 [ORIGINAL] key Touch this key when you wish to manually set the size of the original to be scanned or scan both sides of
the original.
14 [FILE FORMAT] key Touch this key to set the file format of scan images that you transmit. The selected file format setting will be
highlighted above the key. The initial factory setting is "PDF MMR(G4)".
15 [RESOLUTION] key Touch this key to change the resolution setting for the original to be scanned. The selected resolution
setting will be highlighted above the key. The initial factory setting is "300x300dpi" (SCAN mode) or
"STANDARD" (INTERNET-FAX mode).
16 [EXPOSURE] key Touch this key to change the exposure setting for the original to be scanned. The selected exposure setting
will be highlighted above the key. The initial factory setting is "AUTO".