4.6 Checking the signal level and distance
w The detector line is switched on.
1.
Loosen the two safety screws (3).
2.
Make sure that the vertical scale(7) and the horizontal scale(1) are centered
(factory setting). Otherwise the scales must be re-adjusted with the knurled
screws:
– the vertical scale(7) with the knurled screw(8)
– the horizontal scale (1) with the knurled screw (2).
3.
Set the 'Adjust' menu with the button(4) on the adjustment device.
4.
Read the indicators for the signal level and the distance from the adjustment
device:
– If the signal level is over 100 and the distance indication matches the
detection distance, continue fine-tuning the detector optics.
– If the signal level is below 100 and/or the distance indicator does not match
the detection distance, continue with preliminary setting of the detector
optics.
Possible reasons for the signal level and distance indication deviating:
● The detector and the reflector are not positioned on the same horizontal or
vertical axis.
● The detector is not mounted on an even surface.
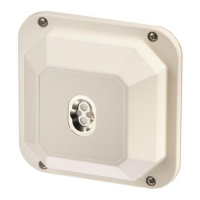
Figure 22: Checking the signal level and distance
1 Horizontal scale 6 Bushes
2 Knurled screw for horizontal
adjustment
7 Vertical scale
3 Safety screws 8 Knurled screw for vertical
adjustment
4 Button 9 Opening for cable entry
5 Adjustment device
Example: Signal level and distance indication in the 'Adjust' menu:
Commissioning
Checking the signal level and distance
4
A6V10332811_e_en_-- 27 | 44
 Loading...