AFTER SALES SUPPORT
1300 7 77 137
service@unclebills.com.au
MODEL: EA2476 PRODUCT CODE: 715222 03/2024
32
INSTRUCTIONS (CONT.)
NOTE: To set the Wildlife Camera recording parameters, refer to ‘Menu Options and
Settings’ section the on pages 21 - 25.
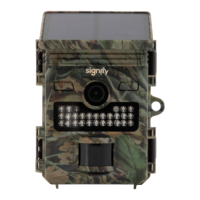
Night Recording
When recording at night, the infrared LEDs (IR LEDs) located at the front of the Wildlife
Camera provide sufficient light for taking photos and/or recording video. The Wildlife
Camera uses IR LEDs with a long wavelength to keep red light to a minimum. The
provided number of IR LEDs generate a high deflection angle, therefore allowing night
recording at a distance of 3-20 metres without overexposing the subject. Reflecting
objects, however, can cause overexposure (within this range) eg. road signs.
NOTE: Night recording using IR LEDs produces black and white photos and/or video.
NOTE: In ‘Time lapse’ mode, the PIR sensor is deactivated.
Image and Video Playback Modes
There are three options for playing back saved files on the Wildlife Camera. These are
on-board viewing, via connected PC, or directly accessing the micro SD card. Each
option for playback is explained below.
On-Board Viewing
To review the saved files directly on the viewing screen of the Wildlife Camera follow
the steps below.
1. Slide the Power/Mode switch to SETUP mode.
2. Press the
button to select playback mode. The or icon will display on
the top left of the viewing screen.
NOTE: If there are no photos/video files saved on the micro SD card, 'No File' in a
blue box will show on the screen instead.
3. Press the
and buttons to scroll through the saved files. The number of saved
files and the date/time that the photos/video were recorded, is displayed in the
top right corner of the viewing screen when in playback mode.