SiMUaA
®
Sew
Reach
Introduction
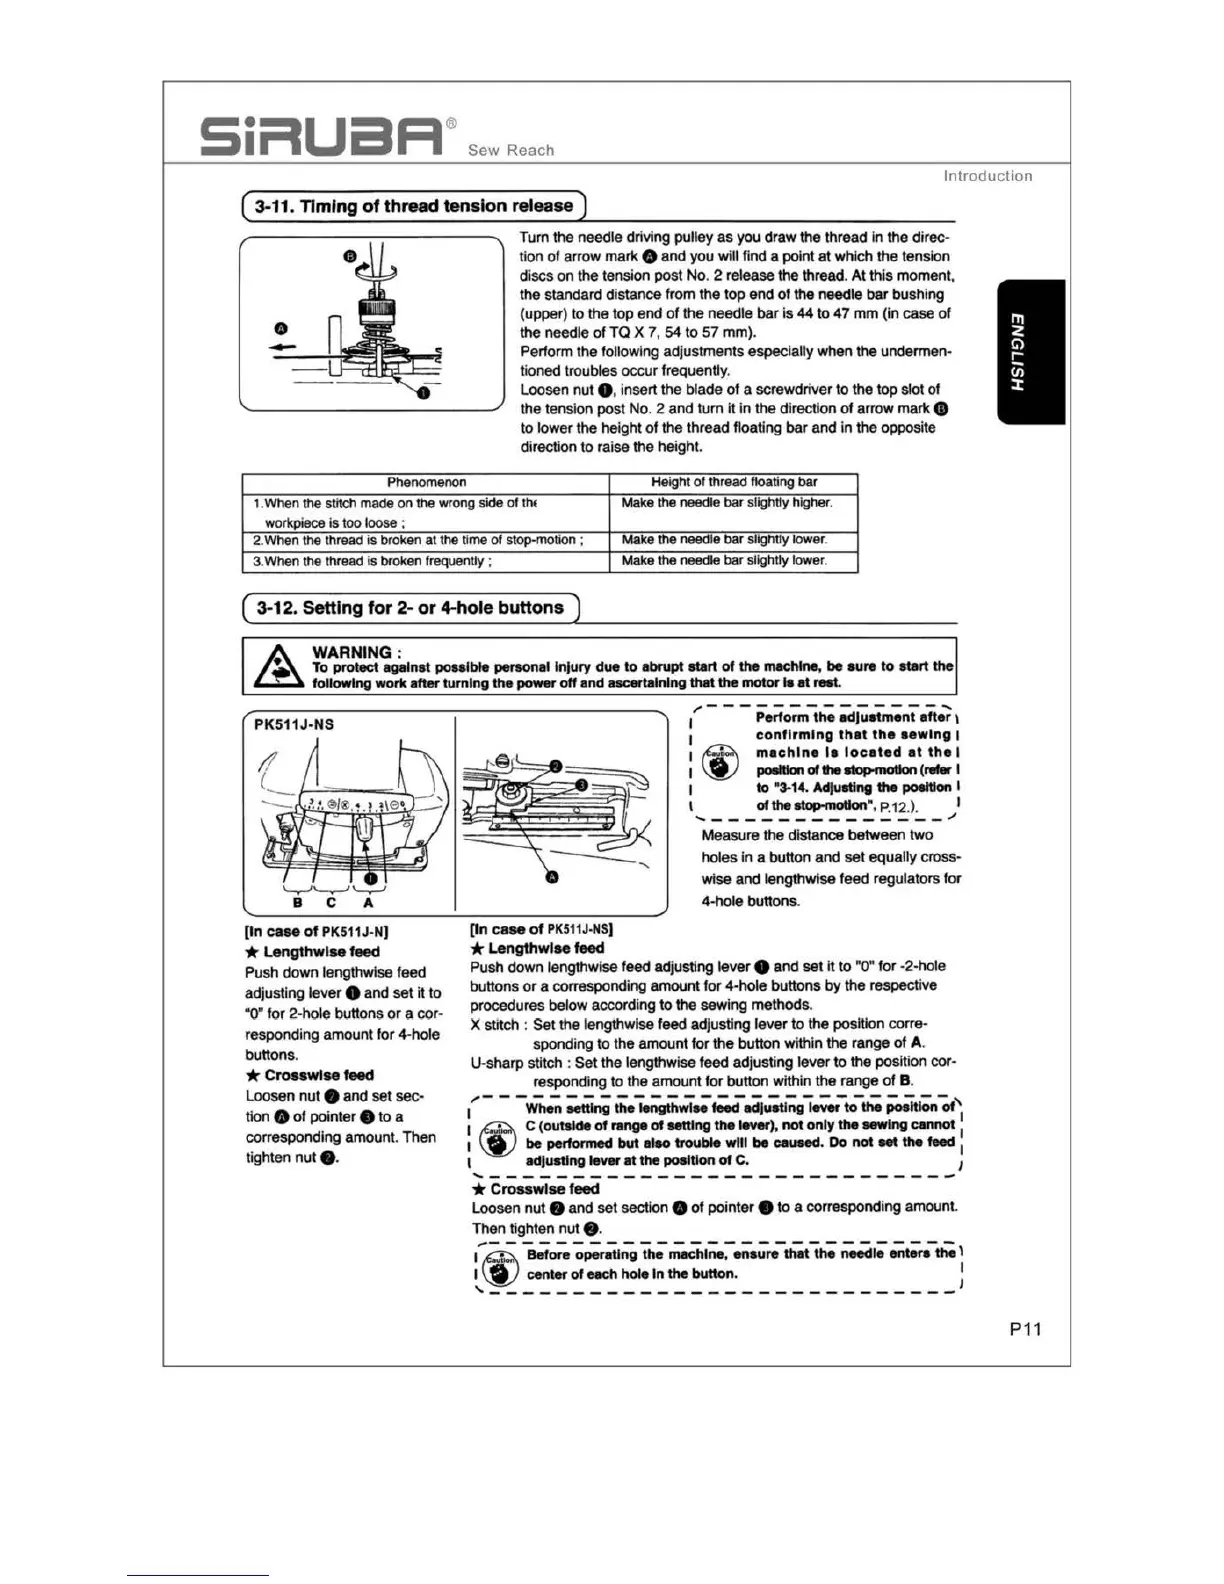
( 3-11.
Timing
of
thread
tension
release)
•
Phenomenon
Tum
the needle driving pull
ey
as
you draw
the
thread in
the
direc-
tion of arrow
mark
e
and
you
will find a point
at
wh
ich
th
e tension
discs
on
the
tension post
No
. 2
re
lease the thread. At this
moment
,
the standard distance from
the top
e
nd
of the needle bar bushing
(upper) to
the
top
end
of
the
needle
bar
is
44
to 47
mm
(in
case
of
the needle
of
TO
X
7,
54
to
57
mm
).
Perform
the
following adjustments especially when the undermen-
tioned troubles
occu
r
fr
equently
.
Loosen nut
e. insert the
blade
of
a
sc
rewdriver to
the top
slot
of
the
tension post No. 2
and
tum
it
in
the
direction
of
arrow mark •
to lower
the
height
of
the thread floating
bar
and
in
the
opposite
direction to rai
se
the height.
Height
of
thread
floating
bar
1.
When
the
stitch
made
on
t
he
wrong
side
of
thl
Make the
needle
bar
slightly h
igher
.
worl<piece
Is
too
loose
:
2.When
the
thread
is
broken
at
the
lime
of
stop-mo
t
ion
;
Mak
e
the
needle
bar
slightly IOwer.
3.When
the
thread
is
broken
frequently :
Make
the
needle
bar
slightly
lower
.
( 3-12. Setting
for
2-
or
4-hole
buttons
)
WARNING :
To
protect against possible personal lnfury
due
to
abrupt start
of
the
machine,
be
sure
to
start
the
followlng
wort<
after
turning
the power
off
and
ncertalnlng
that
the
motOI'
le
at reel.
PK511J-NS
[In
C8M
of
PK511
J•NJ
* Lengthwise
feed
Pu
sh
down
lengthwise feed
adjusting
lever
•
and
set
it
to
·
o•
for
2-hole
bvttons
or
a cor-
responding amount
for
4-hole
buttons.
* Crosswise feed
L
oosen
nu
t e
and
set
sec-
tion
8
of
pointer e to a
correspo
nding amoun
t.
Then
tighten
nut
• ·
[In case
of
PK511J-NS)
* Lengthwise feed
,,,.--
------------
.....
1
Perform
the
adJuatment after \
1
confirming
that
the
sewing
I
I
~
machin
e
II
located
at
tha
I
I
\!I)
poallonofhaop,motiol,(,.,
I
I
to
"3-14. Adjusting
the
polltlon I
I
of
thutop•mollon", P
.12.l.
I
, ______________
,,,,
Measure
the
d
ista
nce
between
two
holes in a button
and
set
equa
lly cross•
wise
and
length
wise
feed regulators for
4-hole buttons.
Push
down
lengthwise feed adjusting
lever
e
and
set
it
to
•o• for -2-hole
butto
ns
or
a correspondi
ng
amount
for
4
-ho
le
buttons
by
the respective
procedures below according to
the
sewing
methods
.
X stitch :
Set
the lengthwise
feed
adjusting l
ev
er
to
the
position corre-
spondi
ng
to the amount
for
the
button with
in
the
range
of
A.
U
-s
harp
stitch :
Se
t
the
lengthwise
feed
adjusti
ng
lever
to
the
position
co
r-
responding
to
the
amount for button within
the
range
of
B.
~----------------------------~
I When setting
the
tengthwfM feed adjusting leYef
to
the posfflon
of
I
1
~
c (outside
of
range
of
setting the leYef),
not
only
the
NWlng
cannot
1
I
\!I)
be
performed
but
allO troub6e
wtll
be
caueed.
Do
not
Nt
the
feed I
I adJuetlng lever
at
the
position
of
C.
I
, ______________________ ___
__
_
* Crosswise feed
Loosen
nut
e a
nd
set
section e
of
pointer e to a
co
rrespond
in
g amount.
The
n tighten
nut
• ·
I~ Before operating
the
machine, ensure
th
at
the needle entere
the\
I
~
center
of
each
hole In
the
button. I
'----------------------------
'
P11