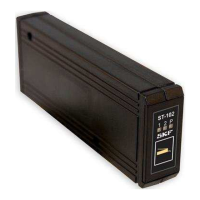
The SKF ST-102-C2P Control Centre is designed for centralized lubrication systems, specifically controlling two progressive (ProFlex) lubrication channels implemented with a Multilube pump. It manages lubrication parameters such as the lubrication cycle, maximum pressurization time, and the desired number of pulses generated by the progressive distributor sensor for both channels.
Function Description
The control centre features a function button and three LED indicators (1, 2, and P) for monitoring and control. These indicators display the current stage of the lubrication cycle for each channel. The function button allows users to:
- Select lubrication channel 1 or 2 by a brief press.
- Initiate extra lubrication during the lubrication interval.
- Interrupt pressurization when lubrication is in progress.
- Reset alarms.
- Access and modify lubrication parameters.
The system includes a power failure memory, allowing it to resume operation from the stage it was in before an outage. If an alarm was active during the outage, the system will automatically lubricate the affected line to clear the alarm without user intervention.
Important Technical Specifications
- Operating Temperature Range: -30 to +80 °C
- Protection Class: IP30
- Dimensions: 26 x 60 x 160 mm (w x h x d)
- Operating Voltage: 12 or 24 VDC (10.5 to 32 VDC)
- Power Consumption: Depends on the lubrication system being controlled, 0-4 A
- Fuse: Self-resetting fuse, 4 A, on the circuit board
- Control Inputs:
- 2 pulse inputs from progressive distributors
- Lubricant reservoir low-level switch (10 to 32 VDC, 12 mA max.)
- Control Outputs:
- Pump control (5 A max.)
- Line valve control (2 pcs, 2 A max.) or Line valve control (1 pc) and heating control (1 pc, 2 A max.)
- Electrical Connections:
- 12-pole Molex connector for power supply and control outputs (X3)
- Three-pole screw terminal for alarm indicators (J6)
- User Interface: Function button and three indicators (1, 2, P)
- Alarms: Indicated by LEDs above the function button.
- Pulse alarm (connection for indicator, 5 W max.)
- Reservoir low-level alarm (connection for indicator, 5 W max.)
- Lubrication Control Programmes: Dual-channel ProFlex
- System Configuration: Using selector switches on the circuit board (J4:A-E, J9, J8, SW1, SW2)
- Lubrication Parameter Setting: Set with the function button for lubrication cycle, pressurization time, and pulse count for both channels.
- Power Failure Memory: Stores lubrication parameters and programme status.
- EMC Tests: Conforms to EN61000-6-4, EN61000-6-2, CISPR 25 (30-1000 MHz), ISO 11452-2 (100-2000 MHz), ISO 11452-4 (20-200 MHz), ISO7637-2 (1, 2a, 2b, 3a, 3b, 4).
Usage Features
The ST-102-C2P allows for flexible configuration and operation:
- Channel Selection: A brief press of the function button selects either channel 1 or 2, indicated by the respective LED.
- Lubrication Cycle Setting: Hold the function button for 5 seconds until indicator 1 flashes rapidly. The P indicator flashes 1-10 times to show the current setting, which can be adjusted by brief presses. The lubrication cycle values depend on the J8 selector switch position (J8:1 or J8:2 tables).
- Maximum Pressurization Time Setting: Hold the function button for approximately 10 seconds until indicator 2 flashes rapidly. The P indicator flashes 1-10 times to show the current setting, which can be adjusted by brief presses. Setting the pressurization time to zero closes the lubrication channel (unless J8 is in position 2).
- Progressive Distributor Pulse Count Setting: Hold the function button for approximately 15 seconds until indicators 1 and 2 flash rapidly. The P indicator flashes to show the current pulse count setting, which can be adjusted by brief presses. If the pulse number is set to zero, the pump operates for the maximum pressurization time.
- Saving Settings: To save any changes made in setting mode, hold the function button for approximately 5 seconds until all three indicators light up.
- Exiting Without Saving: If the device is left in setting mode for 3 minutes, or if power is turned off, changes will not be saved.
- Alarm Indicators: LEDs indicate pulse alarms (flashing 1 or 2), reservoir low-level alarms (lit 1 or 2 with flashing P), and progressive distributor sensor function (brief flashes of 1 or 2).
- External Alarm Indicators: Two external indicators (max. 5 W) can be connected to J6 for pulse and low-level alarms.
Maintenance Features
- Cleaning: Cleaning should follow company rules, using compatible cleaning agents. The interior typically does not require cleaning unless contaminated lubricant enters. Exterior cleaning requires caution to prevent fluid ingress. Electrical components must be de-energized before cleaning.
- Troubleshooting: A comprehensive table is provided to diagnose malfunctions based on indicator status and suggest solutions, such as checking supply voltage, replacing components, or addressing leaks.
- Assembly and Maintenance Safety: Prior to any work, unauthorized persons must be kept away, the work area secured, live parts covered, and surfaces dried. Electrical work must be performed by qualified electricians on de-energized components.
- Component Integrity: Only original SKF spare parts and accessories should be used. Unauthorized modifications are prohibited.
- China RoHS Compliance: The device includes a China RoHS table indicating the presence of hazardous substances and their levels, ensuring compliance with environmental regulations.