EN – 22
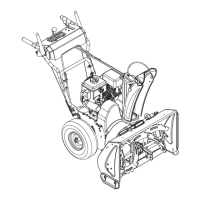
Install Auger
See Figure 42.
1. Install auger onto auger shaft with auger kickers
positioned toward gearcase.
IMPORTANT: Make sure auger helix direction matches the
original auger orientation.
2. Apply grease to grease zerk and spin auger by hand
to spread grease along auger shaft. Repeat.
3. Align holes in auger with holes in auger shaft and
reinstall shear bolt. Torque bolt to 7.9 N•m – 16.5 N•m
(5.8 lb-ft – 12.2 lb-ft). If torque wrench is unavailable,
tighten until bolts no longer spin freely. DO NOT
overtighten.
4. Reinstall nylon bushing into auger bushing and install
onto auger shaft end.
5. Reinstall auger assembly into housing so impeller
shaft is seated in ball bearing at housing rear. See
Figure 43.
See Figure 44.
6. Align support bushings with auger housing and
partially thread all six tapping screws.
7. Tighten tapping screws.