Proximity SwitchSection 3 - Service & Repair
Page 3-27
3-13 P
ROXIMITY SWITCH
W A R N I N G
!
!
Never perform work within the elevating assembly area while the platform is elevated without first blocking the
elevating assembly, see Section 3-1.
R
EMOVAL
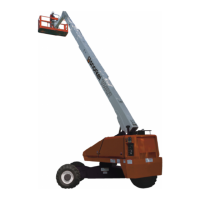
1. Raise the platform and gain access to the proximity switch located within the chassis on the
front bulkhead close to the mast. See WARNING note above.
2. Turn the base control key-switch to OFF and press the emergency stop button to OFF.
3. Disconnect the proximity switch plug from the wiring harness proximity switch connector.
4. Remove one nut and one shakeproof washer from the proximity switch and remove the
proximity switch (Refer to Figure 3-21).
I
NSTALLATION
1. Remove one nut and one shakeproof washer from the proximity switch (Refer to Figure 3-21).
2. Fit the proximity switch into the chassis mounting hole at the front of the machine.
3. Refit the shakeproof washer and the nut.
4. Initially set the proximity switch with the sensing head projecting approximately 20mm externally
from the chassis external face and tighten the proximity switch nut.
5. Connect the proximity switch plug into the wiring harness proximity switch connector.
6. Turn base control key-switch to Lower Control and twist and pull the emergency stop button to ON.
7. Remove the supporting block (see Section 3-1) prior to operating the mast lowering functions to
check that the proximity switch will not foul the mast and that the proximity switch and related
functions operate correctly.
To check that the proximity switch will not foul the mast:
8. Slowly lower the mast and ensure/check tha
t the proximity switch will not foul the mast.
To check that the proximity switch position is set correctly and functions operate correctly:
9. Raise the platform floor approximately 500mm above the chassis.
10. Lower the platform and check if the proximity switch activates.
Lowering of the platform will automatically stop (armguard delay) and requires the lowering controls to be
released and waiting 3 seconds before the lowering controls can
be reactivated to continue the platform
lowering operation.
11. With the platform lowered (stowed position or below the proximity switch switching position,
i.e. proximity switch is closed) activate the drive function. Check that the depression guard bars
(see Figure 3-10) raise and that the full travel speed range is activated.
12. With the platform raised just above the proximity switch switching point i.e. proximity switch is
open, activate the drive function. Check that the depressio
n guard bars (see Figure 3-10) are lowered
and only reduced travel speed is activated.
If the proximity switch does not activate or the functions do not operate correctly:
13. Raise the platform to gain access to the proximity switch. See WARNING note above.
14. Adjust the position of the proximity switch sensing head closer to the mast.
Important: Positional adjustments are to be made in small increments only (approximately 1mm)
follo
wed by ensuring/checking that the proximity switch will not foul the mast and that the proximity
switch position is set correctly and functions operate correctly (see relevant steps above).
Figure 3-21 Proximity Switch
Chassis External View Chassis Internal View