April 21, 2021 11
10. Connecting a Generator (240V/208V only)
a. Generators smaller than 10kW - See diagram 1
i. Connect the generator output to the “Gen” input breaker in the Sol-Ark 5K user panel.
ii. Only 240V/208V generators are supported.
iii. THD of less than 15% preferred but not required.
iv. If you have AC coupled solar panels and a generator then you must use the TOU setting to
prevent the generator from being called for during the daytime or else damage will occur.
Simply uncheck the “charge” checkbox for time slots that may have PV production.
v. If Off-Grid, connect the generator output to the “Grid” input in the Sol-Ark and select the “GEN
connected to Grid input” option in the Sell Control tab of the Grid Setup Menu.
1. Home Screen → Gear Icon → Grid Setup → Sell Control
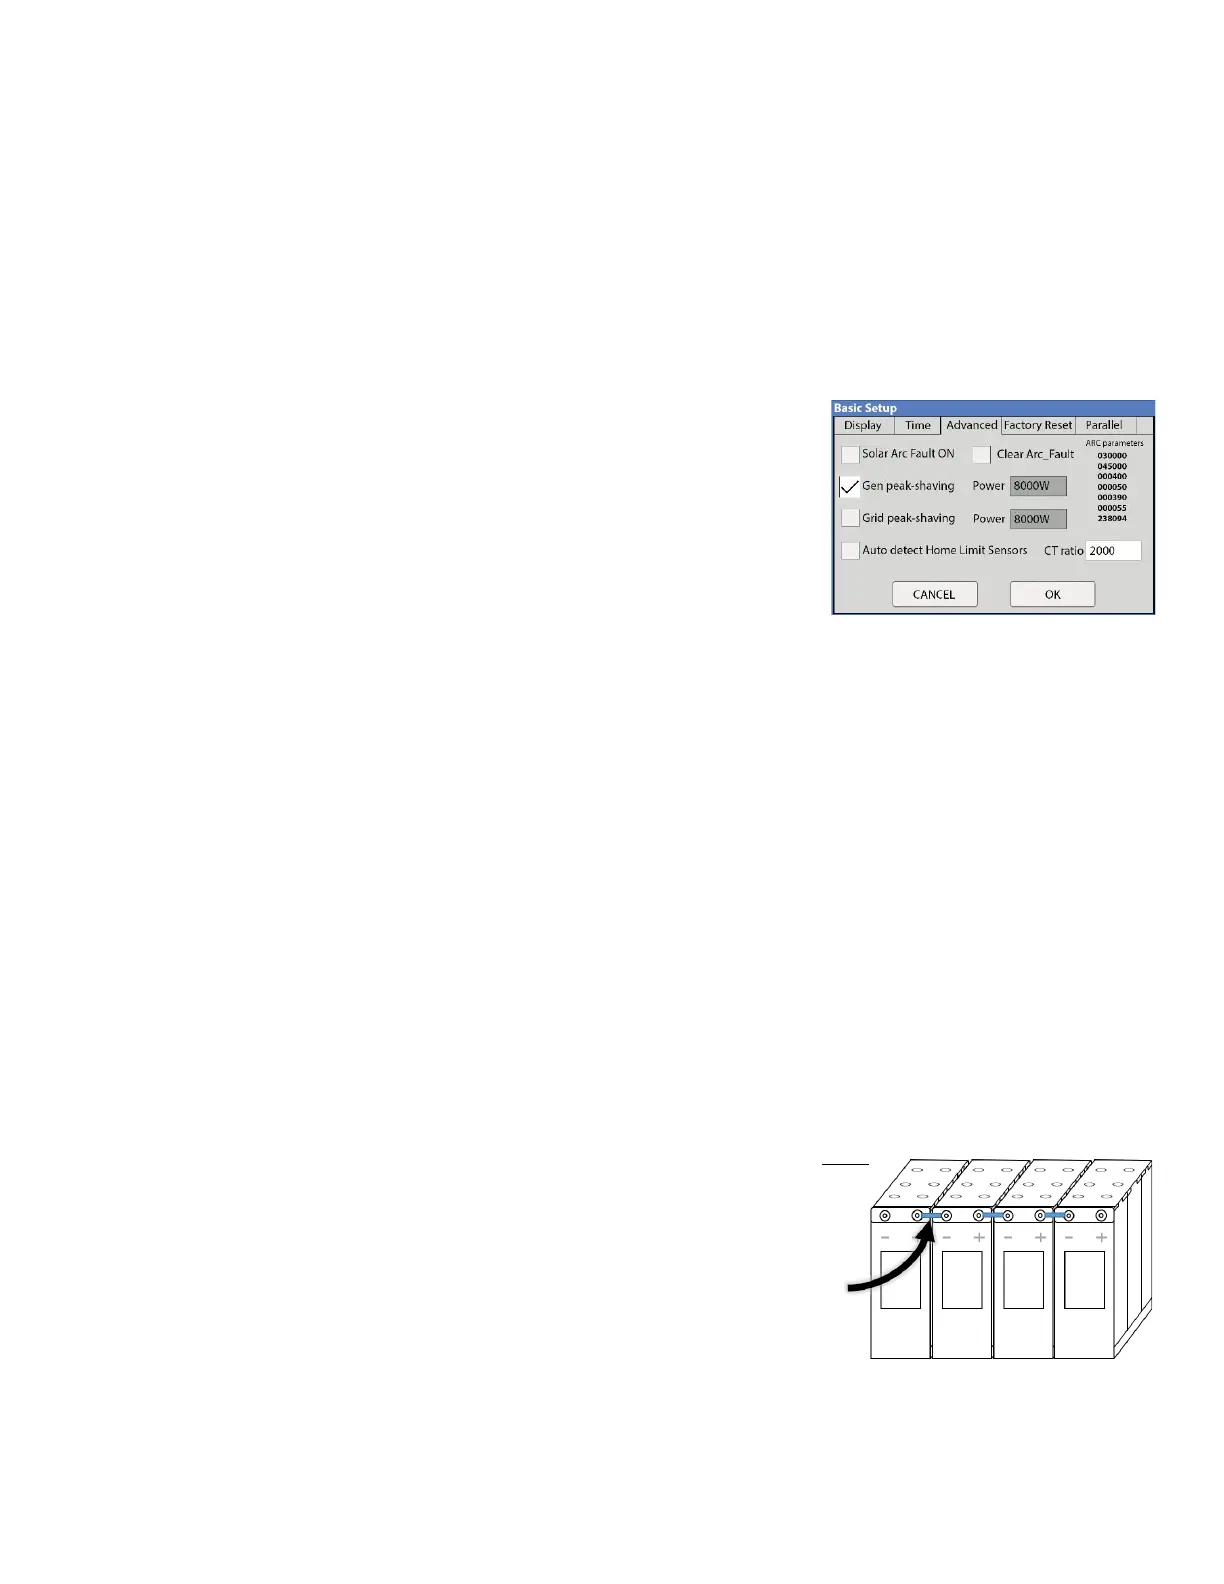
vi. Gen peak shaving mode is used to prevent the Sol-Ark
from overloading small generators. The CT sensors must
be placed so that they measure L1 and L2 of the
generators output and the arrows on the CTs will point
toward the generator. The “Power” value is the threshold
at which the Sol-Ark will contribute and prevent the
generator from being overloaded. This mode will auto
adjust the gen charge amperage to prevent overload.
b. Standby Generators >10kW - See diagram 3
i. If Off-Grid, you may connect the generator output directly to the “Grid” input on the Sol-Ark 5K.
The Sol-Ark 5K will perceive the generator as if it were the grid. You will need to select the “GEN
connected to Grid input” option in the Sell Control tab of the Grid Setup Menu.
1. Home Screen → Gear Icon → Grid Setup → Sell Control
ii. If you have AC coupled solar panels and a generator then you must use the TOU setting to
prevent the generator from being called for during the daytime or else damage will occur.
Simply uncheck the “charge” checkbox for time slots that may have PV production.
iii. Being Off-Grid, you will have “Grid Sell” off and will only need CT sensors if you plan to use Gen
peak shaving mode. See description above.
iv. To make your generator work better with the Sol-Ark: Under “Grid Setup” do the following:
1. Select “Limited to Load”
2. Select “General Standard”
3. Increase Grid frequency range: 55-65Hz
v. If using a large generator with a whole home transfer switch, we suggest not using the “Gen”
input breakers in the Sol-Ark. Instead, use the existing home wiring to distribute the generator’s
power (through your existing “Gen” transfer switch, usually to the main panel in the home or
building).
11. Sensor and Accessory Placement
a. Limiter Sensors (CT Sensors)
i. Install on incoming electrical service wires on L1 and L2 (see
diagram pg. 44). Required if in Limited To Home Mode
(meter zero) and Peak Shaving. Please check your wire size
before ordering to ensure the sensors will fit.
b. Battery Temp Sensor
i. Place between batteries, tape is a common mounting
method. (See Fig. F). Note: Temp sensor is not required for lithium batteries. This sensor has no
polarity when connecting to the sensor input of the Sol-Ark.
c. CanBus & RS485