17
Hookups and Settings
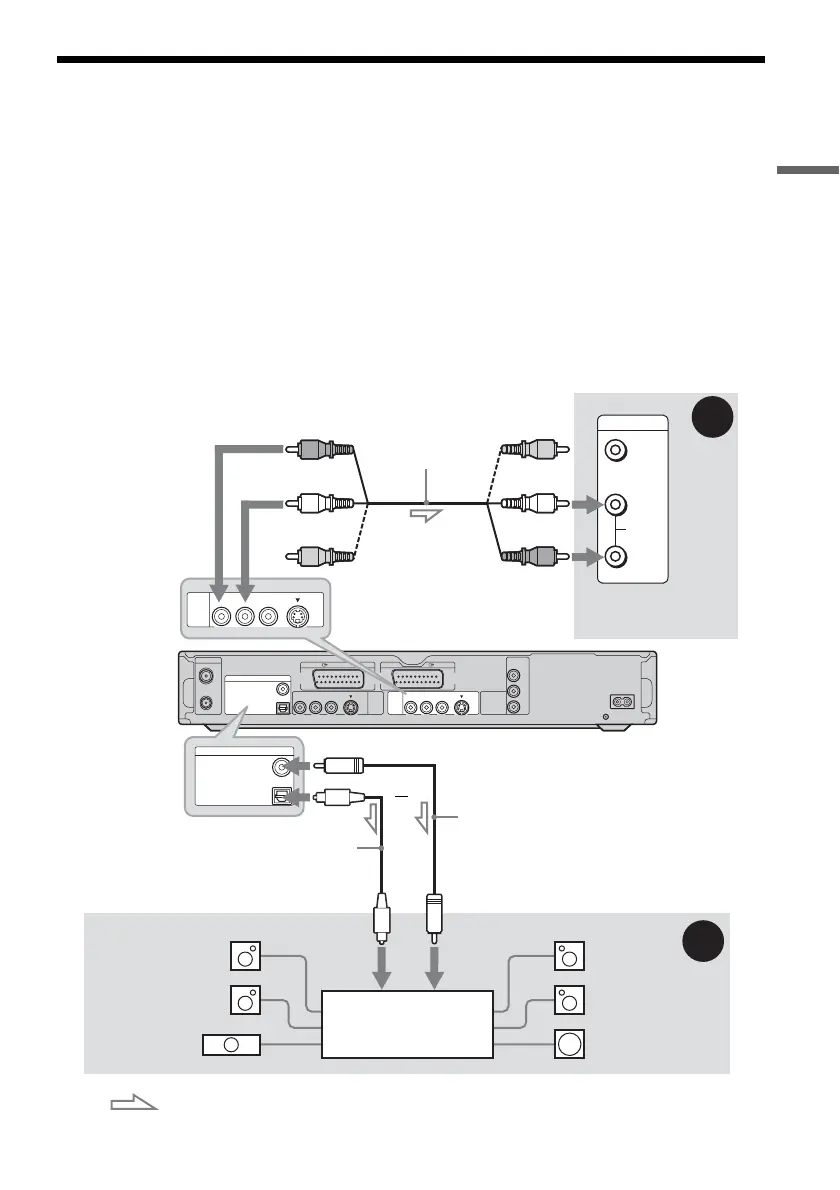
Step 4: Connecting the Audio Cords
Select one of the following patterns A or B, according to the input jack on your TV monitor, projector,
or AV amplifier (receiver). This will enable you to listen to sound.
A Connecting to audio L/R input jacks
This connection will use your TV’s or stereo amplifier’s (receiver’s) two speakers for sound. You can
enjoy the following surround effects (page 60).
• TV: Dynamic, Wide, Night
• Stereo amplifier (receiver): Standard, Night
B Connecting to a digital audio input jack
If your AV amplifier (receiver) has a Dolby
*1
Digital, DTS
*2
, or MPEG audio decoder and a digital input
jack, use this connection. You can enjoy Dolby Digital (5.1ch), DTS (5.1ch), and MPEG audio (5.1ch)
surround effects.
* The yellow plug is used for video signals (page 14).
AERIAL
~ AC IN
IN
OUT
COMPONENT
VIDEO OUT
PB/
C
B
Y
P
R/
C
R
LINE
2
OUT
LINE
4
IN
LINE 1
-
TV
VIDEO
-
AUDIO
S VIDEO
RL
VIDEO
-
AUDIO
S VIDEO
RL
DIGITAL OUT
COAXIAL
OPTICAL
PCM/DTS/MPEG/DOLBY DIGITAL
LINE 3
VIDEO
AUDIO
INPUT
L
R
LINE
2
OUT
VIDEO
-
AUDIO
S VIDEO
RL
B
A
DIGITAL OUT
COAXIAL
OPTICAL
PCM/DTS/MPEG/DOLBY DIGITAL
AV amplifier (receiver)
with a decoder
(red)
TV, projector, or AV
amplifier (receiver)
Audio/video cord
(supplied)
: Signal flow
Coaxial digital cord (not supplied)
to DIGITAL OUT (COAXIAL or OPTICAL)
to LINE 2 OUT (R-AUDIO-L)
Optical digital cord (not supplied)
Rear (L)
DVD recorder
(white)
(yellow)*
(yellow)
(white)
(red)
[Speakers]
Front (L)
[Speakers]
to coaxial
digital input
Rear (R)
Front (R)
Subwoofer
or
Centre
to optical
digital input
,continued