88
1. The micrometer handle actuator assembly is
held together by one hex nut on top. Remove
the stem nut (see fig. 5) by holding micrometer
stem in a non-marring vise or utilize the
spring clip slot. Remove the stem nut with a ¾”
wrench.
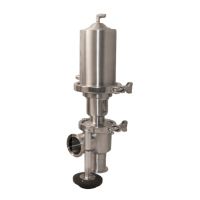
FIG. 1 - MICROMETER ACTUATOR
ASSEMBLED
2. With the stem nut removed, the micrometer
stem can be removed out the bottom of the
actuator assembly.
FIG. 4 - MICROMETER STEM
REMOVED
FIG. 3 - STEM NUT AND WASHER
FIG. 2 - MICROMETER ACTUATOR
STEM NUT
MICROMETER VALVES ASSEMBLY INSTRUCTIONS
FIG. 5 - MICROMETER HANDLE
EXPLODED DIAGRAM
STEM NUT
SP10-12
MICROMETER STEM
SP160-7MTH-2D
SPACE WASHER
SP160-7MH-SW
 Loading...