13
Turn the steam/hot water control (Fig. 1/C) anti-clockwise back
to position 0.
Press the steam/rinsing button (Fig. 1/E) once again.
The machine is now back to coee mode.
4.
The lter will need to be replaced after approximately 50 litres of
water has been drawn. The display shows symbol S6
. You can still
make coee, but we recommend that you always change the lter
immediately.
Switch the machine on.
Press the strength/volume selector (Fig. 1/B) for more than three
seconds to go to the maintenance menu.
Symbol S6
, S7 or S11 will show up.
Turn the strength/volume selector (Fig. 1/B) clockwise or anti-
clockwise until symbol S6
shows on the display.
Empty the water tank (Fig. 3) and unscrew the lter, using the
integrated tool at the end of the measuring spoon. Discard the
lter.
Set the dial (by the month) at the top of the new lter to either
the date when the lter was installed or when the lter needs
replacing, whichever you prefer.
Screw the lter into the receptacle in the water tank, using the
integrated tool at the end of the measuring spoon (Fig. 5).
Fill the tank with fresh water and insert it back in the appliance.
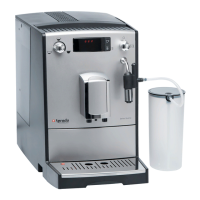
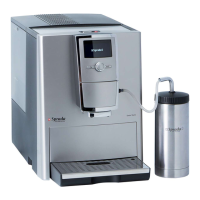
Place a suciently large bowl (minimum contents 0.5 litres)
under the steam/hot water spout/frothing device (Fig. 1/K).
3. MAKING COFFEE/ 4. CLEANING AND MAINTENANCE
!
!
!