5 Quick start
Before installing and using the product, accept the evaluation product license agreement from the www.st.com/
epla webpage. For more information on the STM32U083C-DK Discovery kit and the demonstration software
example, visit the STM32U083C-DK webpage.
5.1 Getting started
Follow the sequence below to configure the
STM32U083C-DK Discovery kit and launch the demonstration
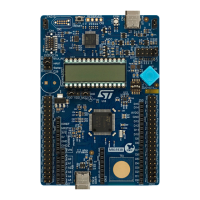
application (refer to Section 6.1: STM32U083C-DK board layout for component locations):
1. Check jumper and switcher positions on board (refer to Table 4. Default jumper configuration),
2. For correct identification of all device interfaces from the host PC, install the STLINK-V2EC USB driver
available on the www.st.com/stm32nucleo webpage, before connecting to the board,
3. To power the board, connect the STM32U083C-DK Discovery board to a PC with a USB Type-A or USB Type-
C
®
to USB Type-C
®
cable through the USB connector (CN1). Once powered on, the PWR green LED (LD6)
lights up and the COM
LED (LD1) blinks,
4. Observe the LCD screen (U11) and push the joystick (B2) direction based on the display:
– If the air quality sensor is connected to the board (if the user plugs it): The LCD informs of air quality
measurements (CO2 and TVOC),
– If the air quality sensor is not connected to the board (not plugged), a menu to select three different
demonstrations is displayed on the LCD:
a. Temp Sensor demo displays the temperature of the temperature sensor on the LCD,
b. Touch Wakeup demo uses TSC1 to wake up from the Stop mode (Stop/Wakeup displayed on the
LCD),
c. LowPower Modes demo selects one of the low‑power modes to be used with a duty cycle from RTC
to be in the Low‑power or Running mode.
5. Download the demonstration software and several software examples that help to use the STM32U083C-DK
Discovery kit features. These are available on the www.st.com website,
6. Develop your application using the available examples.
Table 4. Default jumper configuration
Jumper
Definition Default position Comment
JP7 IDD measurement ON STM32 VDD current measurement
JP3 5 V power selection [1-2] 5 V power supply from STLINK USB
JP4 STLK reset OFF No STLK reset
JP5 NRST connection ON Reset signal fromSTLINK-V2EC to target MCU
JP6 Sensor power selection [1-2]
VDD is the temperature sensor and mikroBUS
™
connectors power supply
SW1
VDD output voltage
configuration
[1-8] OFF;
[2-7], [3-6] ON
Output voltage VDD is 3.3 V
BOOT0 selection [4-5] OFF Main flash memory is selected as boot space
UM3292
Quick start
UM3292 - Rev 1
page 6/33