•
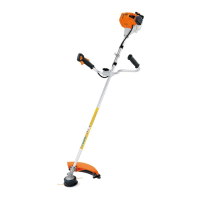
Ifthepressuredrops,theleak
mustbelocatedandthefaulty
partreplaced.
Note:Tolocatetheleak,coatthe
suspectareawithoilandpressuri-
zethecrankcaseagain.Bubbles
willappearattheoil-coatedareaif
aleakexists.
-Thencarryoutvacuumtest,
see4.2.3.
-Openventscrewanddisconnect
hosewhentestiscomplete.
-Removetestflange.
-Loosenthemufflerscrews.
-Drawoutthesealingplateand
tightenthemufflerscrewswith
9.5Nm.
-Fitouterscrewofmufflerand
tightenwith9.5Nm.
-Installcarburetor,see8.2.2.
Oilsealstendtofailwhensub-
jectedtoavacuum,i.e.thesealing
lipliftsawayfromthecrankshaft
duringthepiston’sinductionstroke
becausethereisnointernalcoun-
terpressure.
Faultsofthiskindcanbedetected
withtheaidofavacuumpump.
Thepreparationsarethesameas
forthepressuretest,see4.2.2.
•
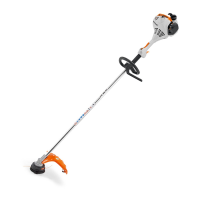
Connectsuctionhoseofvacuum
pump00008503501tonippleof
testflange.
•
Closeventscrew(1)onpump
cylinder.
•
Actuatelever(2)untilpressure
gauge(3)indicatesavacuumof
0.5bar.
Note:Theoilsealsareingood
conditioniftheindicatedvacuum
ismaintainedorifthepressure
risestonomorethan0.3bar
within20seconds.
Theoilsealsmustbereplacedif
thepressureinthecrankcasecon-
tinuestorise.
-Openventscrewanddisconnect
hosewhentestiscomplete.
-Removetestflange.
-Loosenmufflerscrews.
-Removesealingplateand
tightenscrewstoatorqueof9.5
Nm.
-Fitouterscrewinmufflerand
tightentoatorqueof9.5Nm.
-Installcarburetor,see8.2.2.
392RA021 VA
392RA020 VA
33
11
22
392RA022 VA
4.2.3 Vacuumtest
13