Service Information
12
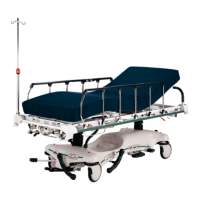
CASTER COVER INSTALLATION AND REMOVAL
Double Prongs
Single Prong
Properly Attached
Cover
1.
2.
3.
Top View (Cut−Away)
Top View (Cut−Away)
Top View (Cut−Away)
Looking through the larger of the two side cut−outs,
align the cover with the axle nut or bolt head, as shown.
Push down on the opposite side of the cover until the
single prong engages the caster horn.
Push on the cover with your palm until
the double prongs engage.
To remove the wheel cover, insert a large screwdriver into the cut−out
in the side of the wheel cover and into the space between the double
prongs. Pry up the cover to disengage the double prongs and push
sharply upward to disengage the single prong.
CASTER REMOVAL
Required Tools:
9/16” Open End Wrench
1. Remove the caster cover.
2. While keeping pressure on the caster bolt with your index finger, use a 9/16” open end wrench to remove
the nylock hex nut on top of the caster assembly.
3. Using the brake ring, lift up on the base assembly and pull the caster assembly down to remove it.
4. Reverse steps 1−3 to install the new caster.
Return to Table of Contents
 Loading...