EasyManuals Logo

Stryker X8000 Service Manual

Stryker X8000
71 pages
To Next Page IconTo Next Page
To Previous Page IconTo Previous Page
Page #16 background imageLoading...
Page #16 background image
14
Diagnosis
T
o diagnose
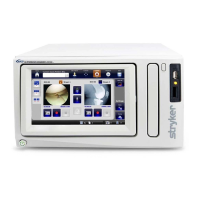
system errors, follow the
strategies provided
below. For steps that involve test points on the control
board, refer to the control board diagram at the e
nd of the
Diagnosis section.
Diagnosis strategies are grouped
by symptom
:
A.
Bulb
does
not
turn
on
B.
Bulb
does
not
turn
o
ff
C.
Bulb
ignites
immediately
upon
system
startup
D.
LCD dis
play
is b
lue o
r com
pletely
dark
E.
Fan
does
not
run
F
.
Light
source does
not
switch
from
STANDBY
to
RUN mode
G.
Brightness
cannot
be
adjusted
H.
E-1 error
appears
on the
LCD di
splay
I.
E-2
error
appears
on
the
LCD
display
J.
E-3
error
appears
on
the
LCD
display
K.
E-4 erro
r a
ppears
on
the L
CD di
splay
L.
E-5
error
appears
on
the
LCD
display
M.
Bulb ho
urs value
does no
t disp
lay
N.
Shutter makes
noise or
does not
move
properly.
A.
Bulb
does
not
turn
on
1.
Check the
voltages
on
the co
ntrol
board
test
points
TP22 and TP23.
If
the
test
points
read
12V
and
0V
respectively
,
then the ballast
is faulty
. Replace the ba
llast.
If
the
voltages
are
in
the
vicinity
of
5.5V
and
2.
Visually
check
if
the
bulb
door
is
properly
closed with the cover or a stand-alone magnet. If
necessary, close the
door.
3.
Visually
check
if
the ligh
t
cable
is
properly
inserted
into the jaw. If necessary, reinsert the
cable.
4.
Visually
check
if
the b
ulb
has the
one-wire
memory
chip. If it does, ensure the chip makes contact with
the bulb mount board connector. If necessar
y,
adjust contact between the chip and the
connector
.
5.
Using
a
multimeter
,
electronically
check
the
following test points on the control board. Each
test
point should read 3.3
volts.
PD1—reads
3.3
volts
if
the
one
wire
chip
is
detected by the control board. If PD1 reads 0
volts (and PD2
reads 3.3 volts),
try a di
ff
erent
bulb. Push the bulb
rmly towards the plastic
separator panel to ensure contact.
PD2—reads
3.3
volts
if
the
door
reed
switches
are closed. If PD2 reads 0
volts,
-
Check
if
the
reed
switches
on
the
bulb
mount boards are s
oldered properly
. If
necessary, repair the soldering.
-
Check
for
shorts
using
the
magnet
on
the
reed switch. Repair/replace as nec
essary.
-
Check
if
the
cable
wire
colors
are
correctly oriented. Adjust as necessar
y
.
PD3—reads
3.3
volts
if
the
fans
are
functioning
properly
PD4—reads
3.3
volts
if
a
regular
light
cable
is
inserted. If PD4 reads 0
volts, remove the front
panel and check if the beam sensor is properly
positioned and connected to the display board.
Adjust as necessar
y.
PD5—reads
3.3
volts
if
an
ESST
light
cable
is
inserted. If PD5 reads 0
volts, remove the front
panel and check if the beam sensor is properly
positioned and connected to the display board.
Adjust as necessar
y.
6.
If
none
of
these hel
p,
contact
T
echnical Sup
port a
t
+1.800.624.4422.
B.
Bulb
does
not
turn
o
ff
If the bulb turns on immediately a
er AC power is applied
to the light source, proceed to diagnosis strategy
C, “Bulb
ignites immediately upon system startup.”
If the bulb ignites a
er the regular startup sequence but then
will not turn o
ff
, perform the following steps until the source
of the problem is identi
ed.
1.
Remove
the
light
cable
from
the
jaw.
2.
Open the
bulb
door
or
remove
the m
agnet
from
the
reed switches.
3.
Using
a
multimeter,
check the
following
test
points
on the control board:
PD2—If
PD2
reads
3.3
volts,
the
reed
switches
are faulty
. Replace the
reed switches.
PD4
and
PD5—If
either
PD4
or
PD5
reads
3.3
volts, the light
cable sensor (beam sensor) is
faulty
. Replace
the light
cable sensor.
4.
If
PD4 o
r PD5
reads 0
volts,
measure the
voltage
di
ff
erence between TP22 and TP23.
If
the
voltage
di
ff
erence is around -1.3 volts,
replace the ballast.
If
the
voltage
di
ff
erence is around 12 volts,
proceed to step 5.
5.
Measure
the
voltage
level
for
TP32.
If
TP32
reads
0
volts,
replace
the
control
board.
(See the Repair/Replacement Procedures
section of this manual.)
If
TP32
reads
3.3
volts,
proceed
to
step
6.

Other manuals for Stryker X8000

Questions and Answers:

Question and Answer IconNeed help?

Do you have a question about the Stryker X8000 and is the answer not in the manual?

Stryker X8000 Specifications

General IconGeneral
BrandStryker
ModelX8000
CategoryMedical Equipment
LanguageEnglish

Related product manuals