Do you have a question about the Supero X9SPV-F and is the answer not in the manual?
Manual is for system integrators, PC technicians, and knowledgeable PC users.
Details on the X9SPV motherboard series features and capabilities.
Outlines the structure and content of each chapter and appendix.
Explains symbols used for safety, warnings, and important notes.
Contact details for Super Micro Computer, Inc. headquarters.
Contact details for Super Micro Computer B.V. in Europe.
Contact details for Super Micro Computer, Inc. in Asia-Pacific.
Introduction to the motherboard and checklist of included items.
Details on the Intel QM77 Express chipset functionality.
Features for monitoring system health like voltage and fan status.
Settings related to power management and configuration.
Requirements and recommendations for system power supply.
Information on the Super I/O chip and its functions.
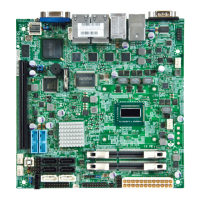
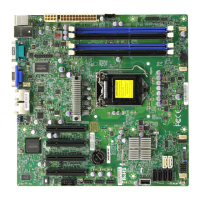
Visual representation of the X9SPV-F/LN4F motherboard.
Diagram showing the physical layout of motherboard components and connectors.
Detailed list of motherboard ports, LEDs, and their functions.
Explanation of the purpose and settings for various jumpers.
Overview of the key features and specifications of the motherboard.
Table summarizing motherboard models and their specifications.
Visual representation of the motherboard's internal connections.
Precautions and measures to protect against ESD.
Instructions for physically installing the motherboard into a chassis.
Lists the necessary tools for motherboard installation.
Identifies the four mounting hole locations on the motherboard.
Details on installing and supporting SO DIMM memory modules.
Step-by-step guide for installing SO DIMM memory modules.
Information on the types and capacity of supported memory.
Identifies and describes various connectors and I/O ports on the board.
Details the layout and function of rear I/O ports.
Describes the PS/2 keyboard and mouse connection.
Details the location and pin definitions for USB ports.
Describes the onboard serial port connections.
Details the VGA port and its pin definitions.
Describes the gigabit LAN ports and IPMI port.
Information on front panel connectors for buttons and LEDs.
Details the pin assignments for the front control panel header.
Explains the connection and function of the Power LED.
Explains the connection and function of the HDD LED.
Describes the LED indicators for network interface controllers.
Explains the overheat and fan fail indicator LED.
Explains the connection and function of the Power Fail LED.
Describes the Non-Maskable Interrupt button header.
Explains the connection and function of the Reset Button.
Explains the connection and function of the Power Button.
Information on connecting power and other essential cables.
Details the 24-pin ATX power connector pin assignments.
Describes the 4-pin fan headers and their pin definitions.
Explains the chassis intrusion header for security monitoring.
Describes the header for connecting a Trusted Platform Module (TPM).
Explains the SATA DOM power connector for storage devices.
Describes the SMB I2C connector for system management.
Details the System Management Bus header for IPMI.
Explains the T-SGPIO headers for enclosure management.
Describes the LED header for overheat and fan fail warnings.
Details the Power LED and external speaker connector.
Explains the onboard speaker for beep codes.
Explains the function and configuration of motherboard jumpers.
Configures the BMC and onboard IPMI connection.
Protects the BIOS firmware from accidental erasure.
Procedure to clear the CMOS settings.
Enables system wake-up functionality via USB devices.
Configures the system monitor for automatic reboots.
Explains the status and function of various LEDs on the motherboard.
Describes the link/speed and activity LEDs for LAN ports.
Explains the standby power indicator LED.
Describes the IPMI heartbeat indicator LED.
Explains the overheat and fan fail indicator LED.
Instructions for connecting SATA devices and hard drives.
Details SATA 3.0 and SATA 2.0 connectors and RAID support.
General steps to diagnose and resolve system issues.
Pre-power-on checks for system troubleshooting.
Steps to diagnose and resolve a 'no power' issue.
Steps to diagnose and resolve a 'no video' issue.
Troubleshooting steps for system memory errors.
Steps to recover lost system setup configuration.
Guidelines for seeking technical assistance from Supermicro.
Answers to common questions regarding the motherboard.
Process for returning products for warranty or repair services.
Overview of the AMI BIOS Setup Utility and navigation.
Procedure to enter the AMI BIOS setup utility.
Instructions on modifying system parameters via BIOS setup.
Details on the main BIOS setup screen and system information display.
Guide on initiating the BIOS setup utility during boot.
Displays key system information like time, date, processor, and memory.
Explores various advanced configuration options within the BIOS.
Configuration options related to the system boot process.
Settings for processor features and clock speed.
Configuration options for CPU Power Management features.
Settings for advanced chipset configurations.
Settings related to system memory frequency and type.
Settings for managing USB controller support and features.
Configuration for IDE and SATA storage controllers and modes.
Settings for configuring PCI Express and Plug and Play devices.
Advanced configuration options for PCI Express.
Specific configuration settings for PCI Express Generation 2.
Configuration settings for Super IO devices.
Settings for configuring onboard serial ports.
Settings for remote system access and management.
Configuration for console redirection features.
Settings for Advanced Configuration and Power Interface.
Configuration options for trusted computing features.
Settings for Intel Trusted Execution Technology.
Configuration settings for iSCSI devices.
Settings for the Network Interface Controller.
Configuration and viewing of system event logs.
Settings for managing SmBIOS event logs.
Configuration options for Intelligent Platform Management Interface.
Configuration settings for the System Event Log (SEL).
Configuration for the IPMI LAN adapter network address.
Settings for system boot order and device priorities.
Allows deletion of previously defined boot devices.
Options for setting BIOS and HDD passwords.
Procedure to create or change the Administrator password.
Procedure to create or change the User password.
Enables or disables Hard Disk Drive password support.
Options for saving changes, discarding, or restoring defaults.
Quits BIOS setup without saving changes and reboots.
Saves configuration changes and reboots the computer.
Restores BIOS settings to factory defaults.
Lists beep codes for recoverable POST errors.
Guide to installing motherboard drivers and utilities.
Instructions for using Supero Doctor III for system monitoring.
Explanation of the Unified Extensible Firmware Interface (UEFI).
Procedure to recover the main BIOS image if corrupted.
Steps to recover the boot sector using a USB device.
| Brand | Supero |
|---|---|
| Model | X9SPV-F |
| Category | Motherboard |
| Language | English |